Mysql架构与索引优化分析
1. 索引优化
1.1 索引分析
一表
1 | #建SQL |
1 | # 案例 |
两表
1 | # 建SQL |
1 | #案例 |
三表
1 | #案例 |
1.2 索引失效(应该避免)
1.2.1 建表SQL
1 | use oemp; |
1.2.2 案例(索引失效)
1.全值匹配
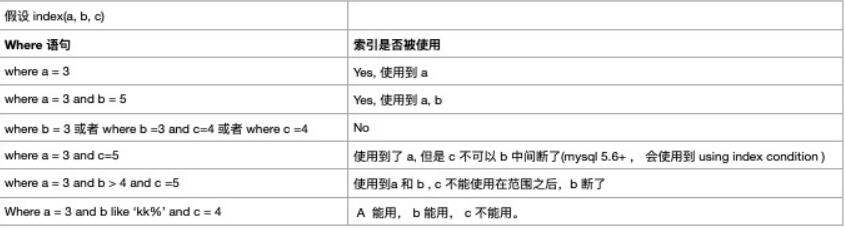
2.最佳左前缀法则
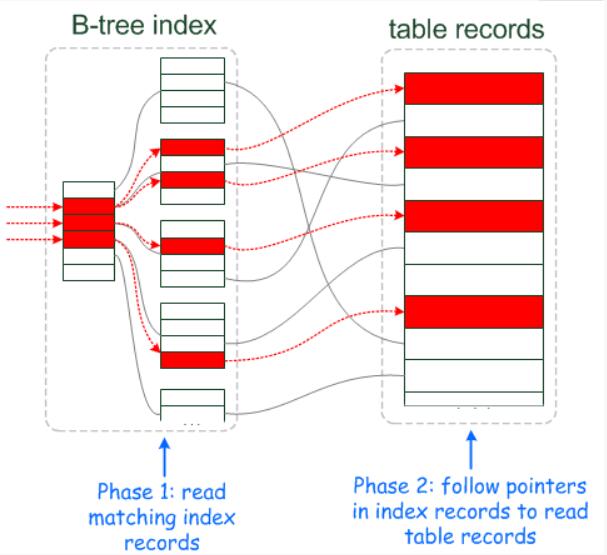
1 | 如果索引了多列,需要准守最左前缀法则,指的是查询从索引的最左前列开始并且 不跳过索引中的列。 |
explain select * from staffs where name = 'July' and pos = 'dev1';
1 | MySQL 5.6 以上版本中的新特性,是一种在存储引擎层使用索引过滤数据的一种优化方式。ICP开启时的执行计划含有 Using index condition 标示 ,表示优化器使用了ICP对数据访问进行优化。 |
 ](https://zhangxin-blog.oss-cn-beijing.aliyuncs.com/blog/mysql/zzyy/mq43.jpg)
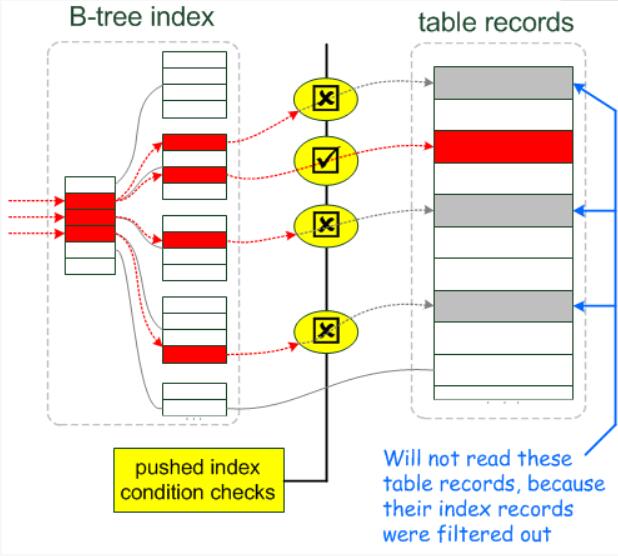 ](https://zhangxin-blog.oss-cn-beijing.aliyuncs.com/blog/mysql/zzyy/mq44.jpg)
官方解释:https://dev.mysql.com/doc/refman/5.6/en/index-condition-pushdown-optimization.html
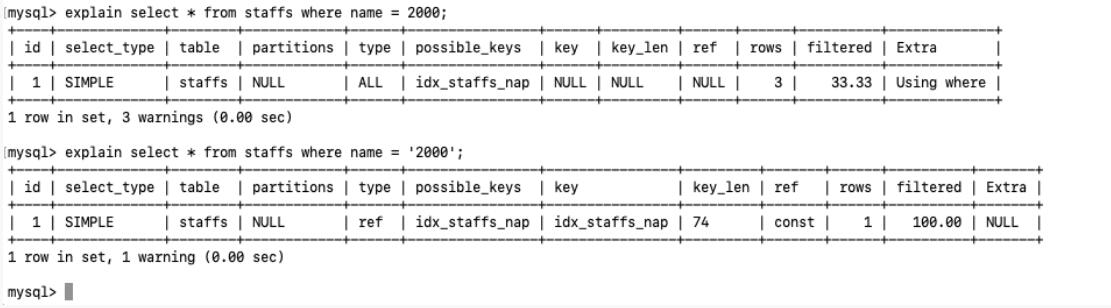
3.不在索引列上左任何操作 (计算、函数、(自动 or 手动)类型转换), 会导致索引失效而转向全表扫描
 ](https://zhangxin-blog.oss-cn-beijing.aliyuncs.com/blog/mysql/zzyy/mq45.jpg)
4.存储引擎不能使用索引中范围条件右边的列
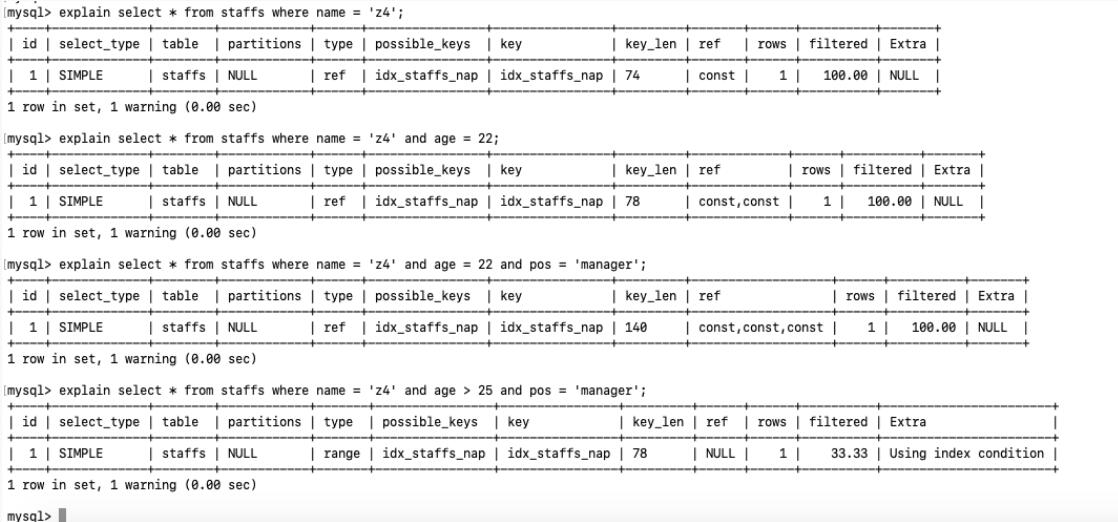 ](https://zhangxin-blog.oss-cn-beijing.aliyuncs.com/blog/mysql/zzyy/mq46.jpg)
在 5.6 +, ICP特征可以使用到 Using index condition
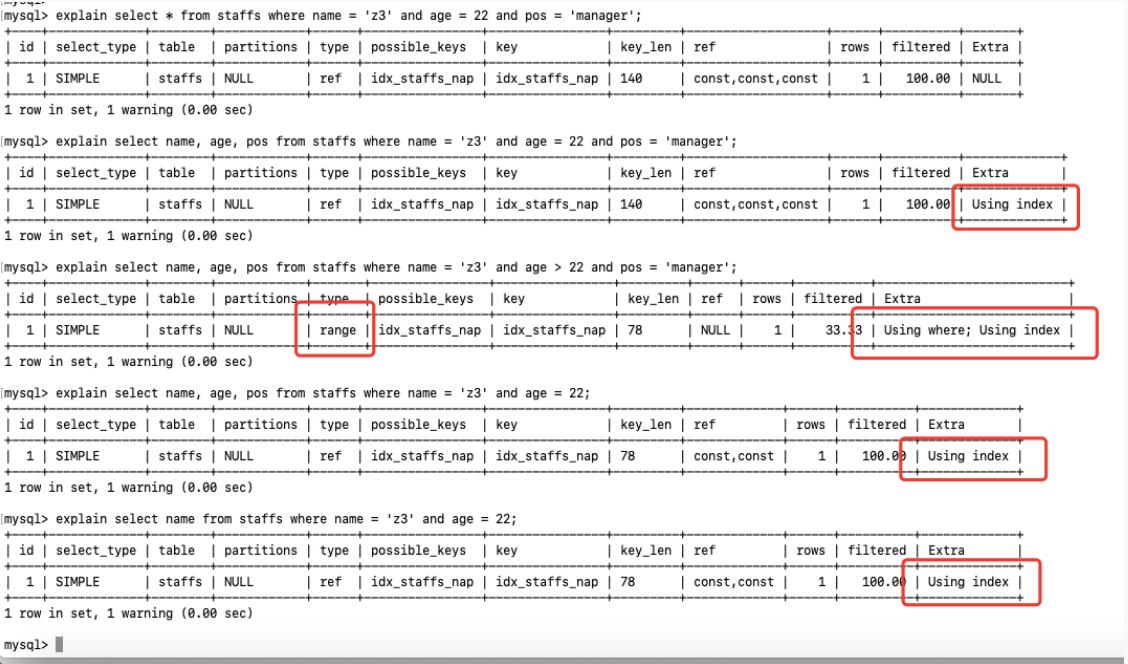
**5.尽量使用覆盖索引(只访问索引的查询(索引列和查询列一致)),减少 select ***
 ](https://zhangxin-blog.oss-cn-beijing.aliyuncs.com/blog/mysql/zzyy/mq47.jpg)
6.mysql 在适应不等于 (!= 或者 <>)的时候无法使用索引会导致全表扫描
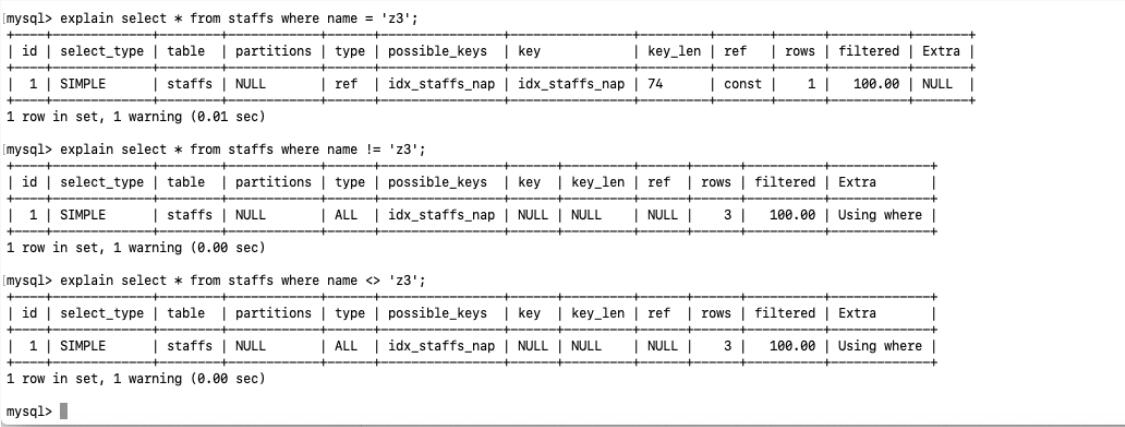 ](https://zhangxin-blog.oss-cn-beijing.aliyuncs.com/blog/mysql/zzyy/mq48.jpg)
7.is null, is not null 也无法使用索引
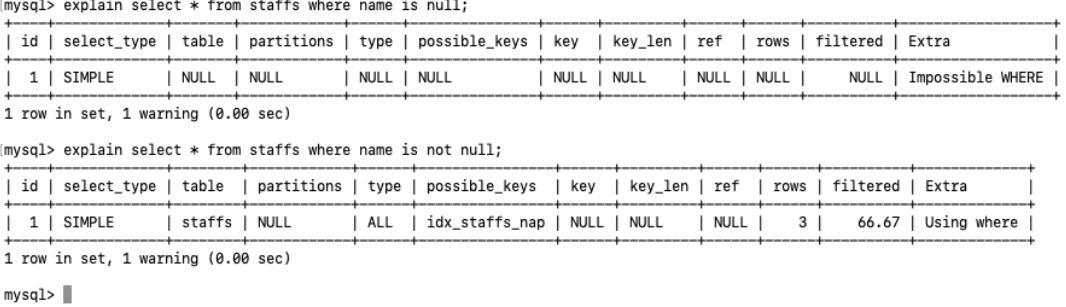 ](https://zhangxin-blog.oss-cn-beijing.aliyuncs.com/blog/mysql/zzyy/mq49.jpg)
8.like 以通配符开头 (’%abc …’)mysql 索引失效会变成全表扫描的操作
问题:解决 like ‘% 字符串 %’ 索引不被使用的方法 ??
1 | #like 关键字 '%%' |
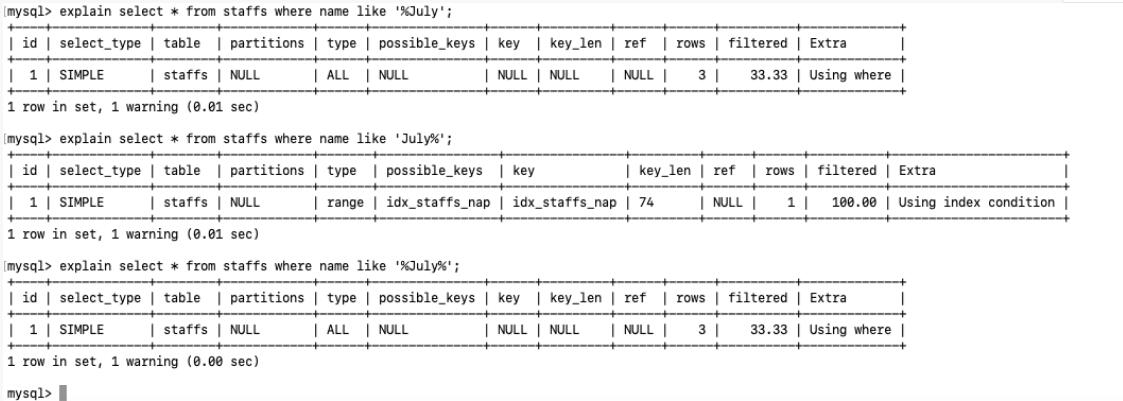 ](https://zhangxin-blog.oss-cn-beijing.aliyuncs.com/blog/mysql/zzyy/mq50.jpg)
9.字符串不加单引号索引失效
 ](https://zhangxin-blog.oss-cn-beijing.aliyuncs.com/blog/mysql/zzyy/mq51.jpg)
10.少用 or, 用它来连接时会索引失效
 ](https://zhangxin-blog.oss-cn-beijing.aliyuncs.com/blog/mysql/zzyy/mq52.jpg)
11.小总结
 ](https://zhangxin-blog.oss-cn-beijing.aliyuncs.com/blog/mysql/zzyy/mq53.jpg)
 ](https://zhangxin-blog.oss-cn-beijing.aliyuncs.com/blog/mysql/zzyy/mq54.jpg)
1.2.3 面试题讲解
SQL 题目
1 | #【建表语句】 |
解题和分析
1 | #【建表语句】 |
定值、范围还是排序,一般order by是给一个范围
group by 基本上都是需要排序的, 会有临时表产生
1.3 一般性建议
1 | 对于单键索引,尽量选择针对当前 query 过滤更好的索引 |
1.4 总结
1 | 全值匹配我最爱,最左匹配前缀要准守 |
2. 查询截取分析
2.1 查询优化
2.1.1 永远小表驱动大表,类似嵌套循环 Nested Loop
1 | # 优化原则:小表驱动大表, 即小的数据集合驱动大的数据集合 |
in 和 exstis
1 | explain select * from tb_emp where exists (select 1 from tb_dept where tb_dept.id = tb_emp.dept_id); |
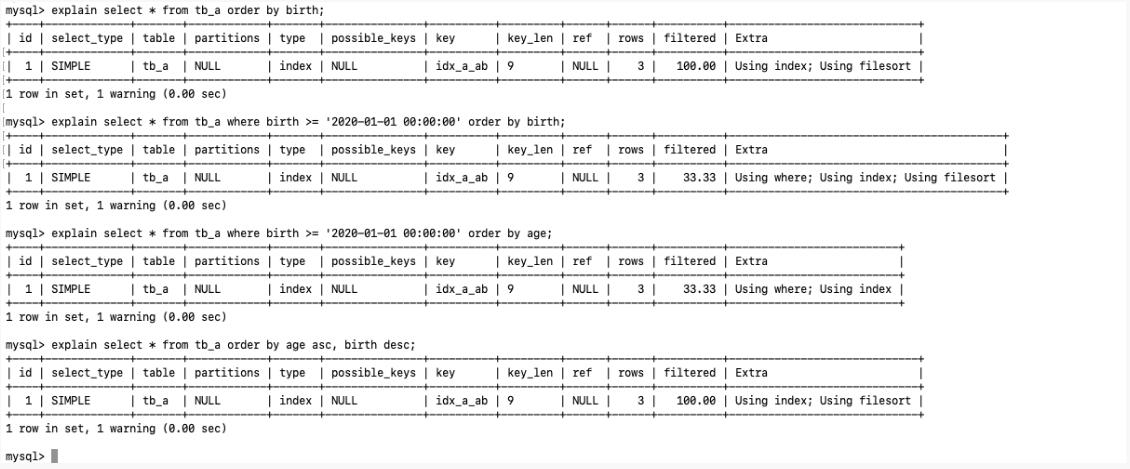
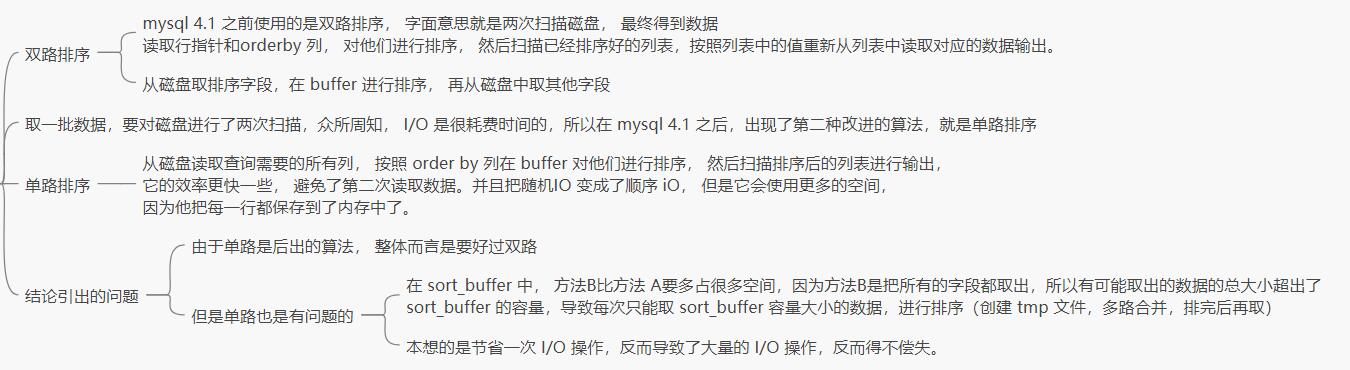
2.1.2 order by 关键字优化
order by 子句,尽量使用 index 方式排序, 避免使用filesort 方式排序
1 | # 建表SQL |
CASE
 ](https://zhangxin-blog.oss-cn-beijing.aliyuncs.com/blog/mysql/zzyy/mq55.jpg)
1 | MySQL 支持两种方式的排序, FileSort 和 Index, Index 效率高 |
尽可能在索引列上完成排序操作,准照索引建立的最佳左前缀
 ](https://zhangxin-blog.oss-cn-beijing.aliyuncs.com/blog/mysql/zzyy/mq56.jpg)
优化策略
 ](https://zhangxin-blog.oss-cn-beijing.aliyuncs.com/blog/mysql/zzyy/mq57.png)
小总结
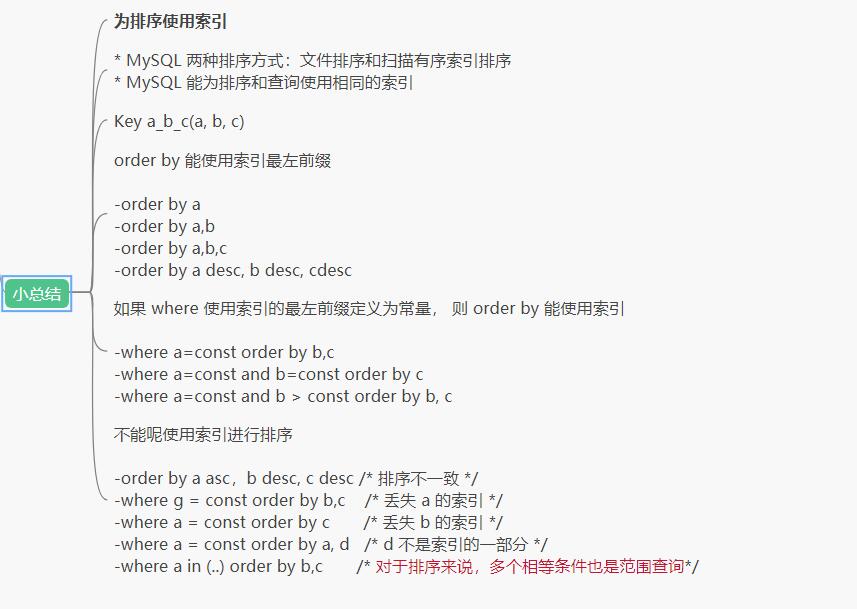 ](https://zhangxin-blog.oss-cn-beijing.aliyuncs.com/blog/mysql/zzyy/mq58.jpg)
2.1.3 group by 关键字优化
1 | group by 实质是先排序后分组, 准照索引建的最佳左前缀 |
2.2 慢日志查询
2.2.1 是什么
1 | MySQL 的慢查询日志是 MySQL 提供的一种日志记录,它用来记录在 MySQL 中响应时间超过阈值的语句, |
2.2.2 怎么玩
说明
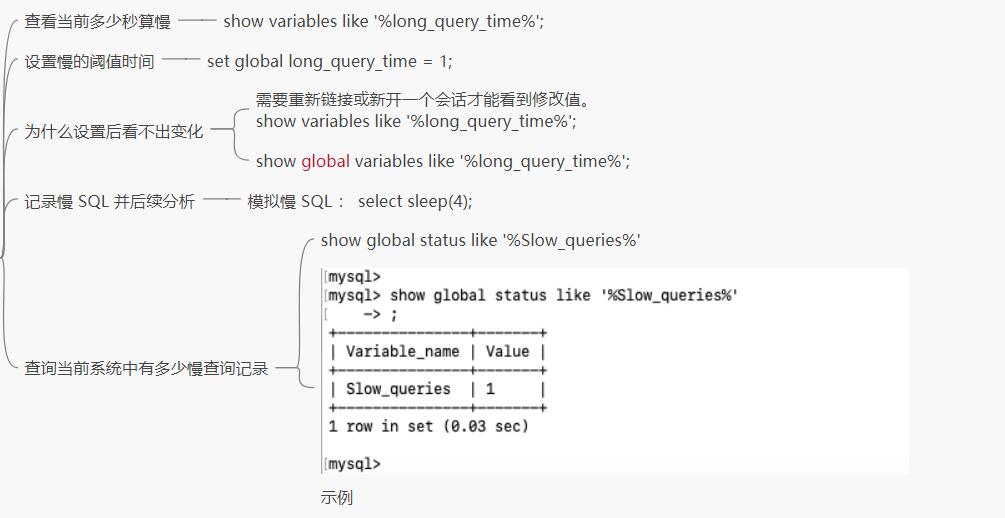
1 | 默认情况下,MySQL 数据库没有开启慢查询日志,需要我们来手动设置这个参数。 |
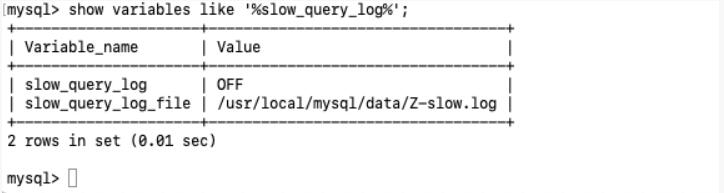
查看是否开启以及如何开启
- 默认—-show variables like ‘%slow_query_log%’;
默认情况下 slow_query_log 的为 off , 表示慢查询日志是禁用的,
可以通过设置 slow_query_log 的值来开启
 ](https://zhangxin-blog.oss-cn-beijing.aliyuncs.com/blog/mysql/zzyy/mq59.jpg)
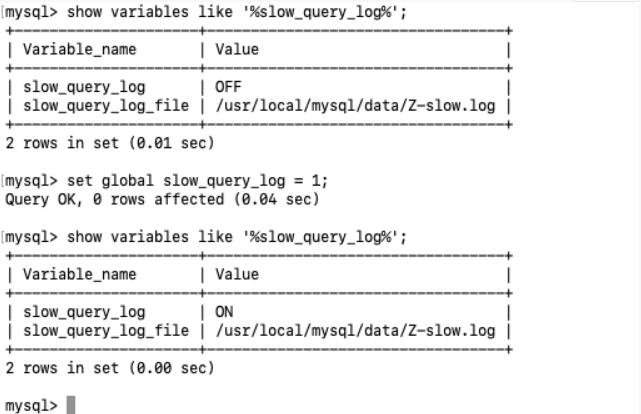
- 开启—-set global slow_query_log = 1;
使用了 set global slow_query_log = 1; 开启了慢查询日志只对当前数据库生效。
如果 mysql 重启后会失效
 ](https://zhangxin-blog.oss-cn-beijing.aliyuncs.com/blog/mysql/zzyy/mq60.jpg)
那么慢查询开启了慢查询日志后, 怎么样的 SQL 才会记录到慢查询日志中呢?
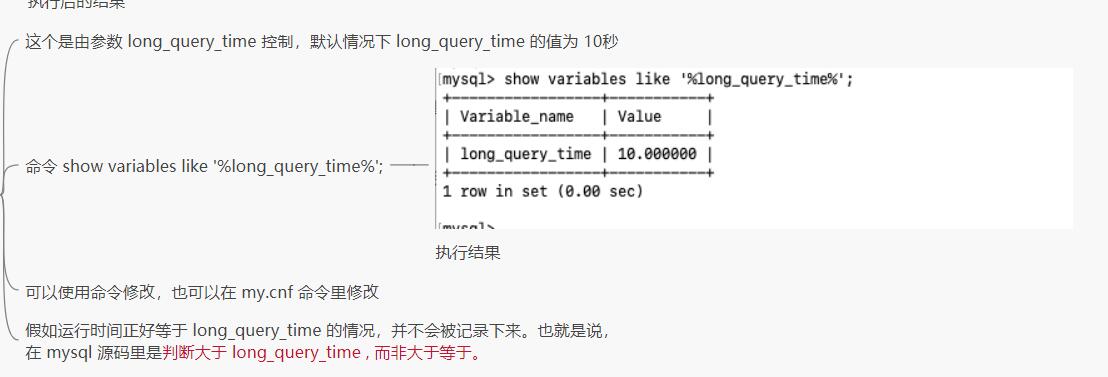 ](https://zhangxin-blog.oss-cn-beijing.aliyuncs.com/blog/mysql/zzyy/mq62.jpg)
Case
 ](https://zhangxin-blog.oss-cn-beijing.aliyuncs.com/blog/mysql/zzyy/mq63.jpg)
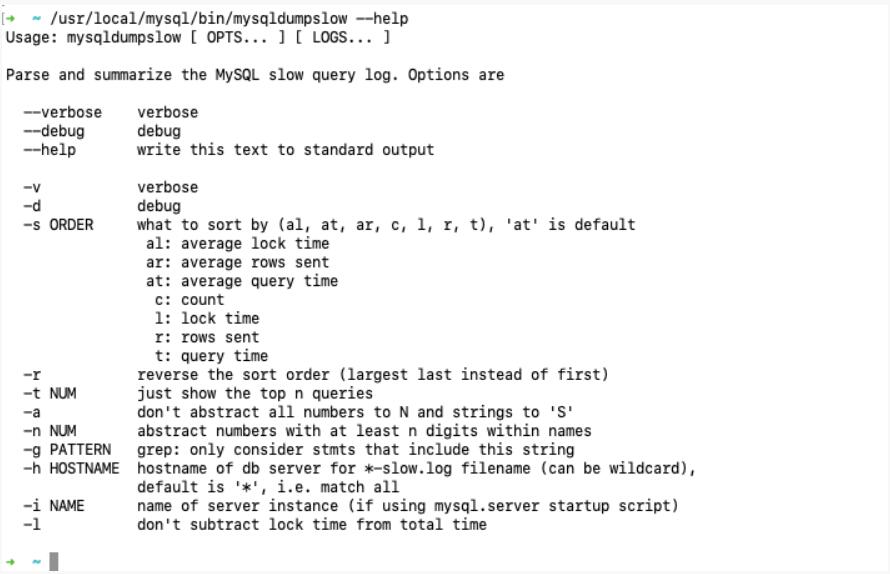
2.2.3 日志分析工具 mysqldumpslow
在生产环境中,如果需要手工分析日志,查找、分析SQL、显然是个体力活,MySQL提供了日志分析工具 mysqldumpslow。
查看 mysqldumpslow 的帮助信息
 ](https://zhangxin-blog.oss-cn-beijing.aliyuncs.com/blog/mysql/zzyy/mq64.jpg)
- s: 是表示按照何种方式排序;
- c: 访问次数
- l: 锁定时间
- r: 返回记录
- t: 查询时间
- al: 平均锁定时间
- ar: 平均返回记录数
- at: 平均查询时间
- t: 即为返回前面多少条的数据
- g: 后面搭配一个正则匹配模式,大小写不敏感
工作常用参考
1 | 得到返回记录集最多的 10 个SQL |
2.2.4 批量数据脚本
插入 1000w 数据
1.建表
1 | create database big_data; |
2.设置参数 log_bin_trust_function_creators
1 | 创建函数, 假如报错:this function has none of DETERMINISTIC ... |
3.创建函数,保证每条数据都不同
随机字符串
1 |
|
随机产生部门编号
1 |
|
4.创建存储过程
创建往emp表中插入数据的存储过程
1 |
|
创建往dept表中插入数据的存储过程
1 |
|
5.调用存储过程
dept
1 | # dept 表中插入数据 |
emp
1 | # emp 表中插入数据 |
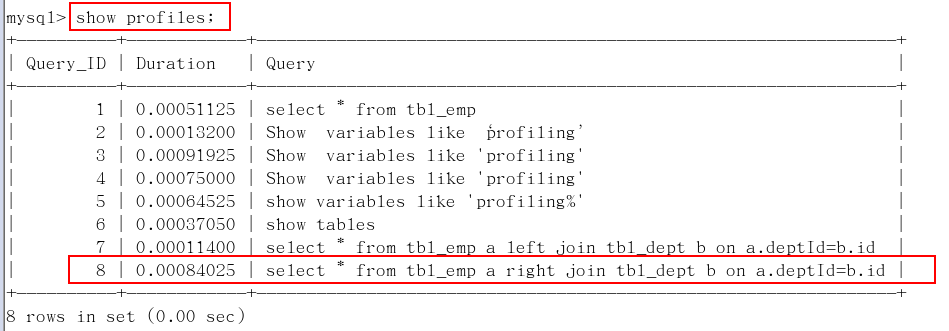
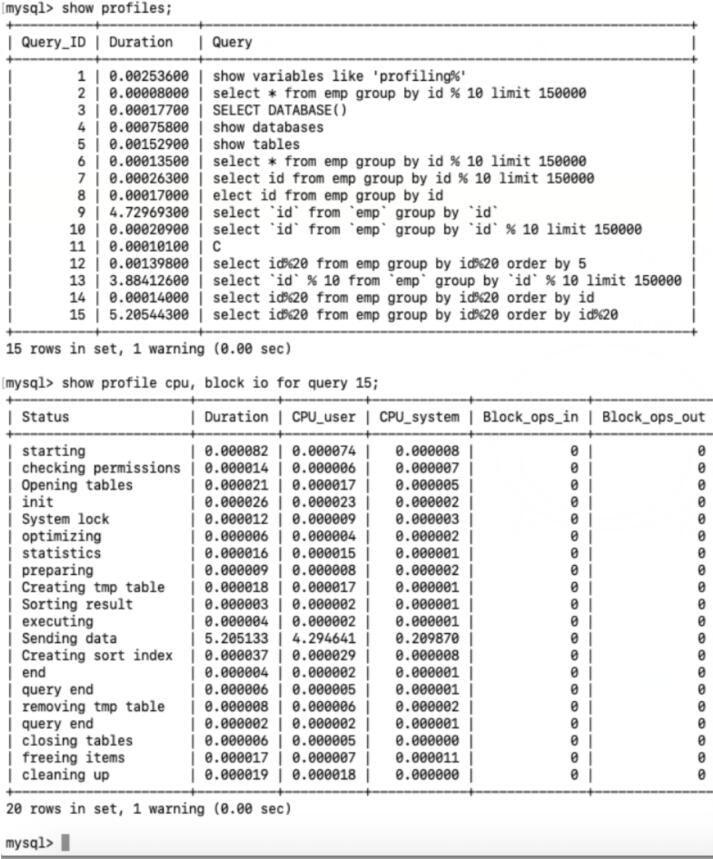
2.4 Show Profile
1 | **是什么**:是mysql 提供用来分析当前会话中语句执行的资源消耗情况。可以用于 SQL 的调优的测量 |
2.4.1 分析步骤
 ](https://zhangxin-blog.oss-cn-beijing.aliyuncs.com/blog/mysql/zzyy/mq65.jpg)
4.查看运行结果:show profiles;
 ](https://zhangxin-blog.oss-cn-beijing.aliyuncs.com/blog/mysql/zzyy/mq66.png)
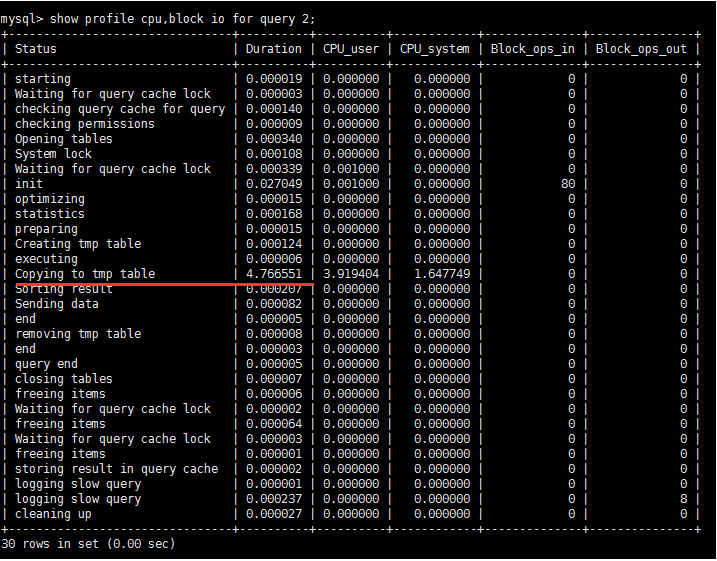
5.诊断SQL : show profile cpu, block io for query 上一步前面的问题 SQL 数字号码;
 ](https://zhangxin-blog.oss-cn-beijing.aliyuncs.com/blog/mysql/zzyy/mq67.jpg)
参数备注
1 |
|
6.日常开发需要注意的事项
converting HEAP to MyISAM 查询结果太大,内存都不够用了往磁盘上面搬了
Create tmp table 创建临时表
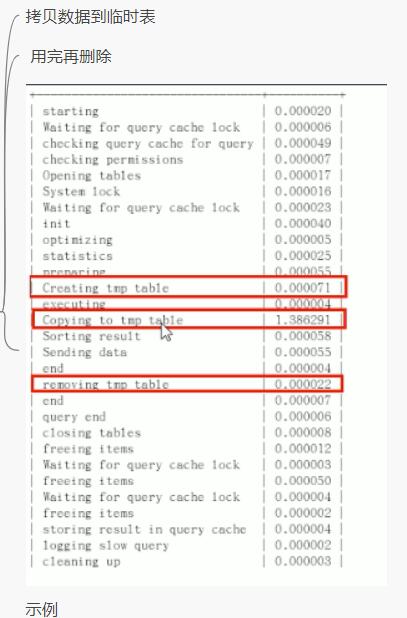 ](https://zhangxin-blog.oss-cn-beijing.aliyuncs.com/blog/mysql/zzyy/mq68.jpg)
Copying to tmp table on disk 把内存中的临时表复制到磁盘, 危险!!!!
 ](https://zhangxin-blog.oss-cn-beijing.aliyuncs.com/blog/mysql/zzyy/mq67.png)
bocked
2.5 全局查询日志(测试环境使用)
配置启用
1 | 在 mysql 的 my.cnf 中设置如下: |
编码启用
1 | set global general_log = 1; |
永远不要在生产环境启用这个功能!!!