第 6 章 面向对象 Scala 的面向对象思想和 Java 的面向对象思想和概念是一致的。
Scala 中语法和 Java 不同,补充了更多的功能。
6.1 Scala 包 6.1.1 包的命名 1) 命名规则 只能包含数字、字母、下划线、小圆点.,但不能用数字开头,也不要使用关键字。
2) 案例实操 1 2 3 demo.class .exec1 demo.12 a
3) 命名规范 1 2 3 一般是小写字母+小圆点 com.公司名.项目名.业务模块名
4) 案例实操 1 2 3 com.atguigu.oa.model com.atguigu.oa.controller com.sohu.bank.order
6.1.2 包说明(包语句) 1)说明 Scala 有两种包的管理风格,一种方式和 Java 的包管理风格相同,每个源文件一个包(包名和源文件所在路径不要求必须一致 ),包名用“.”进行分隔以表示包的层级关系,如 com.atguigu.scala。另一种风格,通过嵌套的风格表示层级关系,如下
1 2 3 4 5 6 package com{ package atguigu{ package scala{ } } }
第二种风格有以下特点 :
一个源文件中可以声明多个 package
子包中的类可以直接访问父包中的内容,而无需导包
2)案例实操 1 2 3 4 5 6 7 8 9 10 11 12 13 14 15 16 17 18 19 20 21 22 23 24 25 26 package com{ import com.atguigu.scala.Inner object Outer var out: String = "out" def main Array [String ]): Unit = { println(Inner .in) } } package atguigu{ package scala{ object Inner var in: String = "in" def main Array [String ]): Unit = { println(Outer .out) Outer .out = "outer" println(Outer .out) } } } } }
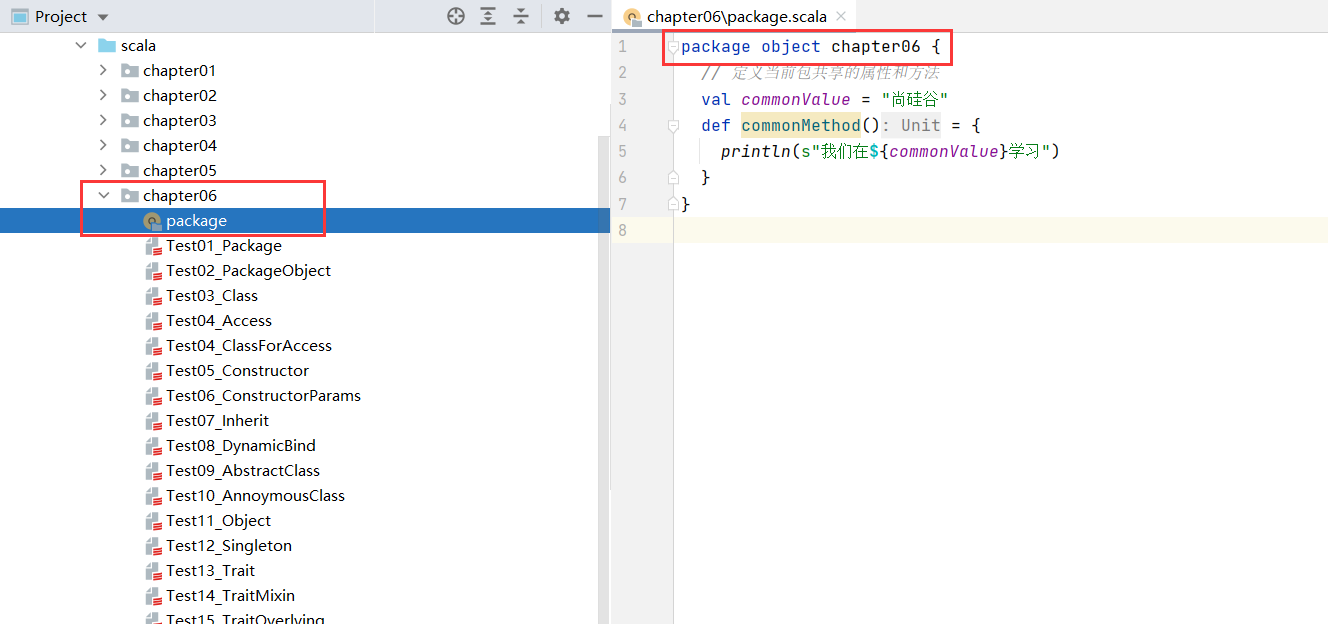
6.1.3 包对象 在 Scala 中可以为每个包定义一个同名 的包对象,定义在包对象中的成员,作为其对应包下 所有 class 和 object 的共享变量,可以被直接访问。
1)定义 1 2 3 4 package object com val shareValue="share" def shareMethod }
2)说明 (1)若使用 Java 的包管理风格,则包对象一般定义在其对应包下的 package.scala 文件中,包对象名与包名保持一致。
(2)如采用嵌套方式管理包,则包对象可与包定义在同一文件中,但是要保证包对象 与包声明在同一作用域中。
1 2 3 4 5 6 7 8 9 10 11 12 13 14 package ccc{ package ddd{ object Test02_PackageObject def main Array [String ]): Unit = { println(school) } } } } package object ccc val school: String = "atguigu" }
1 2 3 4 5 6 7 8 9 10 11 12 13 14 package ccc{ package ddd{ object Test02_PackageObject def main Array [String ]): Unit = { println(school) } } } package object ddd val school: String = "atguigu" } }
6.1.4 导包说明 1)和 Java 一样,可以在顶部使用 import 导入,在这个文件中的所有类都可以使用。
2)局部导入:什么时候使用,什么时候导入。在其作用范围内都可以使用
3)通配符导入:import java.util._
4)给类起名:import java.util.{ArrayList=>JL}
5)导入相同包的多个类:import java.util.{HashSet, ArrayList}
6)屏蔽类:import java.util.{ArrayList =>_,_}
7)导入包的绝对路径:new _root_.java.util.HashMap
注意
Scala 中的三个默认导入分别是
1 2 3 4 5 import java.lang._ import scala._ import scala.Predef ._
6.2 类和对象
6.2.1 定义类 1)回顾:Java 中的类
如果类是 public 的,则必须和文件名一致。
一般,一个.java 有一个 public 类
注意:Scala 中没有 public,一个.scala 中可以写多个类。
1)基本语法 说明
(1)Scala 语法中,类并不声明为 public,所有这些类都具有公有可见性(即默认就是 public)
(2)一个 Scala 源文件可以包含多个类
2)案例实操 1 2 3 4 5 6 7 8 9 class Person } class Teacher }
6.2.2 属性 属性是类的一个组成部分
1)基本语法 1 2 3 4 5 [修饰符] var |val 属性名称 [: 类型] = 属性值 注:Bean 属性(@BeanPropetry ),可以自动生成规范的 setXxx/getXxx 方法
2)案例实操 1 2 3 4 5 6 7 8 9 10 11 12 13 14 15 16 17 18 19 20 object Test03_Class def main Array [String ]): Unit = { val student = new Student () println(student.age) println(student.sex) student.sex = "female" println(student.sex) } } class Student private var name: String = "alice" @BeanProperty var age: Int = _ var sex: String = _ }
6.2.3 封装 封装就是把抽象出的数据和对数据的操作封装在一起,数据被保护在内部,程序的其它 部分只有通过被授权的操作(成员方法),才能对数据进行操作。Java 封装操作如下,
(1)将属性进行私有化
(2)提供一个公共的 set 方法,用于对属性赋值
(3)提供一个公共的 get 方法,用于获取属性的值
Scala 中的 public 属性,底层实际为 private,并通过 get 方法(obj.field())和 set 方法 (obj.field_=(value))对其进行操作。所以 Scala 并不推荐将属性设为 private,再为其设置 public 的 get 和 set 方法的做法。但由于很多 Java 框架都利用反射调用 getXXX 和 setXXX 方 法,有时候为了和这些框架兼容,也会为 Scala 的属性设置 getXXX 和 setXXX 方法(通过 @BeanProperty 注解实现)。
6.2.4 访问权限 1)说明 在 Java 中,访问权限分为:public,private,protected 和默认。在 Scala 中,你可以通 过类似的修饰符达到同样的效果。但是使用上有区别。
(1)Scala 中属性和方法的默认访问权限为 public,但 Scala 中无 public 关键字。
(2)private 为私有权限,只在类的内部和伴生对象中可用。
(3)protected 为受保护权限,Scala 中受保护权限比 Java 中更严格,同类、子类可以 访问,同包无法访问。
(4)private[包名]增加包访问权限,包名下的其他类也可以使用
2)案例实操 1 2 3 4 5 6 7 8 9 10 11 12 13 14 15 object Test04_ClassForAccess } class Person private var idCard: String = "3523566" protected var name: String = "alice" var sex: String = "female" private [chapter06] var age: Int = 18 def printInfo Unit = { println(s"Person: $idCard $name $sex $age " ) } }
1 2 3 4 5 6 7 8 9 10 11 12 13 14 15 16 17 18 19 20 21 22 23 24 25 26 27 28 29 object Test04_Access def main Array [String ]): Unit = { val person: Person = new Person () println(person.age) println(person.sex) person.printInfo() var worker: Worker = new Worker () worker.printInfo() } } class Worker extends Person override def printInfo Unit = { name = "bob" age = 25 sex = "male" println(s"Worker: $name $sex $age " ) } }
6.2.5 方法 1)基本语法 1 2 3 def 方法名 方法体 }
2)案例实操 1 2 3 4 5 6 7 8 9 10 11 12 class Person def sum Int , n2:Int ) : Int = { n1 + n2 } } object Person def main Array [String ]): Unit = { val person = new Person () println(person.sum(10 , 20 )) } }
6.2.6 构造器 和 Java 一样,Scala 构造对象也需要调用构造方法,并且可以有任意多个构造方法。 Scala 类的构造器包括:主构造器和辅助构造器
1)基本语法 1 2 3 4 5 6 7 8 9 10 11 class 类名 (形参列表 ) def this } def this } }
说明:
(1) 辅助构造器,函数的名称 this,可以有多个,编译器通过参数的个数及类型来区分。
(2) 辅助构造方法不能直接构建对象,必须直接或者间接调用主构造方法。
(3) 构造器调用其他另外的构造器,要求被调用构造器必须提前声明。
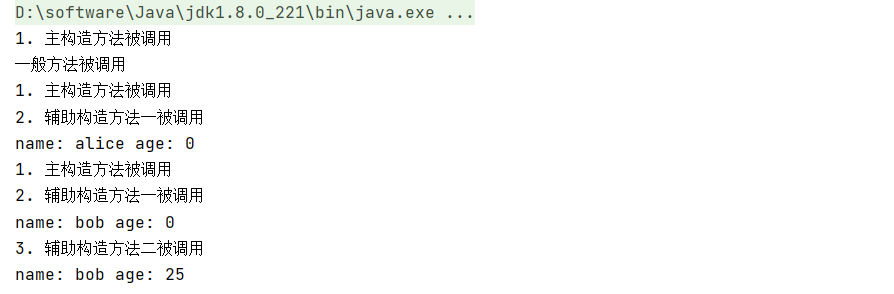
2) 案例实操 (1)如果主构造器无参数,小括号可省略,构建对象时调用的构造方法的小括号也可以省略。
1 2 3 4 5 6 7 8 9 10 11 12 13 14 15 16 17 18 19 20 21 22 23 24 25 26 27 28 29 30 31 32 33 34 35 36 37 object Test05_Constructor def main Array [String ]): Unit = { val student1 = new Student1 student1.Student1 () val student2 = new Student1 ("alice" ) val student3 = new Student1 ("bob" , 25 ) } } class Student1 ( var name: String = _ var age: Int = _ println("1. 主构造方法被调用" ) def this String ) { this () println("2. 辅助构造方法一被调用" ) this .name = name println(s"name: $name age: $age " ) } def this String , age: Int ){ this (name) println("3. 辅助构造方法二被调用" ) this .age = age println(s"name: $name age: $age " ) } def Student1 Unit = { println("一般方法被调用" ) } }
6.2.7 构造器参数 1)说明 Scala 类的主构造器函数的形参包括三种类型:未用任何修饰、var 修饰、val 修饰
(1)未用任何修饰符修饰,这个参数就是一个局部变量
(2)var 修饰参数,作为类的成员属性使用,可以修改
(3)val 修饰参数,作为类只读属性使用,不能修改
2) 案例实操 1 2 3 4 5 6 7 8 9 10 11 12 13 14 15 16 17 18 19 20 21 22 23 24 25 26 27 28 29 30 31 32 33 34 35 36 37 38 39 40 41 42 43 44 45 46 47 48 49 50 51 52 53 54 55 56 57 58 59 60 61 62 object Test06_ConstructorParams def main Array [String ]): Unit = { val student2 = new Student2 student2.name = "alice" student2.age = 18 println(s"student2: name = ${student2.name} , age = ${student2.age} " ) val student3 = new Student3 ("bob" , 20 ) println(s"student3: name = ${student3.name} , age = ${student3.age} " ) val student4 = new Student4 ("cary" , 25 ) student4.printInfo() val student5 = new Student5 ("bob" , 20 ) println(s"student3: name = ${student5.name} , age = ${student5.age} " ) student3.age = 21 val student6 = new Student6 ("cary" , 25 , "atguigu" ) println(s"student6: name = ${student6.name} , age = ${student6.age} " ) student6.printInfo() } } class Student2 var name: String = _ var age: Int = _ } class Student3 (var name: String , var age: Int )class Student4 (name: String , age: Int ) def printInfo println(s"student4: name = ${name} , age = $age " ) } } class Student5 (val name: String , val age: Int )class Student6 (var name: String , var age: Int ) var school: String = _ def this String , age: Int , school: String ){ this (name, age) this .school = school } def printInfo println(s"student6: name = ${name} , age = $age , school = $school " ) } }
6.3 继承和多态 1)基本语法 1 class 子类名 extends 父类名
(1)子类继承父类的属性和方法
(2)scala 是单继承
2)案例实操 (1)子类继承父类的属性和方法
(2)继承的调用顺序:父类构造器->子类构造器
1 2 3 4 5 6 7 8 9 10 11 12 13 14 15 16 17 18 19 20 21 22 23 24 25 26 27 28 29 30 31 32 33 34 35 36 37 38 39 40 41 42 43 44 45 46 47 48 49 50 51 52 53 54 55 56 57 58 59 60 61 62 63 64 65 66 object Test07_Inherit def main Array [String ]): Unit = { val student1: Student7 = new Student7 ("alice" , 18 ) val student2 = new Student7 ("bob" , 20 , "std001" ) student1.printInfo() student2.printInfo() println("=========================" ) val teacher = new Teacher teacher.printInfo() def personInfo Person7 ): Unit = { person.printInfo() } println("=========================" ) val person = new Person7 personInfo(student1) personInfo(teacher) personInfo(person) } } class Person7 ( var name: String = _ var age: Int = _ println("1. 父类的主构造器调用" ) def this String , age: Int ){ this () println("2. 父类的辅助构造器调用" ) this .name = name this .age = age } def printInfo Unit = { println(s"Person: $name $age " ) } } class Student7 (name: String , age: Int ) extends Person7 (name, age ) var stdNo: String = _ println("3. 子类的主构造器调用" ) def this String , age: Int , stdNo: String ){ this (name, age) println("4. 子类的辅助构造器调用" ) this .stdNo = stdNo } override def printInfo Unit = { println(s"Student: $name $age $stdNo " ) } } class Teacher extends Person7 override def printInfo Unit = { println(s"Teacher" ) } }
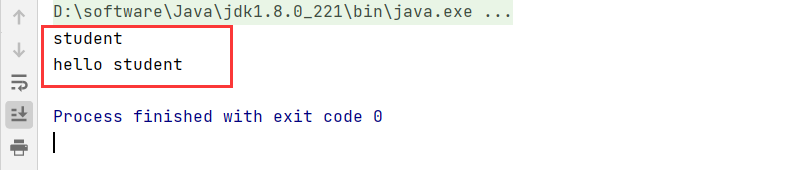
3)动态绑定 Scala 中属性和方法都是动态绑定,而 Java 中只有方法为动态绑定。
1 2 3 4 5 6 7 8 9 10 11 12 13 14 15 16 17 18 19 20 21 22 23 24 25 26 27 28 29 30 31 32 33 public class TestDynamicBind { public static void main (String[] args) { Worker worker = new Worker (); System.out.println(worker.name); worker.hello(); worker.hi(); System.out.println("===================" ); Person person = new Worker (); System.out.println(person.name); person.hello(); } } class Person { String name = "person" ; public void hello () { System.out.println("hello person" ); } } class Worker extends Person { String name = "worker" ; public void hello () { System.out.println("hello worker" ); } public void hi () { System.out.println("hi worker" ); } }
1 2 3 4 5 6 7 8 9 10 11 12 13 14 15 16 17 18 19 20 21 object Test08_DynamicBind def main Array [String ]): Unit = { val student: Person8 = new Student8 println(student.name) student.hello() } } class Person8 val name: String = "person" def hello Unit = { println("hello person" ) } } class Student8 extends Person8 override val name: String = "student" override def hello Unit = { println("hello student" ) } }
6.4 抽象类 6.4.1 抽象属性和抽象方法 1)基本语法 (1)定义抽象类:abstract class Person{} //通过 abstract 关键字标记抽象类
(2)定义抽象属性:val|var name:String //一个属性没有初始化,就是抽象属性
(3)定义抽象方法:def hello():String //只声明而没有实现的方法,就是抽象方法
2)案例实操 1 2 3 4 5 6 7 8 9 10 11 12 13 14 15 16 17 18 19 20 21 22 23 24 25 26 27 28 29 30 31 32 33 34 35 36 37 38 39 40 41 42 43 object Test09_AbstractClass def main Array [String ]): Unit = { val student = new Student9 student.eat() student.sleep() } } abstract class Person9 var name: String = "person" var age: Int def eat Unit = { println("person eat" ) } def sleep Unit } class Student9 extends Person9 var age: Int = 18 def sleep Unit = { println("student sleep" ) } name = "student" override def eat Unit = { super .eat() println("student eat" ) } }
3)继承&重写 (1)如果父类为抽象类,那么子类需要将抽象的属性和方法实现,否则子类也需声明 为抽象类
(2)重写非抽象方法需要用 override 修饰,重写抽象方法则可以不加 override。
(3)子类中调用父类的方法使用 super 关键字
(4)子类对抽象属性进行实现,父类抽象属性可以用 var 修饰; 子类对非抽象属性重写,父类非抽象属性只支持 val 类型,而不支持 var。 因为 var 修饰的为可变变量,子类继承之后就可以直接使用,没有必要重写
6.4.2 匿名子类 1)说明 和 Java 一样,可以通过包含带有定义或重写的代码块的方式创建一个匿名的子类。
2)案例实操 1 2 3 4 5 6 7 8 9 10 11 12 13 14 15 16 17 object Test10_AnnoymousClass def main Array [String ]): Unit = { val person: Person10 = new Person10 { override var name: String = "alice" override def eat Unit = println("person eat" ) } println(person.name) person.eat() } } abstract class Person10 var name: String def eat Unit }
6.5 单例对象(伴生对象) Scala语言是完全面向对象 的语言,所以并没有静态的操作(即在Scala中没有静态的概 念)。但是为了能够和Java语言交互(因为Java中有静态概念),就产生了一种特殊的对象来模拟类对象 ,该对象为单例对象 。若单例对象名与类名一致,则称该单例对象这个类的伴生对象 ,这个类的所有“静态”内容都可以放置在它的伴生对象 中声明。
(1)单例对象采用 object 关键字声明
(2)单例对象对应的类称之为伴生类,伴生对象的名称应该和伴生类名一致。
(3)单例对象中的属性和方法都可以通过伴生对象名(类名)直接调用访问。
apply 方法
(1)通过伴生对象的 apply 方法,实现不使用 new 方法创建对象。
(2)如果想让主构造器变成私有的,可以在()之前加上 private。
(3)apply 方法可以重载。
(4)Scala 中 obj(arg)的语句实际是在调用该对象的 apply 方法,即 obj.apply(arg)。用 以统一面向对象编程和函数式编程的风格。
(5)当使用 new 关键字构建对象时,调用的其实是类的构造方法,当直接使用类名构 建对象时,调用的其实时伴生对象的 apply 方法。
1 2 3 4 5 6 7 8 9 10 11 12 13 14 15 16 17 18 19 20 21 22 23 24 25 26 27 28 29 30 31 32 33 object Test11_Object def main Array [String ]): Unit = { val student1 = Student11 .newStudent("alice" , 18 ) student1.printInfo() val student2 = Student11 .apply("bob" , 19 ) student2.printInfo() val student3 = Student11 ("bob" , 19 ) student3.printInfo() } } class Student11 private (val name: String , val age: Int ) def printInfo println(s"student: name = ${name} , age = $age , school = ${Student11.school} " ) } } object Student11 val school: String = "atguigu" def newStudent String , age: Int ): Student11 = new Student11 (name, age) def apply String , age: Int ): Student11 = new Student11 (name, age) }
单例设计模式 1 2 3 4 5 6 7 8 9 10 11 12 13 14 15 16 17 18 19 20 21 22 23 24 25 26 27 28 29 30 31 32 33 34 35 36 4 object Test12_Singleton { def main Array [String ]): Unit = { val student1 = Student12 .getInstance() student1.printInfo() val student2 = Student12 .getInstance() student2.printInfo() println(student1) println(student2) } } class Student12 private (val name: String , val age: Int ) def printInfo println(s"student: name = ${name} , age = $age , school = ${Student11.school} " ) } } object Student12 private var student: Student12 = _ def getInstance Student12 = { if (student == null ){ student = new Student12 ("alice" , 18 ) } student } }
6.6 特质(Trait) Scala 语言中,采用特质 trait(特征)来代替接口的概念 ,也就是说,多个类具有相同 的特质(特征)时,就可以将这个特质(特征)独立出来,采用关键字 trait 声明。
Scala 中的 trait 中即可以有抽象属性和方法,也可以有具体的属性和方法,一个类可 以混入(mixin)多个特质 。这种感觉类似于 Java 中的抽象类。
Scala 引入 trait 特征,第一可以替代 Java 的接口,第二个也是对单继承机制的一种 补充。
6.6.1 特质声明 一个类具有某种特质(特征),就意味着这个类满足了这个特质(特征)的所有要素, 所以在使用时,也采用了 extends 关键字,如果有多个特质或存在父类,那么需要采用 with 关键字连接。
1)基本语法
没有父类:class 类名 extends 特质 1 with 特质 2 with 特质 3 …
有父类:class 类名 extends 父类 with 特质 1 with 特质 2 with 特质 3…
2)说明
类和特质的关系:使用继承的关系。
当一个类去继承特质时,第一个连接词是 extends,后面是 with。
如果一个类在同时继承特质和父类时,应当把父类写在 extends 后。
3)案例实操
特质可以同时拥有抽象方法和具体方法
一个类可以混入(mixin)多个特质
所有的 Java 接口都可以当做 Scala 特质使用
动态混入:可灵活的扩展类的功能
动态混入:创建对象时混入 trait,而无需使类混入该 trait
如果混入的 trait 中有未实现的方法,则需要实现
1)基本语法 1 2 3 4 trait 特质名 trait 主体 }
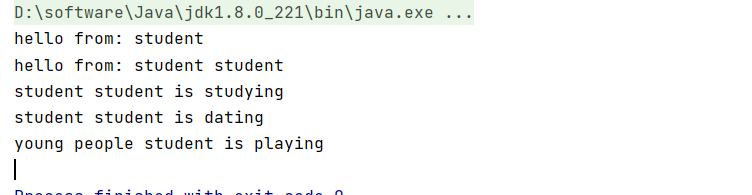
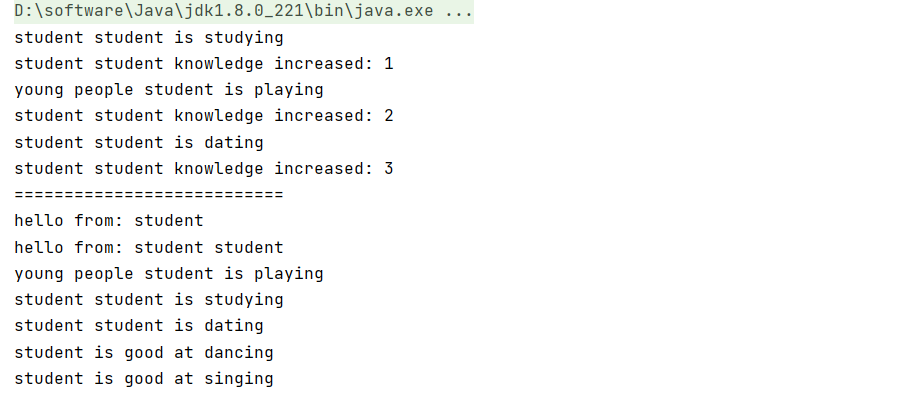
2)案例实操 1 2 3 4 5 6 7 8 9 10 11 12 13 14 15 16 17 18 19 20 21 22 23 24 25 26 27 28 29 30 31 32 33 34 35 36 37 38 39 40 41 42 43 44 45 46 47 48 49 50 51 object Test13_Trait def main Array [String ]): Unit = { val student: Student13 = new Student13 student.sayHello() student.study() student.dating() student.play() } } class Person13 val name: String = "person" var age: Int = 18 def sayHello Unit = { println("hello from: " + name) } def increase Unit = { println("person increase" ) } } trait Young var age: Int val name: String = "young" def play Unit = { println(s"young people $name is playing" ) } def dating Unit } class Student13 extends Person13 with Young override val name: String = "student" def dating Unit = println(s"student $name is dating" ) def study Unit = println(s"student $name is studying" ) override def sayHello Unit = { super .sayHello() println(s"hello from: student $name " ) } }
6.6.2 特质混入 1 2 3 4 5 6 7 8 9 10 11 12 13 14 15 16 17 18 19 20 21 22 23 24 25 26 27 28 29 30 31 32 33 34 35 36 37 38 39 40 41 42 43 44 45 46 47 48 49 50 51 52 53 54 55 56 57 58 59 60 object Test14_TraitMixin def main Array [String ]): Unit = { val student = new Student14 student.study() student.increase() student.play() student.increase() student.dating() student.increase() println("===========================" ) val studentWithTalent = new Student14 with Talent { override def dancing Unit = println("student is good at dancing" ) override def singing Unit = println("student is good at singing" ) } studentWithTalent.sayHello() studentWithTalent.play() studentWithTalent.study() studentWithTalent.dating() studentWithTalent.dancing() studentWithTalent.singing() } } trait Knowledge var amount: Int = 0 def increase Unit } trait Talent def singing Unit def dancing Unit } class Student14 extends Person13 with Young with Knowledge override val name: String = "student" def dating Unit = println(s"student $name is dating" ) def study Unit = println(s"student $name is studying" ) override def sayHello Unit = { super .sayHello() println(s"hello from: student $name " ) } override def increase Unit = { amount += 1 println(s"student $name knowledge increased: $amount " ) } }
6.6.3 特质叠加 由于一个类可以混入(mixin)多个 trait,且 trait 中可以有具体的属性和方法,若混入 的特质中具有相同的方法(方法名,参数列表,返回值均相同),必然会出现继承冲突问题。 冲突分为以下两种:
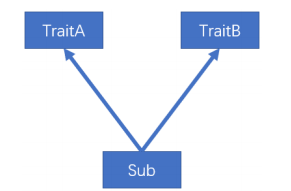
第一种,一个类(Sub)混入的两个 trait(TraitA,TraitB)中具有相同的具体方法,且 两个 trait 之间没有任何关系,解决这类冲突问题,直接在类(Sub)中重写冲突方法。
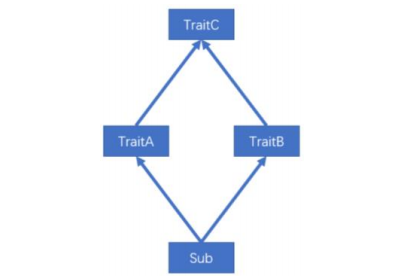
第二种,一个类(Sub)混入的两个 trait(TraitA,TraitB)中具有相同的具体方法,且 两个 trait 继承自相同的 trait(TraitC),及所谓的“钻石问题”,解决这类冲突问题,Scala 采用了特质叠加的策略。
所谓的特质叠加,就是将混入的多个 trait 中的冲突方法叠加起来,案例如下,
1 2 3 4 5 6 7 8 9 10 11 12 13 14 15 16 17 18 19 20 21 22 23 24 25 26 27 28 29 30 31 32 33 34 35 36 37 38 39 40 41 42 43 44 45 46 47 48 49 50 51 52 53 54 55 56 57 object Test15_TraitOverlying def main Array [String ]): Unit = { val student = new Student15 student.increase() val myFootBall = new MyFootBall println(myFootBall.describe()) } } trait Ball def describe String = "ball" } trait ColorBall extends Ball var color: String = "red" override def describe String = color + "-" + super .describe() } trait CategoryBall extends Ball var category: String = "foot" override def describe String = category + "-" + super .describe() } class MyFootBall extends CategoryBall with ColorBall override def describe String = "my ball is a " + super .describe() } trait Knowledge15 var amount: Int = 0 def increase Unit = { println("knowledge increased" ) } } trait Talent15 def singing Unit def dancing Unit def increase Unit = { println("talent increased" ) } } class Student15 extends Person13 with Talent15 with Knowledge15 override def dancing Unit = println("dancing" ) override def singing Unit = println("singing" ) override def increase Unit = { super [Person13 ].increase() } }
6.6.4 特质叠加执行顺序 思考: 上述案例中的 super.describe()调用的是父 trait 中的方法吗?
当一个类混入多个特质的时候,scala 会对所有的特质及其父特质按照一定的顺序进行 排序,而此案例中的 super.describe()调用的实际上是排好序后的下一个特质中的 describe() 方法。,排序规则如下:
结论: (1)案例中的 super,不是表示其父特质对象,而是表示上述叠加顺序中的下一个特质, 即,MyClass 中的 super 指代 Color,Color 中的 super 指代 Category,Category 中的 super 指代 Ball。
(2)如果想要调用某个指定的混入特质中的方法,可以增加约束:super[],例如super[Category].describe()。
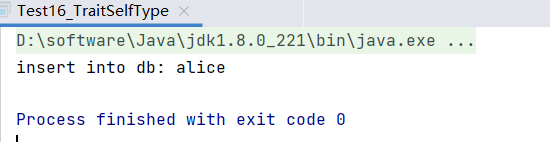
6.6.5 特质自身类型 1)说明 自身类型可实现依赖注入的功能。
2)案例实操 1 2 3 4 5 6 7 8 9 10 11 12 13 14 15 16 17 18 19 20 21 object Test16_TraitSelfType def main Array [String ]): Unit = { val user = new RegisterUser ("alice" , "123456" ) user.insert() } } class User (val name: String , val password: String )trait UserDao _: User => def insert Unit = { println(s"insert into db: ${this.name} " ) } } class RegisterUser (name: String , password: String ) extends User (name, password ) with UserDao
6.6.6 特质和抽象类的区别 1.优先使用特质。一个类扩展多个特质是很方便的,但却只能扩展一个抽象类。
2.如果你需要构造函数参数,使用抽象类。因为抽象类可以定义带参数的构造函数, 而特质不行(有无参构造)。
6.7 扩展 6.7.1 类型检查和转换 1) 说明
obj.isInstanceOf[T]:判断 obj 是不是T 类
obj.asInstanceOf[T]:将 obj 强转成 T 类型。
classOf 获取对象的类名。
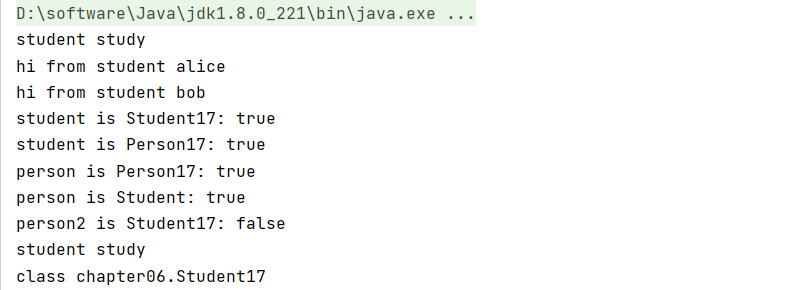
2) 案例实操 1 2 3 4 5 6 7 8 9 10 11 12 13 14 15 16 17 18 19 20 21 22 23 24 25 26 27 28 29 30 31 32 33 34 35 36 37 38 39 40 41 42 object Test17_Extends def main Array [String ]): Unit = { val student: Student17 = new Student17 ("alice" , 18 ) student.study() student.sayHi() val person: Person17 = new Student17 ("bob" , 20 ) person.sayHi() println("student is Student17: " + student.isInstanceOf[Student17 ]) println("student is Person17: " + student.isInstanceOf[Person17 ]) println("person is Person17: " + person.isInstanceOf[Person17 ]) println("person is Student: " + person.isInstanceOf[Student17 ]) val person2: Person17 = new Person17 ("cary" , 35 ) println("person2 is Student17: " + person2.isInstanceOf[Student17 ]) if (person.isInstanceOf[Student17 ]){ val newStudent = person.asInstanceOf[Student17 ] newStudent.study() } println(classOf[Student17 ]) } } class Person17 (val name: String , val age: Int ) def sayHi Unit = { println("hi from person " + name) } } class Student17 (name: String , age: Int ) extends Person17 (name, age ) override def sayHi Unit = { println("hi from student " + name) } def study Unit = { println("student study" ) } }
6.7.2 枚举类和应用类 1)说明
枚举类:需要继承 Enumeration
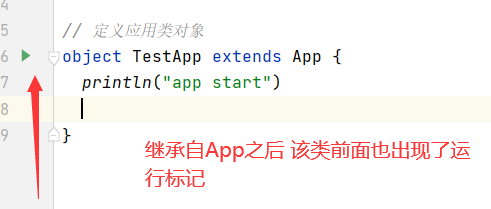
应用类:需要继承 App
2)案例实操 1 2 3 4 5 6 7 8 9 10 11 12 13 object Test17_Extends def main Array [String ]): Unit = { println(WorkDay .MONDAY ) } } object WorkDay extends Enumeration val MONDAY = Value (1 , "Monday" ) val TUESDAY = Value (2 , "TuesDay" ) }
6.7.3 Type 定义新类型 1)说明 使用 type 关键字可以定义新的数据数据类型名称,本质上就是类型的一个别名
2)案例实操 1 2 3 4 5 6 7 object TestApp extends App type MyString String val a: MyString = "abc" println(a) }