Spring进阶 1. Spring注解开发 1.1 SpringIOC容器 两种注入方式
xml配置文件:applicationContext.xml(这个xml配置文件就是IOC容器)
注解:带有@Configuration注解的类(这个配置类就是IOC容器)
1
2
3
4
5
6
7
8
9
10
11
12
13
14
15
16
17
IOC容器的作用 存Bean 取Bean # xml配置文件 存bean: <bean id class> 取bean: ApplicationContext context= new ClassPathXmlApplicationContext("applicationContext.xml"); context.getBean(); # 注解方式 取bean ApplicationContext context = new AnnotationConfigApplicationContext(MyConfig.class) ; context.getBean(); # 取所有Bean String[] beanDefinitionNames = context.getBeanDefinitionNames(); for(String name :beanDefinitionNames){ System.out.println(name); }
注解方式存Bean
必须有@Configuration注解(配置类)
形式
三层组件加入IOC容器: 给个各类加 注解 、 扫描器识别注解所在包
给三层组件 分别加注解(@Controller、@Service、@Repository -> @Component)
将注解所在包 纳入ioc扫描器(ComponentScan)
①xml配置文件 : <context:component-scan base-package=”com.yanqun.controller” >
②注解扫描器@ComponentScan(”com.zzxx”)
2.形式:
给扫描器指定规则
1 2 3 4 5 6 7 8 9 10 11 12 13 excludeFilters默认什么都没排除可以自定义排除,通过@ComponentScan .Filter自定义排除 public @interface Filter { FilterType type () default FilterType.ANNOTATION; @AliasFor("classes") Class<?>[] value() default {}; @AliasFor("value") Class<?>[] classes() default {}; String[] pattern() default {}; }
1 2 3 4 5 6 7 8 9 10 11 12 13 14 15 16 17 18 19 20 public enum FilterType { ANNOTATION, ASSIGNABLE_TYPE, ASPECTJ, REGEX, CUSTOM; private FilterType () { } } 过滤类型:FilterType(ANNOTATION,ASSIGNABLE_TYPE,CUSTOM) ANNOTATION:三层注解类型@Controller 、@Service 、@Repository -> @Component @ComponentScan(value="com.yanqun",excludeFilters = { @ComponentScan.Filter(type= FilterType.ANNOTATION,classes ={Controller.class} )} ) @ComponentScan(value="com.yanqun",excludeFilters = {@ComponentScan.Filter(type= FilterType.ANNOTATION,classes ={Service.class, Repository.class} )})
includeFilters:有默认行为,可以通过useDefaultFilters = false禁止
1 2 3 4 5 6 7 8 @ComponentScan(value="com.yanqun",includeFilters = {@ComponentScan.Filter(type= FilterType.ANNOTATION,classes ={Controller.class})},useDefaultFilters = false) @ComponentScan(value="com.yanqun",includeFilters = {@ComponentScan.Filter(type= FilterType.ASSIGNABLE_TYPE,classes ={StudentService.class})},useDefaultFilters = false)
1
2
3
4
CUSTOM自定义:自己定义包含规则 @ComponentScan .Filter(type= FilterType.CUSTOM ,value={MyFilter.class}MyFilter implements TypeFilter 重写其中的match,如果return true 则加入IoC容器
1 2 3 4 5 6 7 8 9 10 11 12 13 14 public class MyFilter implements TypeFilter { @Override public boolean match (MetadataReader metadataReader, MetadataReaderFactory metadataReaderFactory) throws IOException { ClassMetadata classMetadata = metadataReader.getClassMetadata(); String className = classMetadata.getClassName(); if (className.contains("School" )) return true ; return false ; } }
区分:
ANNOTATION:Controller.clss 指的是 所有标有@Controller的类
ASSIGNABLE_TYPE:值得是具体的一个类 StudentController.class
CUSTOM自定义:自己定义包含规则
和扫描器有关的只研究三层组件!!!!
  ②非三层组件(Student.class 、IntToStringConver.class):

      i.  @Bean+方法的返回值 ,id默認就是方法名(可以通过@Bean("stu") 修改id值)
      ii. import 、FactoryBean
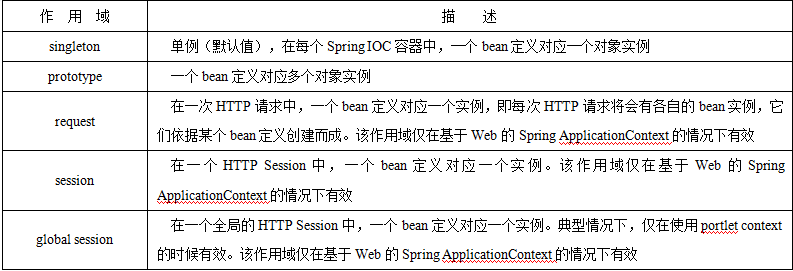
2. 作用域、条件注解和import注入方式 2.1 Spring中Bean的作用域
1
2
3
4
5
scope: singleton| prototype 执行时机(产生bean的时机): singleton:容器在初始化时,就会创建对象(唯一的一个);以后再getBean时,不再产生新的bean。singleton也支持延迟加载(懒加载):在第一次使用时产生。 @Lazy prototype:容器在初始化时,不创建对象;只是在每次使用时(每次从容器获取对象时 ,context.getBean(Xxxx)),再创建对象;并且 每次getBean()都会创建一个新的对象。
1
2
3
4
5
6
7
8
9
@Bean(value="stu") @Scope("singleton") @Lazy public Student myStudent ( Address address) { Student student = new Student (10 ,"zs10" ,23 ); System.out.println("=================address:" +address); student.setAddress(address); return student; }
2.2 条件注解 1 2 3 4 5 Spring Boot 可以让某一个Bean 在某些条件下 加入Ioc容器,其他情况下不加IoC容器。 a.准备 bean b.增加条件Bean:给每个Bean设置条件 ,必须实现Condition接口 c.根据条件,加入IoC容器
实现一个获取当前环境中传入oil energy时,分别为系统中注入该车。
1 2 3 4 5 6 7 8 9 public interface Car {} public class EnergyCar implements Car {} public class OilCar implements Car {}
1 2 3 4 5 6 7 8 9 10 11 12 13 14 public class OilCarCondition implements Condition { @Override public boolean matches (ConditionContext conditionContext, AnnotatedTypeMetadata annotatedTypeMetadata) { Environment environment = conditionContext.getEnvironment(); String carType = environment.getProperty("car.type" ); if (carType.contains("oil" )){ return true ; } return false ; } }
1
2
3
4
5
6
7
8
9
10
11
12
13
14
public class EnergyCarCondition implements Condition { @Override public boolean matches (ConditionContext conditionContext, AnnotatedTypeMetadata annotatedTypeMetadata) { Environment environment = conditionContext.getEnvironment(); String carType = environment.getProperty("car.type" ); if (carType.contains("energy" )){ return true ; } return false ; } }
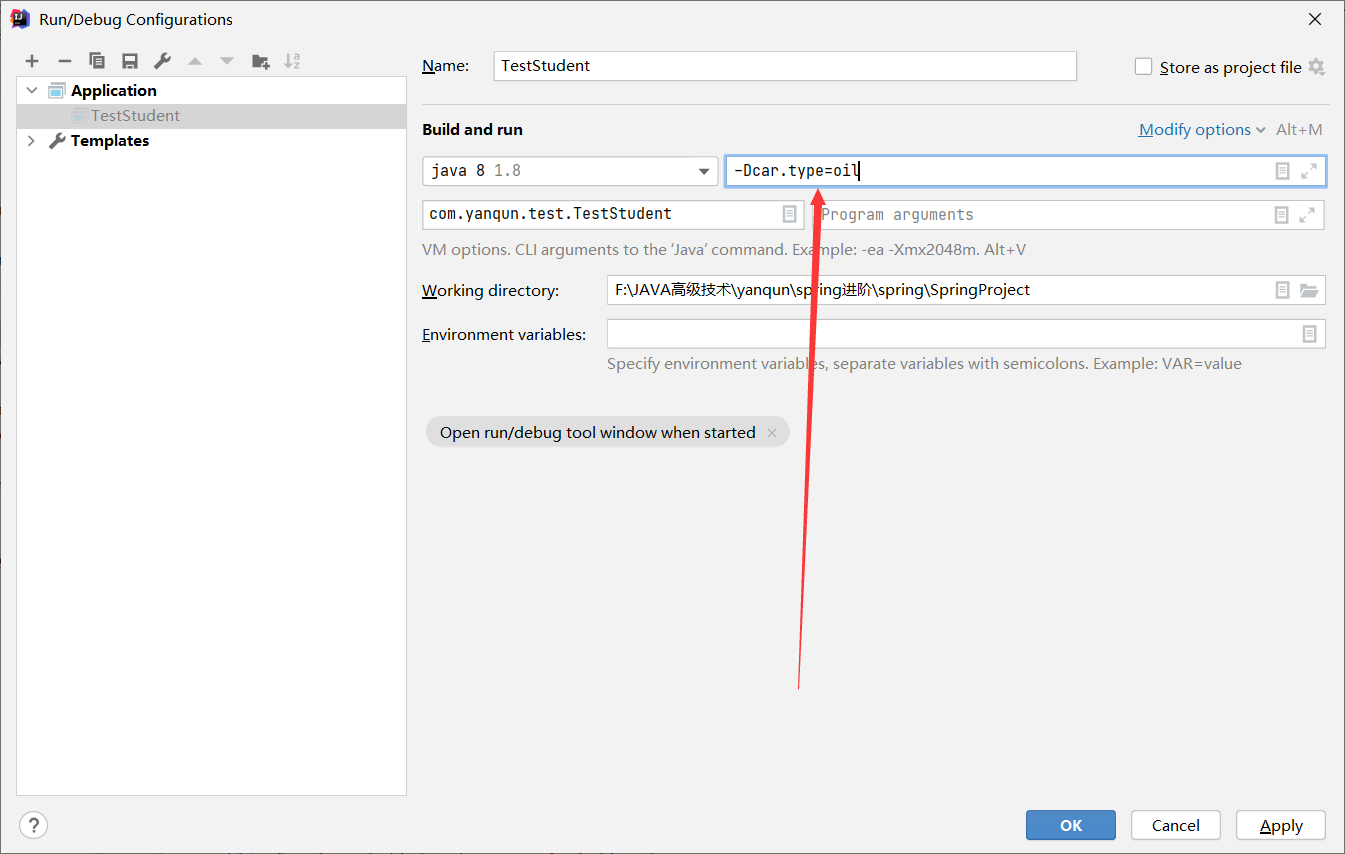
1 2 3 4 5 6 7 8 9 10 11 @Bean @Conditional(OilCarCondition.class) public Car oilCar () { return new OilCar () ; } @Bean @Conditional(EnergyCarCondition.class) public Car energyCar () { return new EnergyCar () ; }
使用IDEA增加 VM options参数
2.3 Import注入方式
回顾给IoC加入Bean的方法
@import使用:
直接编写到@Import中,并且id值是全类名
自定义ImportSelector接口的实现类,通过selectimports方法实现(方法的返回值 就是要纳入IoC容器的Bean) 。 并且 告知程序 自己编写的实现类。 @Import({Orange.class,MyImportSelector.class})
编写ImportBeanDefinitionRegistrar接口的实现类,重写方法
提前准备几个测试类
1 2 3 4 5 6 7 8 public class Apple extends Fruit {} public class Banana extends Fruit {} public class Orange {}
直接编写到@Import中
1 @Import({Apple.class,Banana.class})
自定义ImportSelector接口的实现类
1 2 3 4 5 6 7 8 9 10 @Import({Orange.class,MyImportSelector.class}) public class MyImportSelector implements ImportSelector { @Override public String[] selectImports(AnnotationMetadata importingClassMetadata) { return new String []{"com.yanqun.entity.Apple" ,"com.yanqun.entity.Banana" }; } }
编写ImportBeanDefinitionRegistrar接口的实现类
1 2 3 4 5 6 7 8 9 10 11 12 13 14 @Import({MyImportBeanDefinitionRegistrar.class}) public class MyImportBeanDefinitionRegistrar implements ImportBeanDefinitionRegistrar { @Override public void registerBeanDefinitions (AnnotationMetadata importingClassMetadata, BeanDefinitionRegistry registry) { BeanDefinition beanDefinition = new RootBeanDefinition ("com.yanqun.entity.Orange" ) ; registry.registerBeanDefinition("myorange" , beanDefinition ); } }
3. FactoryBean 1.准备bean。实现类和重写方法 2.注册bean。注册到@Bean中
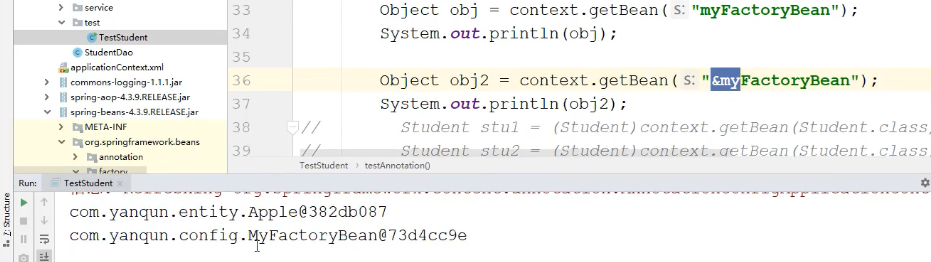
注意:需要通过&区分 获取的对象是哪一个 : 不加&,获取的是最内部真实的Apple;
如果加了&,获取的 是FacotryBean
实现方式
1 2 3 4 5 6 7 8 9 10 11 12 13 14 public class MyFactoryBean implements FactoryBean { @Override public Object getObject () throws Exception { return new Apple (); } @Override public Class<?> getObjectType() { return Apple.class; } @Override public boolean isSingleton () { return true ; } }
1 2 3 4 5 6 7 8 9 10 11 12 13 14 15 16 17 18 19 20 21 22 23 24 25 @Bean public FactoryBean<Apple> myFactoryBean () { return new MyFactoryBean (); } Object obj = context.getBean("myFactoryBean" );System.out.println(obj); 获取的是Apple类型 Object obj2 = context.getBean("&myFactoryBean" );System.out.println(obj2); 获取的是MyFactoryBean类型 源码中 public interface BeanFactory { String FACTORY_BEAN_PREFIX = "&" ;
4. Bean的生命周期 Bean的生命周期:创建(new …)、初始化(赋初值)、 ….、销毁 (servlet)
4.1 初始化销毁方法 4.1.1 通过Init和Destroy方法(适用于Bean+返回值) 方式一:XML方式
1 2 3 4 5 6 7 8 9 10 11 12 13 14 15 16 public class Student { private int stuNo ; private String stuName ; private int stuAge; private Address address ; public Student () { System.out.println("student 无参构造" ); } public void myInit () { stuName="初始化zs" ; System.out.println("init..." ); } public void myDestroy () { System.out.println("destroy..." ); }
1 2 3 4 5 6 <bean id="student" class="com.yanqun.entity.Student" scope="singleton" init-method="myInit" destroy-method="myDestroy" > <!--value:简单类型--> <property name="stuNo" value="1" ></property> <property name="stuName" value="张三" ></property> <property name="stuAge" value="23" ></property> </bean>
1 2 3 4 5 6 7 ApplicationContext context = new ClassPathXmlApplicationContext ("applicationContext.xml" );((ClassPathXmlApplicationContext) context).close(); student 无参构造 init... destroy...
方式二:注解方式
1 2 3 4 5 public Student myStudent ( Address address) { Student student = new Student (10 ,"zs10" ,23 ); return student; }
4.1.2 通过JAVA规范 JSR250(适用于三层注解方式) 1 2 3 4 5 6 7 8 三层注解 (功能性注解、MyIntToStringConverter.java):@Controller 、@Service 、@Repository 、@Component 三层注解广义上叫功能性注解(包括三层、功能性类) 三层组件: 扫描器 + 三层注解(4 个) 1. 将响应组件 加入 @Component 注解、 给初始化方法加@PostConstruct 、给销毁方法加@PreDestroy @PostConstruct :相当于4.1 .1 中的init @PreDestroy :相当于4.1 .1 中的destroy
1 2 3 4 5 6 7 8 9 10 11 12 13 14 15 16 @Component(value="myConverter") public class MyIntToStringConverter { @PostConstruct public void init () { System.out.println("转换..Init..." ); } public void myConverter () { System.out.println("转换......." ); } @PreDestroy public void destroy () { System.out.println("转换..destroy..." ); } }
4.1.3 通过实现初始化销毁接口(适用于三层注解方式) 1 2 3 4 5 InitializingBean初始化 DisposableBean 销毁 初始化:只需要 实现InitializingBean中的afterPropertiesSet()方法 销毁:实现DisposableBean 中的destroy()方法
1 2 3 4 5 6 7 8 9 10 11 12 13 14 15 @Component public class MyFunction implements InitializingBean , DisposableBean { public void myMethod () { } @Override public void afterPropertiesSet () throws Exception { System.out.println("MyFunction初始化...afterPropertiesSet" ); } @Override public void destroy () throws Exception { System.out.println("MyFunction销毁。。。destroy" ); } }
4.1.4 通过实现接口BeanPostProcessor(适用于三层注解方式) 1 接口BeanPostProcessor:拦截了所有中容器的Bean,重点不是对自己进行操作了,是对容器中其他容器全部加初始化销毁。
1 2 3 4 5 6 7 8 9 10 11 12 13 14 @Controller public class MyXxx implements BeanPostProcessor { @Override public Object postProcessBeforeInitialization (Object bean, String beanName) throws BeansException { System.out.println("初始化:" +beanName+":" +bean); return bean; } @Override public Object postProcessAfterInitialization (Object bean, String beanName) throws BeansException { System.out.println("销毁:" + beanName + ":" + bean); return bean; } }
可以通过这个进行”偷梁换柱”
1 2 3 4 5 6 7 8 9 10 11 12 13 14 15 16 17 18 19 20 21 22 @Controller public class MyXxx implements BeanPostProcessor { @Override public Object postProcessBeforeInitialization (Object bean, String beanName) throws BeansException { if (bean instanceof Student){ System.out.println("MyXxx...初始化.." ); Student stu = (Student)bean ; stu.setStuName("zs123456" ); stu.setStuNo(123 ); return stu ; } return bean; } @Override public Object postProcessAfterInitialization (Object bean, String beanName) throws BeansException { if (bean instanceof Student) { System.out.println("MyXxx...销毁.." ); } return bean; } }
5. 三种方式的注解注入 5.1 @Autowired 三层注解方式
1 2 3 4 5 6 7 8 9 10 11 12 13 14 15 16 17 18 19 @Service("stuService") public class StudentService { @Autowired private StudentDao studentDao ; @Autowired public void setStudentDao ( StudentDao studentDao) { System.out.println("***************************111111-" ); this .studentDao = studentDao; } } -三层注解方式不能放在方法的参数前!!! 直接报错
如果有0个类型相同,默认报错;可以修改成不注入(null),@Autowired(required=false)
当有多个类型实例时
1 2 3 4 5 6 7 8 9 10 11 12 13 14 15 16 17 18 19 20 21 22 23 24 25 26 27 public interface StudentDao {} @Repository("stuDao1") public class StudentDaoImpl1 implements StudentDao {} @Repository("stuDao2") public class StudentDaoImpl2 implements StudentDao {} @Service("stuService") public class StudentService { @Qualifier("stuDao2") @Autowired private StudentDao studentDao ; } @Primary @Repository("stuDao1") public class StudentDaoImpl1 implements StudentDao {}
1 2 3 4 5 6 7 8 9 10 11 方法前 (构造方法:特殊,如果只有一个有参构造方法,则构造方法前的@Autowired 也可以省略) @Service("stuService") public class StudentService { private StudentDao studentDao ; public StudentService (StudentDao studentDao,String xxx) { this .studentDao= studentDao ; } }
Bean+返回值
1 2 3 4 5 6 7 8 9 10 11 Bean+返回值 @Autowired 可以放在方法的参数前自动从容器中找。 @Bean public Student myStudent ( @Autowired Address address) { Student student = new Student (10 ,"zs10" ,23 ); return student; @Bean public Address address1 () { Address address = new Address ("xa02" ,"bj02" ) ; return address ; }
5.2 @Resource(JSR250), 默认根据名字 (如果 有名字,根据名字匹配;如果没有名字,先根据名字查找,如果没找到,再根据类型查找);也可以通过name或type属性 指定根据名字 或类型找。
1 2 3 4 5 6 7 8 9 10 11 12 @Service("stuService") public class StudentService { @Resource private StudentDao studentDao ; }
5.3 @Inject(JSR330) 1 2 3 4 5 6 7 8 @Service("stuService") public class StudentService { @Inject private StudentDao studentDao ; }
6. 通过用Aware接口使用Spring底层组件 1 2 3 4 5 6 7 8 ---利用Spring底层组件进行开发 (三层组件) 能够供我们使用的组件,都是Aware的子接口,即XxxxAware 以ApplicationContextAware为例:实现步骤 a.实现ApplicationContextAware, b.重写其中的方法,都包含了一个对象。只需要将该对象 赋值到属性中即可 有什么用:例如ApplicationContextAware,可以通过该接口 获取到Ioc容器对象。 执行时间: 如果在main()中new Ioc 容器: 先执行ApplicationContextAware实现类中的方法,通过该方法传入IoC容器 供我们自己使用; 然后再将该容器通过new 返回给用户
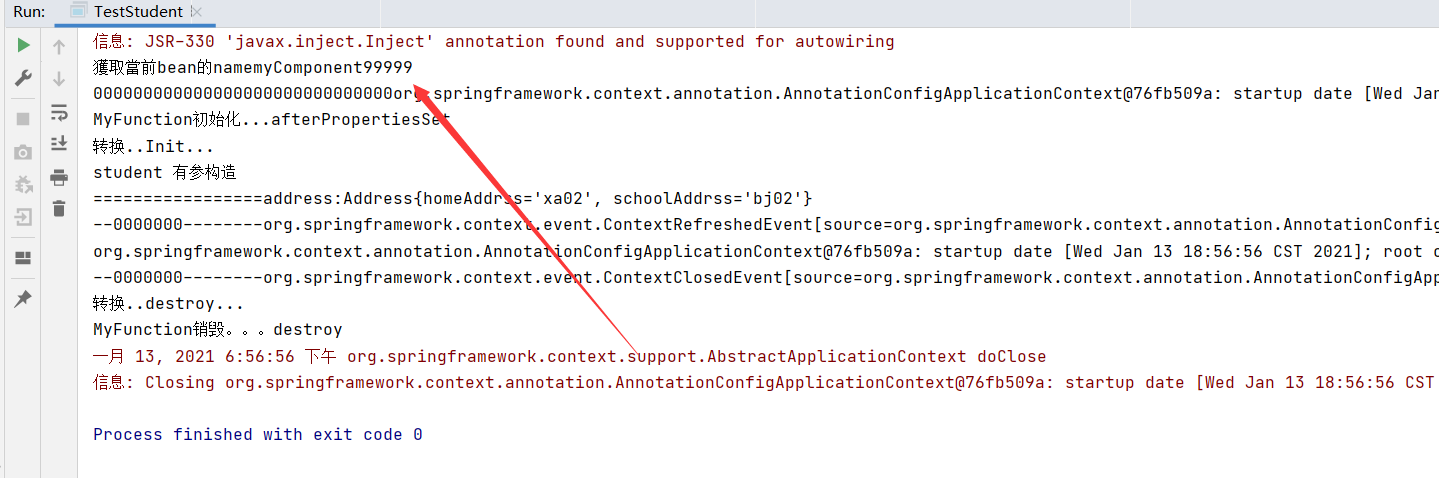
1 2 3 4 5 6 7 8 9 10 11 12 13 14 程序在加载时,首先会看有没有这个组件ApplicationContextAware的实现类,如果有先放如setApplicationContext中,最终在传递出去。 @Component public class MyComponent implements ApplicationContextAware { private ApplicationContext applicationContext; @Override public void setApplicationContext (ApplicationContext applicationContext) throws BeansException { System.out.println("000000000000000000000000000000" +applicationContext); this .applicationContext= applicationContext ; } } AnnotationConfigApplicationContext context = new AnnotationConfigApplicationContext (MyConfig.class) ; System.out.println(context+"9999999999999999999" );
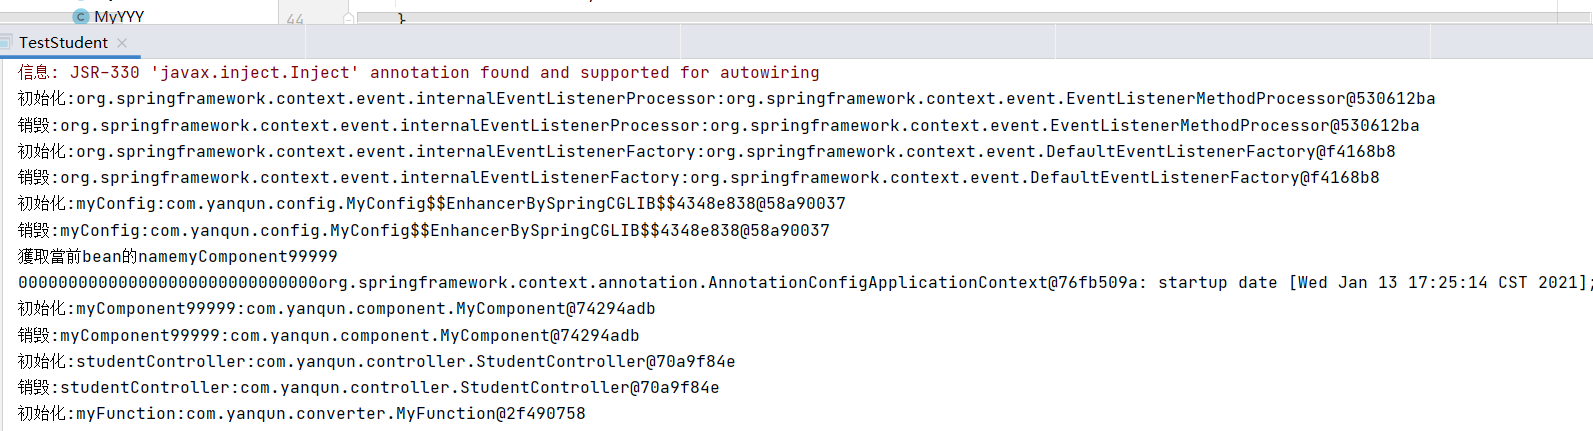
BeanNameAware
1 2 3 4 5 6 7 8 9 10 11 12 13 14 15 16 17 18 @Component("myComponent99999") public class MyComponent implements ApplicationContextAware , BeanNameAware { private ApplicationContext applicationContext; private String beanName ; @Override public void setApplicationContext (ApplicationContext applicationContext) throws BeansException { System.out.println("000000000000000000000000000000" +applicationContext); this .applicationContext= applicationContext ; } @Override public void setBeanName (String name) { System.out.println("獲取當前bean的name" +name); this .beanName = name ; } }
6.1 环境切换 1 2 3 -Dspring.profiles.active =@Profile环境名 -Dspring.profiles.active =myApple
1 2 3 4 5 6 7 8 9 10 11 12 13 14 15 16 17 18 19 @Profile("myApple") @Bean("apple") public Fruit apple () { return new Apple () ; } @Profile("myBanana") @Bean("banana") public Fruit banana () { return new Banana () ; } Object apple = context.getBean("apple" ); System.out.println("------------" +apple); Object banana = context.getBean("banana" ); System.out.println("------------" +banana);
1 2 3 4 5 6 7 8 9 10 11 12 13 14 15 16 17 # 激活方式一: 其中AnnotationConfigApplicationContext中有一个refresh()操作:会将我们设置的一些参数还原 没激活 |->进行激活 ->刷新 ->没激活 什么时候设置 保存点|: 配置类的编写处 IoC容器在使用时必须refresh() ;如果是有参构造,内部已经刷新;如果无参构造,需要手工刷新。 ConfigurableEnvironment environment = (ConfigurableEnvironment)context.getEnvironment(); environment.setActiveProfiles("myBanana" ); context.register(MyConfig.class); context.refresh(); Object banana = context.getBean("banana" ); System.out.println("------------" +banana);
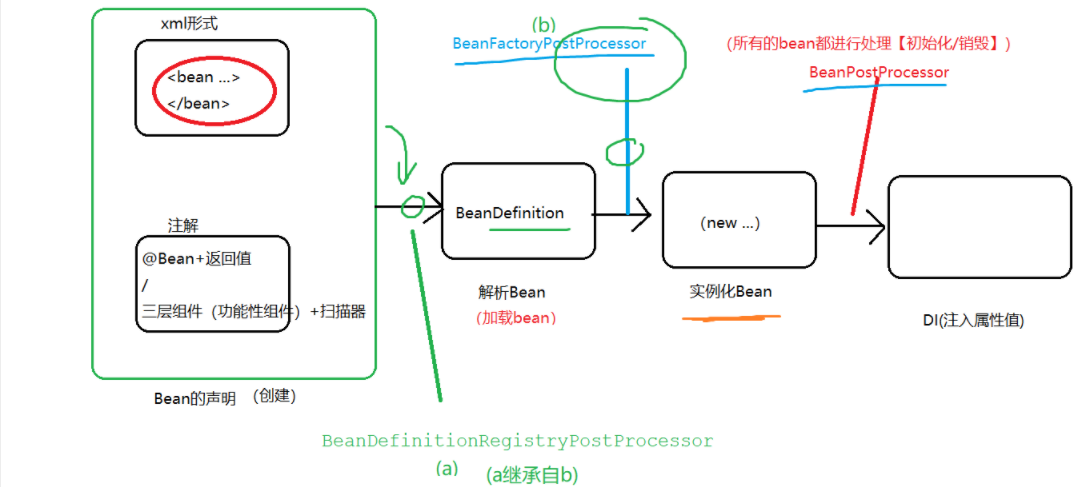
7. BeanFactoryPostProcessor和BeanDefinitionRegistryPostProcessor
1 2 3 4 接口BeanPostProcessor:拦截了所有中容器的Bean,并且可以进行bean的初始化 、销毁 BeanFactoryPostProcessor:拦截了容器 BeanDefinitionRegistryPostProcessor:即将被加载之前(解析之前,称为BeanDefination对象之前)
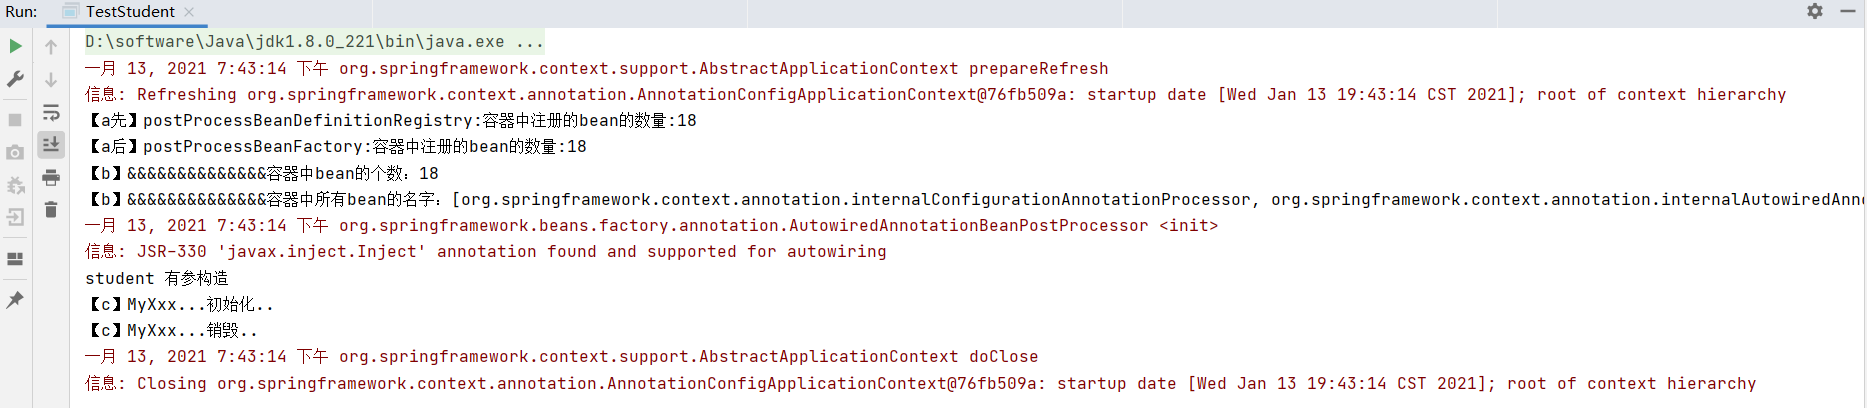
1 2 3 4 5 6 7 8 9 10 11 12 13 14 15 16 17 18 public class MyZZZ implements BeanDefinitionRegistryPostProcessor { @Override public void postProcessBeanFactory (ConfigurableListableBeanFactory beanFactory) throws BeansException { System.out.println("【a后】postProcessBeanFactory:容器中注册的bean的数量:" +beanFactory.getBeanDefinitionCount()); } @Override public void postProcessBeanDefinitionRegistry (BeanDefinitionRegistry registry) throws BeansException { System.out.println("【a先】postProcessBeanDefinitionRegistry:容器中注册的bean的数量:" +registry.getBeanDefinitionCount()); } }
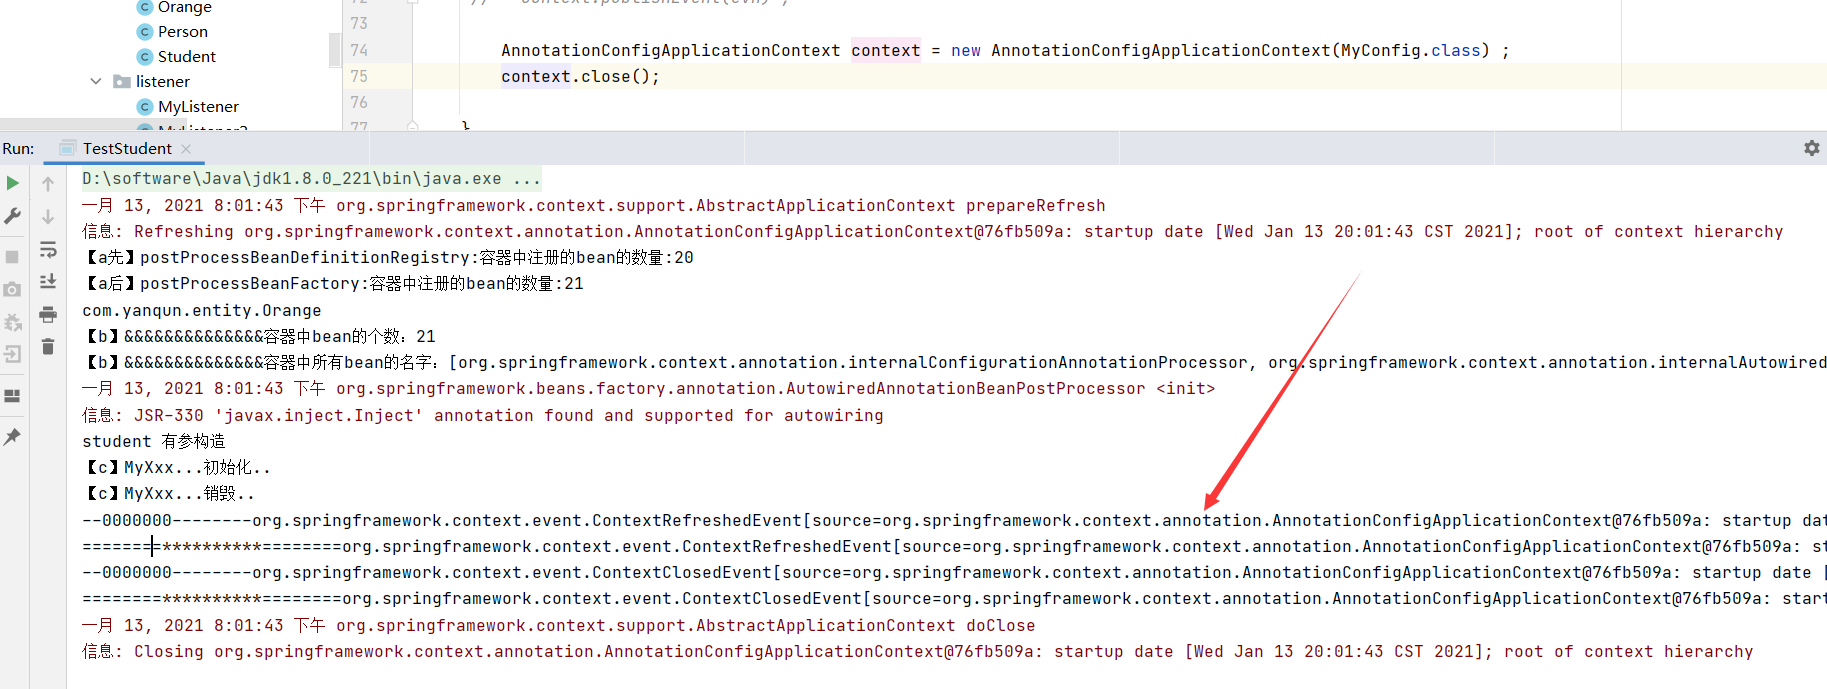
1 2 3 4 5 6 7 8 9 10 11 12 13 14 15 16 17 18 19 20 21 22 23 24 25 26 27 28 29 30 31 32 33 34 35 36 37 38 39 40 41 42 43 @Component public class MyYYY implements BeanFactoryPostProcessor { @Override public void postProcessBeanFactory (ConfigurableListableBeanFactory beanFactory) throws BeansException { int count = beanFactory.getBeanDefinitionCount(); System.out.println("【b】&&&&&&&&&&&&&&容器中bean的个数:" +count); String[] names = beanFactory.getBeanDefinitionNames(); System.out.println("【b】&&&&&&&&&&&&&&容器中所有bean的名字:" +Arrays.asList( names ) ); } } @Controller public class MyXxx implements BeanPostProcessor { @Override public Object postProcessBeforeInitialization (Object bean, String beanName) throws BeansException { if (bean instanceof Student){ System.out.println("【c】MyXxx...初始化.." ); Student stu = (Student)bean ; stu.setStuName("zs123456" ); stu.setStuNo(123 ); return stu ; } return bean; } @Override public Object postProcessAfterInitialization (Object bean, String beanName) throws BeansException { if (bean instanceof Student) { System.out.println("【c】MyXxx...销毁.." ); } return bean; } } @Bean(value="stu") public Student myStudent ( Address address) { Student student = new Student (10 ,"zs10" ,23 ); return student; }
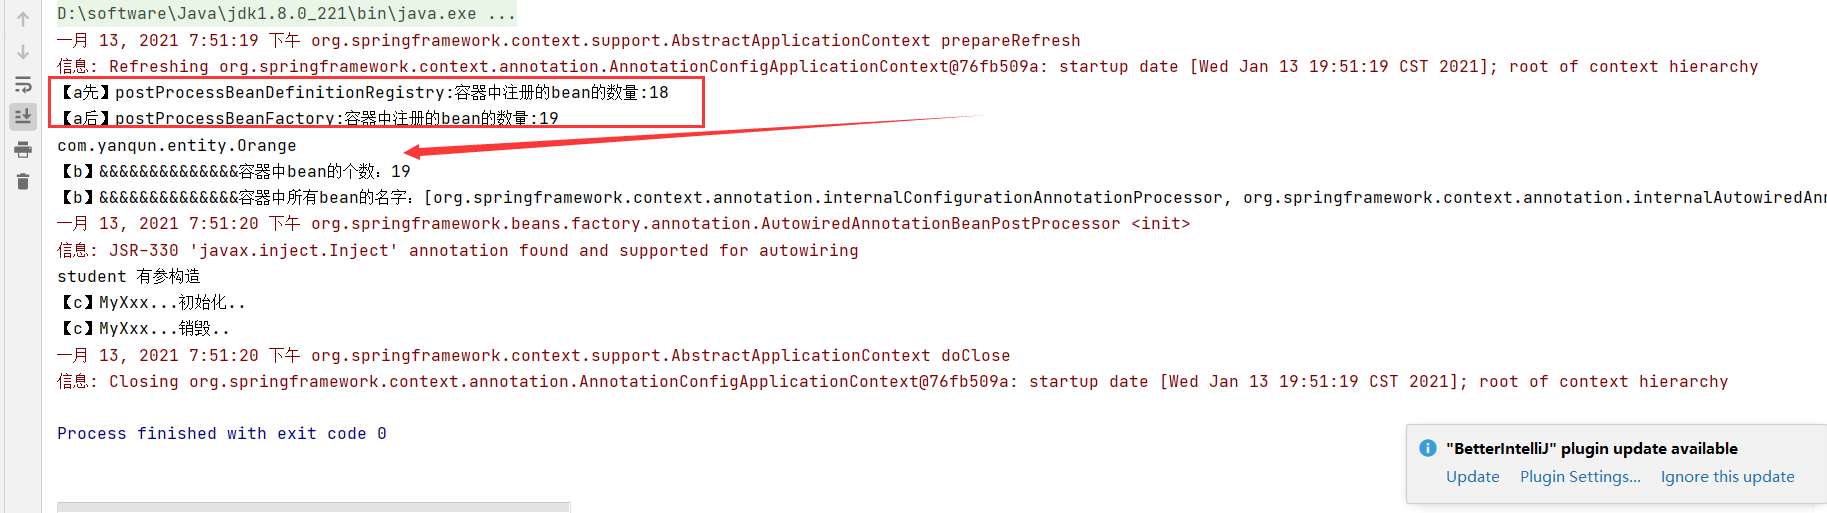
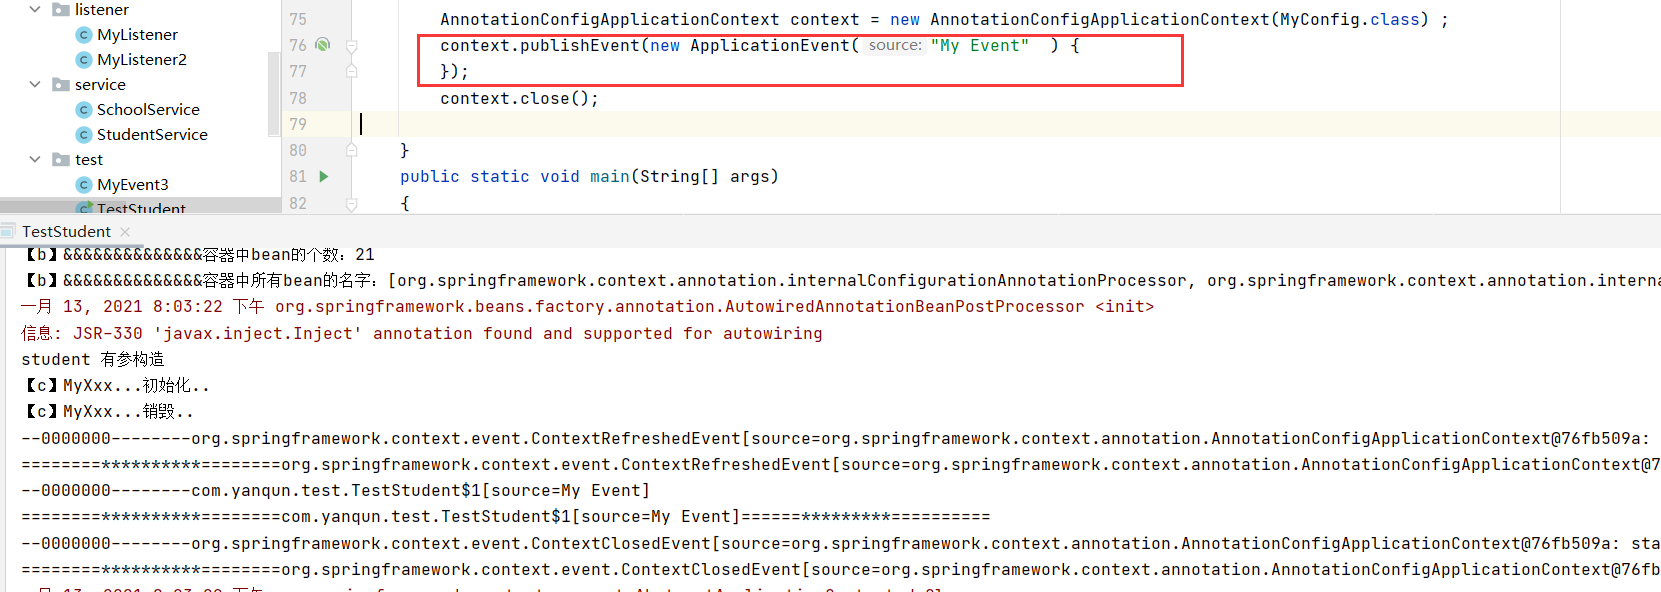
8. 自定义事件发布 1 2 3 4 5 6 7 8 9 10 11 12 13 14 15 16 17 18 19 20 21 22 23 24 25 26 27 28 29 public class Orange {} @Component public class MyZZZ implements BeanDefinitionRegistryPostProcessor { @Override public void postProcessBeanFactory (ConfigurableListableBeanFactory beanFactory) throws BeansException { System.out.println("【a后】postProcessBeanFactory:容器中注册的bean的数量:" +beanFactory.getBeanDefinitionCount()); Object myBean = beanFactory.getBean("myBean" ); System.out.println( myBean.getClass().getName() ); } @Override public void postProcessBeanDefinitionRegistry (BeanDefinitionRegistry registry) throws BeansException { System.out.println("【a先】postProcessBeanDefinitionRegistry:容器中注册的bean的数量:" +registry.getBeanDefinitionCount()); BeanDefinitionBuilder beanDefinitionBuilder = BeanDefinitionBuilder.rootBeanDefinition(Orange.class); registry.registerBeanDefinition("myBean" , beanDefinitionBuilder.getBeanDefinition()); } }
8.1 监听器 可以监听事件 ,监听的对象必须是 ApplicationEvent自身或其子类/子接口
方式一:必须实现ApplicationListener接口,
1 2 3 4 5 6 7 8 @Component public class MyListener implements ApplicationListener { @Override public void onApplicationEvent (ApplicationEvent event) { System.out.println("========**********========" +event+"======*********==========" ); } }
方式二:注解
1 2 3 4 5 6 7 8 @Component public class MyListener2 { @EventListener(classes = {ApplicationEvent.class}) public void myListenerMethod (ApplicationEvent event) { System.out.println("--0000000--------" +event); } }
自定被监听事件