ActiveMQ中级篇 1. JMS规范和落地产品 1.1 JavaEE是什么 JavaEE是一套使用Java进行企业级应用开发的大家一致遵循的13个核心规范工业标准。JavaEE平台提供了一个基于组件的方法来加快设计,开发。装配及部署企业应用程序。
JDBC(Java Databease)数据库连接
JNDI(Java Naming and Directory Interfaces)Java的命令和目录接口
EJB(Enterprise JavaBean)
RMI(Remote Method Invoke)远程方法调用
Java IDL(Interface Description Language)/CORBA(Common Object Broker Architecture)接口定义语言/共用对象请求代理程序体系结构
JSP(Java Server Page)
Servlet
XML(Extensible Markup Language)可标记白标记语言
JMS(Java Message Service)Java消息服务
JTA(Java Transaction API)Java事务API
JTS(Java Transaction Service)Java事务服务
JavaMail
JAF(JavaBean Activation Framework)
1.2 JMS Java Message Service(Java消息服务是JavaEE中的一个技术
什么是Java消息服务
Java消息服务指的是两个应用程序之间进行异步通信的API,它为标准协议和消息服务提供了一组通用接口,包括创建、发送、读取消息等,用于支持Java应用程序开发。在JavaEE中,当两个应用程序使用JMS进行通信时,它们之间不是直接相连的,而是通过一个共同的消息收发服务组件关联起来以达到解耦/异步削峰的效果。
1.3 JMS的组成结构和特点
JMS Provider:实现JMS接口和规范的消息中间件,也就是我们说的MQ服务器
JMS Producer:消息生产者,创建和发送JMS消息的客户端应用
JMS Consumer:消息消费者,接收和处理JMS消息的客户端应用
JSM Message:消息头、消息体、消息属性
消息头 JMSDestination :消息发送的目的地,主要是指Queue和Topic
JMSDeliveryMode :持久模式和非持久模式。
一条持久性的消息:应该被传送“一次仅仅一次”,这就意味着如果JMS提供者出现故障,该消息并不会丢失,它会在服务器恢复之后再次传递。
一条非持久的消息:最多会传递一次,这意味着服务器出现故障,该消息将会永远丢失。
JMSExpiration :可以设置消息在一定时间后过期,默认是永不过期
消息过期时间,等于Destination的send方法中的timeToLive值加上发送时刻的GMT时间值。
如果timeToLive值等于0,则JMSExpiration被设为0,表示该消息永不过期。
如果发送后,在消息过期时间之后还没有被发送到目的地,则该消息被清除。
JMSPriority :消息优先级,从0-9十个级别,0-4是普通消息5-9是加急消息。
JMS不要求MQ严格按照这十个优先级发送消息但必须保证加急消息要先于普通消息到达。默认是4级。
JMSMessageID :唯一标识每个消息的标识由MQ产生。
设置方式1
https://image.zxrmrf.com/x/mq23.jpg )
设置方式2
https://zh
消息体 封装具体的消息数据
5种消息格式
TxtMessage:普通字符串消息,包含一个String
MapMessage:一个Map类型的消息,key为Strng类型,而值为Java基本类型
BytesMessage:二进制数组消息,包含一个byte[]
StreamMessage:Java数据流消息,用标准流操作来顺序填充和读取
ObjectMessage:对象消息,包含一个可序列化的Java对象
发送和接收的消息体类型必须一致对应
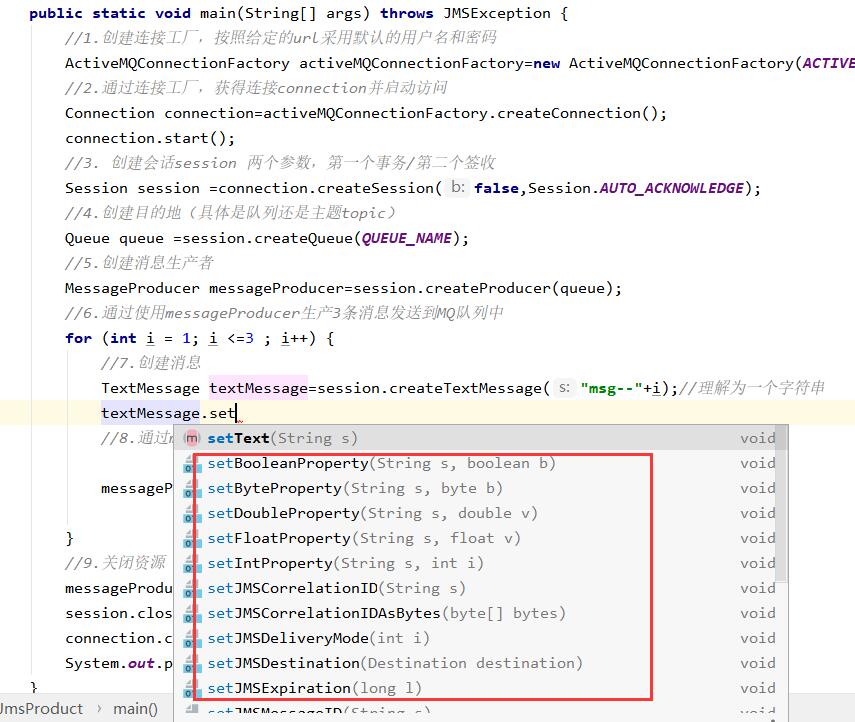
消息属性
如果需要除消息字段以外的值,那么可以使用消息属性
识别/去重/重点标注等操作非常有用的方法
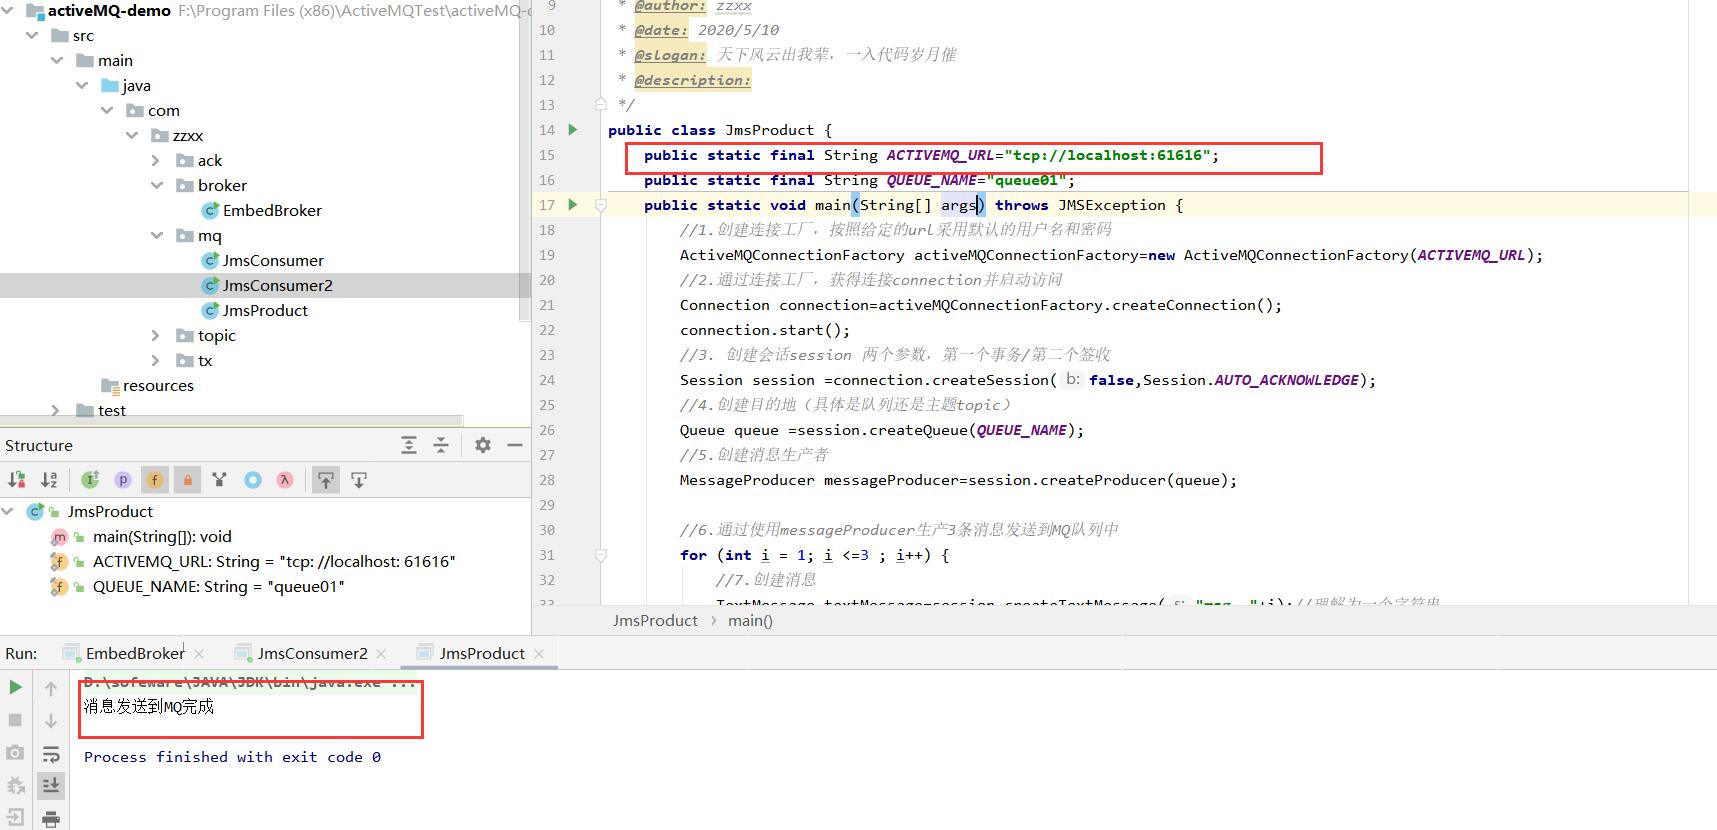
测试(直接测试消息体与消息属性) 消息生产者 1 2 3 4 5 6 7 8 9 10 11 12 13 14 15 16 17 18 19 20 21 22 23 24 25 26 27 28 29 30 31 32 33 34 35 36 37 38 39 40 41 42 43 44 45 46 47 48 49 50 51 52 package com.zzxx.mq;import org.apache.activemq.ActiveMQConnectionFactory;import javax.jms.*;public class JmsProduct { public static final String ACTIVEMQ_URL="tcp://39.97.251.40:61616" ; public static final String QUEUE_NAME="queue01" ; public static void main (String[] args) throws JMSException { ActiveMQConnectionFactory activeMQConnectionFactory=new ActiveMQConnectionFactory (ACTIVEMQ_URL); Connection connection=activeMQConnectionFactory.createConnection(); connection.start(); Session session = connection.createSession(false ,Session.AUTO_ACKNOWLEDGE); Queue queue = session.createQueue(QUEUE_NAME); MessageProducer messageProducer=session.createProducer(queue); for (int i = 1 ; i <=3 ; i++) { TextMessage textMessage=session.createTextMessage("msg--" +i); textMessage.setStringProperty("co1" ,"vip" ); MapMessage mapMessage=session.createMapMessage(); mapMessage.setString("k1" ,"mapMessage-----v1" ); messageProducer.send(textMessage); messageProducer.send(mapMessage); } messageProducer.close(); session.close(); connection.close(); System.out.println("消息发送到MQ完成" ); } }
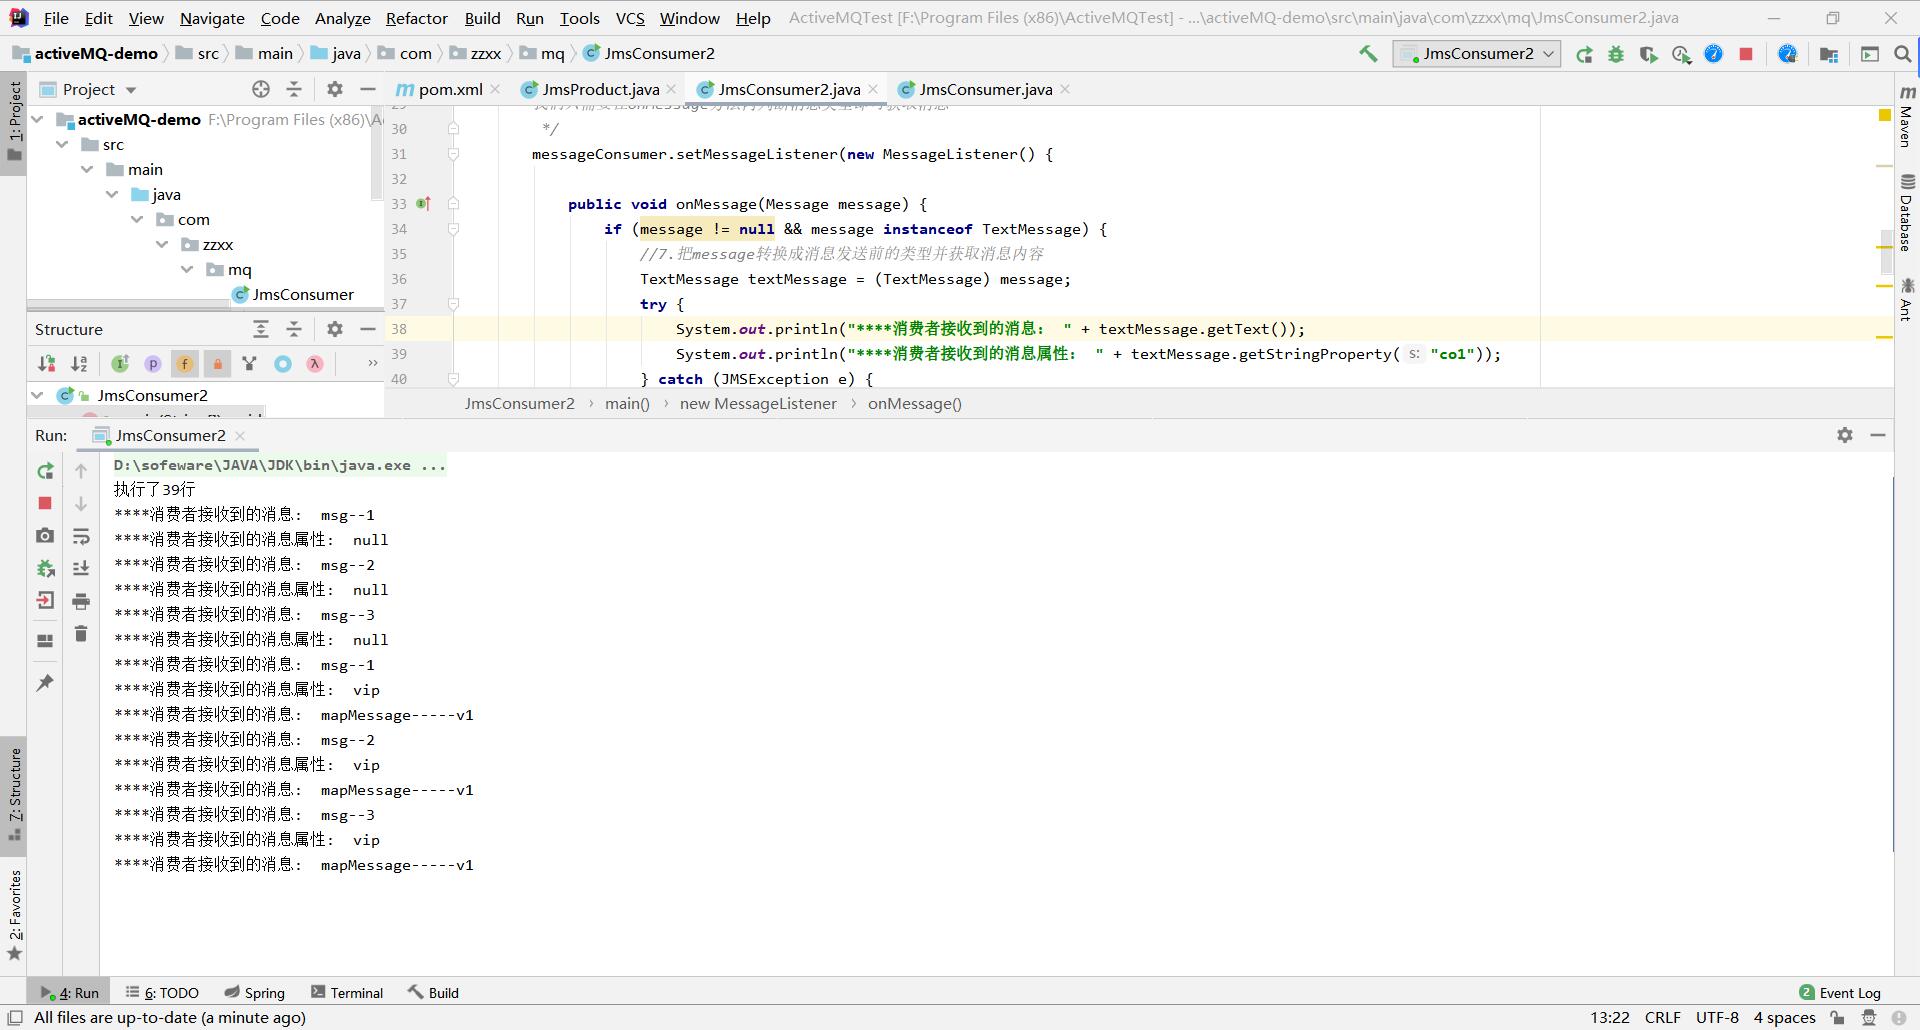
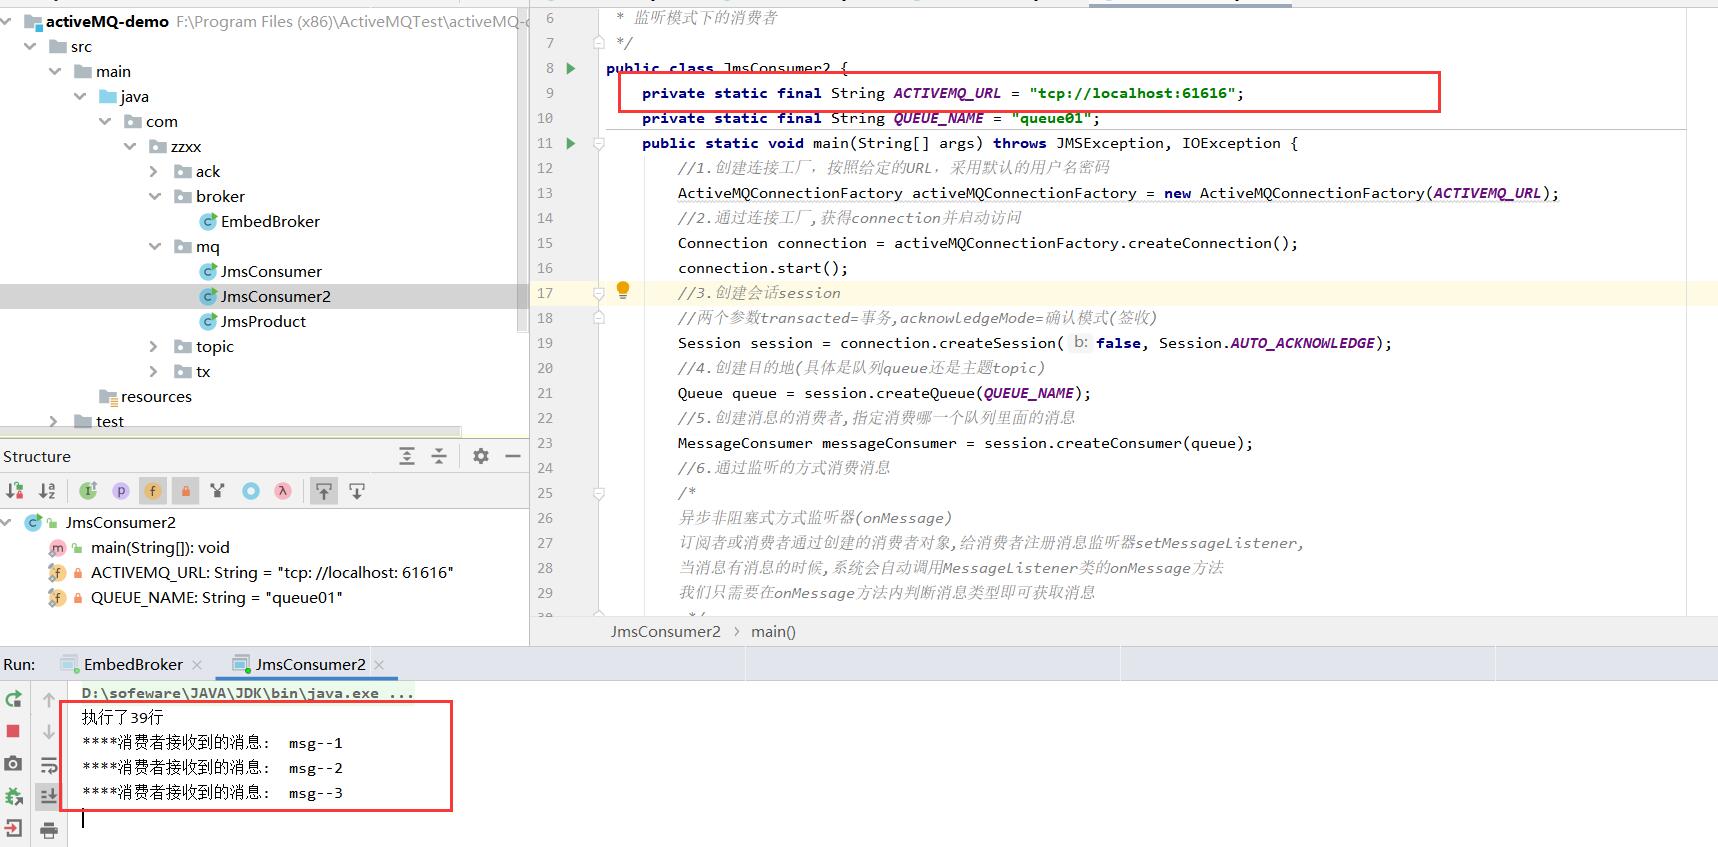
消息消费者 1 2 3 4 5 6 7 8 9 10 11 12 13 14 15 16 17 18 19 20 21 22 23 24 25 26 27 28 29 30 31 32 33 34 35 36 37 38 39 40 41 42 43 44 45 46 47 48 49 50 51 52 53 54 55 56 57 58 59 60 61 62 63 64 package com.zzxx.mq;import org.apache.activemq.ActiveMQConnectionFactory;import javax.jms.*;import java.io.IOException;public class JmsConsumer2 { private static final String ACTIVEMQ_URL = "tcp://39.97.251.40:61616" ; private static final String QUEUE_NAME = "queue01" ; public static void main (String[] args) throws JMSException, IOException { ActiveMQConnectionFactory activeMQConnectionFactory = new ActiveMQConnectionFactory (ACTIVEMQ_URL); Connection connection = activeMQConnectionFactory.createConnection(); connection.start(); Session session = connection.createSession(false , Session.AUTO_ACKNOWLEDGE); Queue queue = session.createQueue(QUEUE_NAME); MessageConsumer messageConsumer = session.createConsumer(queue); messageConsumer.setMessageListener(new MessageListener () { public void onMessage (Message message) { if (message != null && message instanceof TextMessage) { TextMessage textMessage = (TextMessage) message; try { System.out.println("****消费者接收到的消息: " + textMessage.getText()); System.out.println("****消费者接收到的消息属性: " + textMessage.getStringProperty("co1" )); } catch (JMSException e) { e.printStackTrace(); } } if (message != null && message instanceof MapMessage) { MapMessage mapMessage = (MapMessage) message; try { System.out.println("****消费者接收到的消息: " + mapMessage.getString("k1" )); } catch (JMSException e) { e.printStackTrace(); } } } }); System.out.println("执行了39行" ); System.in.read(); messageConsumer.close(); session.close(); connection.close(); } }
执行结果
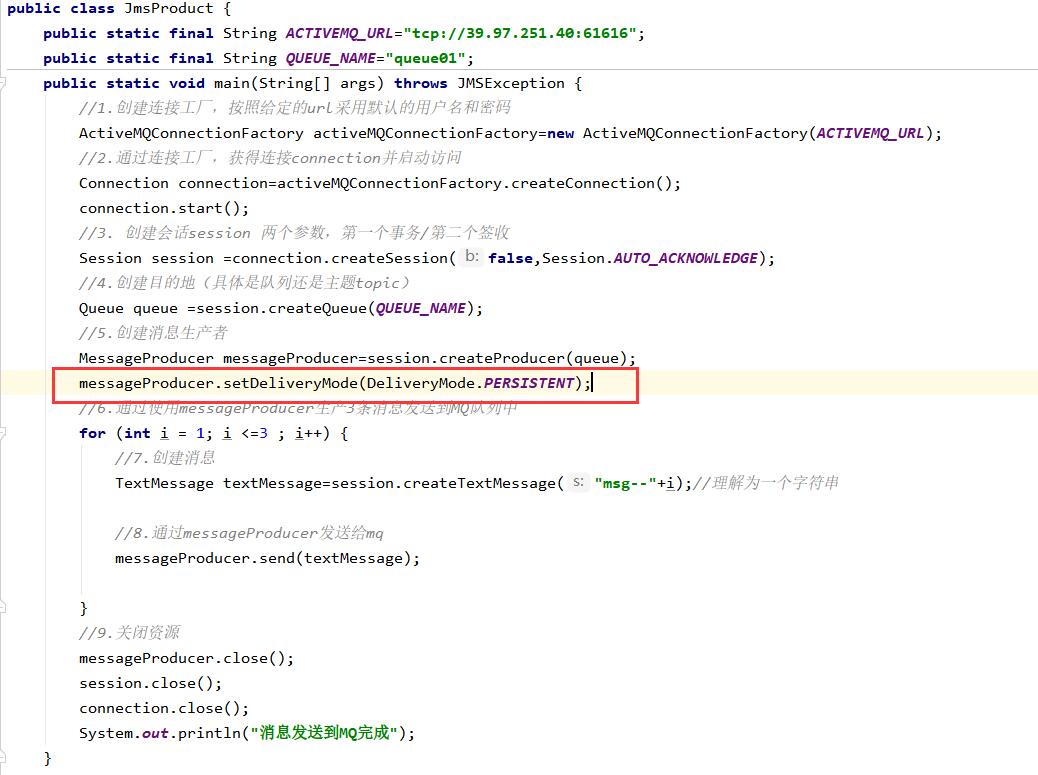
1.4 JMS的可靠性 PERSISTENT:持久性 参数设置说明
非持久:当服务器宕机,消息不存在。
messageProducer.setDeliveryMode(DeliveryMode.NON_PERSISTENT)
持久:当服务器宕机,消息依然存在。
messageProducer.setDeliveryMode(DeliveryMode.PERSISTENT)
Queue默认是持久 订阅者在线
订阅者不在线
持久化消息
这是队列的默认传递模式,此模式保证这些消息只被传送一次和成功使用一次。对于这些消息,可靠性是优先考虑的因素。
可靠性的另一个重要方面是确保持久性消息传送至目标后,消息服务在向消费者传送它们之前不会丢失这些消息。
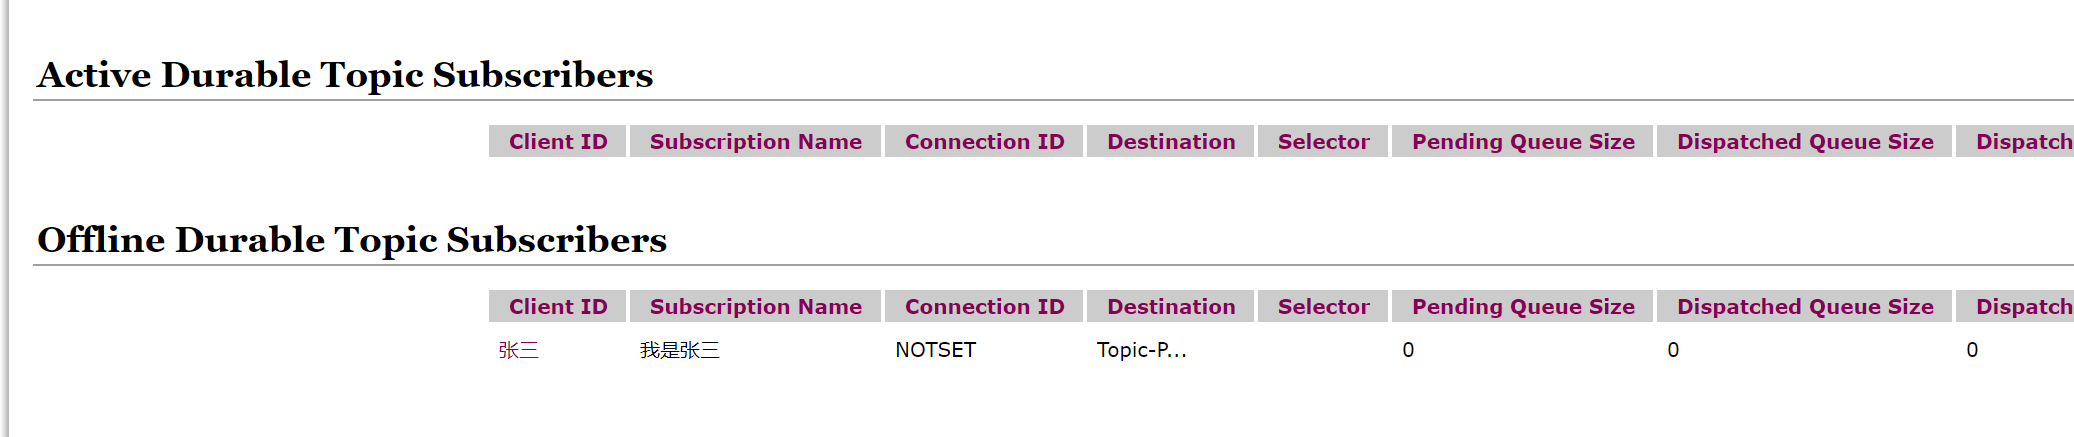
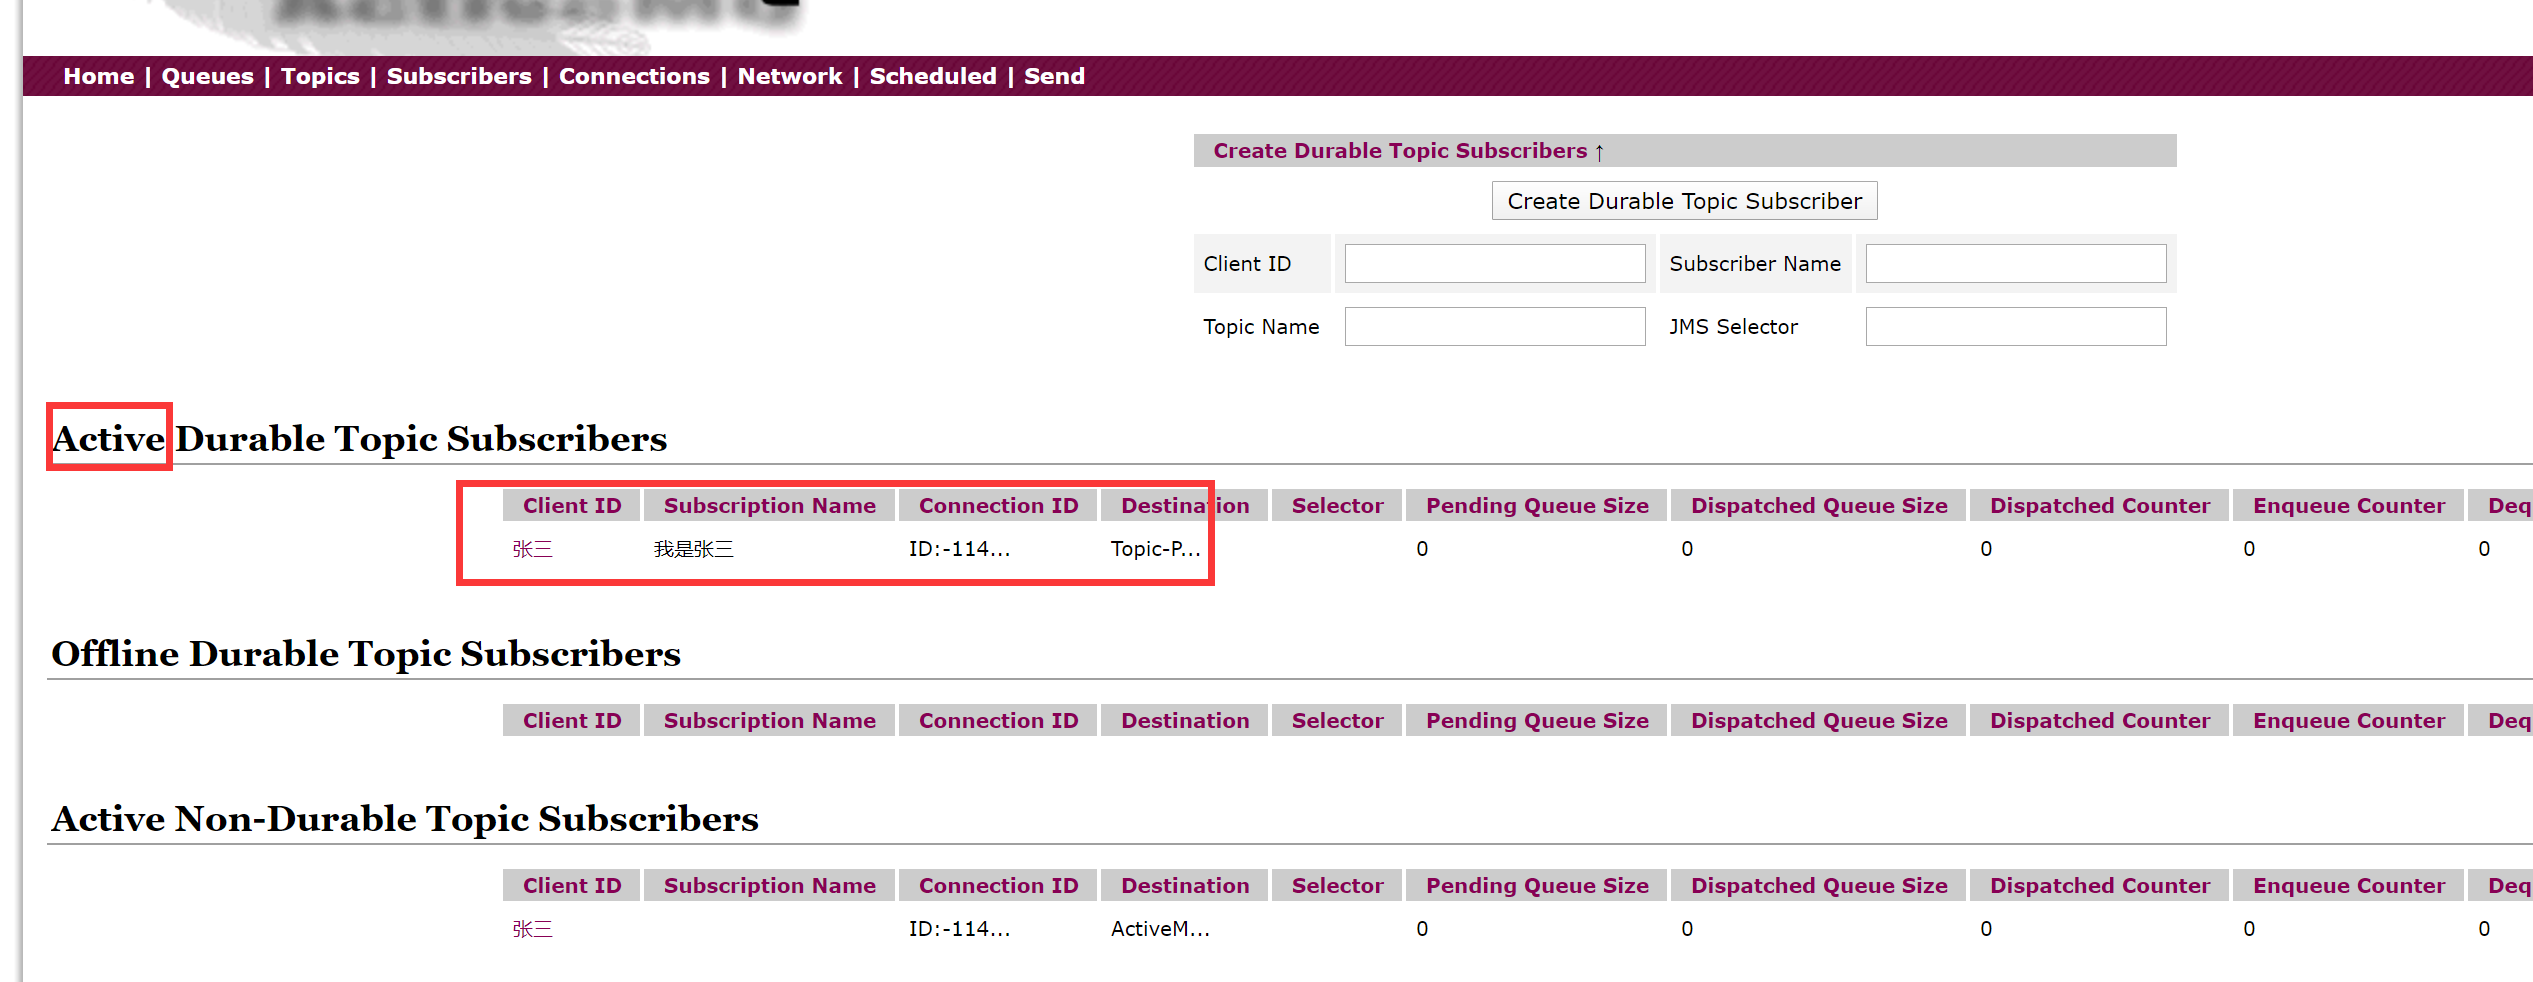
持久的Topic 先启动定阅消费者再启动定阅生产者
1 2 3 4 5 6 7 8 9 10 11 12 13 14 15 16 17 18 19 20 21 22 23 24 25 26 27 28 29 30 31 32 33 34 35 36 37 38 39 40 41 42 43 44 45 46 package com.zzxx.activemq.persist;import org.apache.activemq.ActiveMQConnectionFactory;import javax.jms.*;public class JmsProducer_Topic_Persist { private static final String ACTIVEMQ_URL = "tcp://192.168.10.130:61616" ; private static final String ACTIVEMQ_TOPIC_NAME = "Topic-Persist" ; public static void main (String[] args) throws JMSException { ActiveMQConnectionFactory activeMQConnectionFactory = new ActiveMQConnectionFactory (ACTIVEMQ_URL); Connection connection = activeMQConnectionFactory.createConnection(); Session session = connection.createSession(false , Session.AUTO_ACKNOWLEDGE); Topic topic = session.createTopic(ACTIVEMQ_TOPIC_NAME); MessageProducer messageProducer = session.createProducer(topic); messageProducer.setDeliveryMode(DeliveryMode.PERSISTENT); connection.start(); for (int i = 0 ; i < 3 ; i++) { TextMessage textMessage = session.createTextMessage("msg-persist" + i); messageProducer.send(textMessage); } messageProducer.close(); session.close(); connection.close(); System.out.println("****TOPIC_NAME消息发布到MQ完成" ); } }
1 2 3 4 5 6 7 8 9 10 11 12 13 14 15 16 17 18 19 20 21 22 23 24 25 26 27 28 29 30 31 32 33 34 35 36 37 38 39 40 41 42 43 44 45 46 47 48 49 50 package com.zzxx.activemq.persist;import org.apache.activemq.ActiveMQConnectionFactory;import javax.jms.*;import java.io.IOException;public class Jms_Topic_Consumer_Persist { private static final String ACTIVEMQ_URL = "tcp://192.168.10.130:61616" ; private static final String ACTIVEMQ_TOPIC_NAME = "Topic-Persist" ; public static void main (String[] args) throws JMSException, IOException { System.out.println("我是3号消费者王五" ); ActiveMQConnectionFactory activeMQConnectionFactory = new ActiveMQConnectionFactory (ACTIVEMQ_URL); Connection connection = activeMQConnectionFactory.createConnection(); connection.setClientID("王五" ); Session session = connection.createSession(false , Session.AUTO_ACKNOWLEDGE); Topic topic = session.createTopic(ACTIVEMQ_TOPIC_NAME); TopicSubscriber topicSubscriber = session.createDurableSubscriber(topic, "我是王五" ); connection.start(); topicSubscriber.setMessageListener(message -> { if (message instanceof TextMessage) { TextMessage textMessage = (TextMessage) message; try { System.out.println("收到的持久化订阅消息: " + textMessage.getText()); } catch (JMSException e) { e.printStackTrace(); } } }); } }
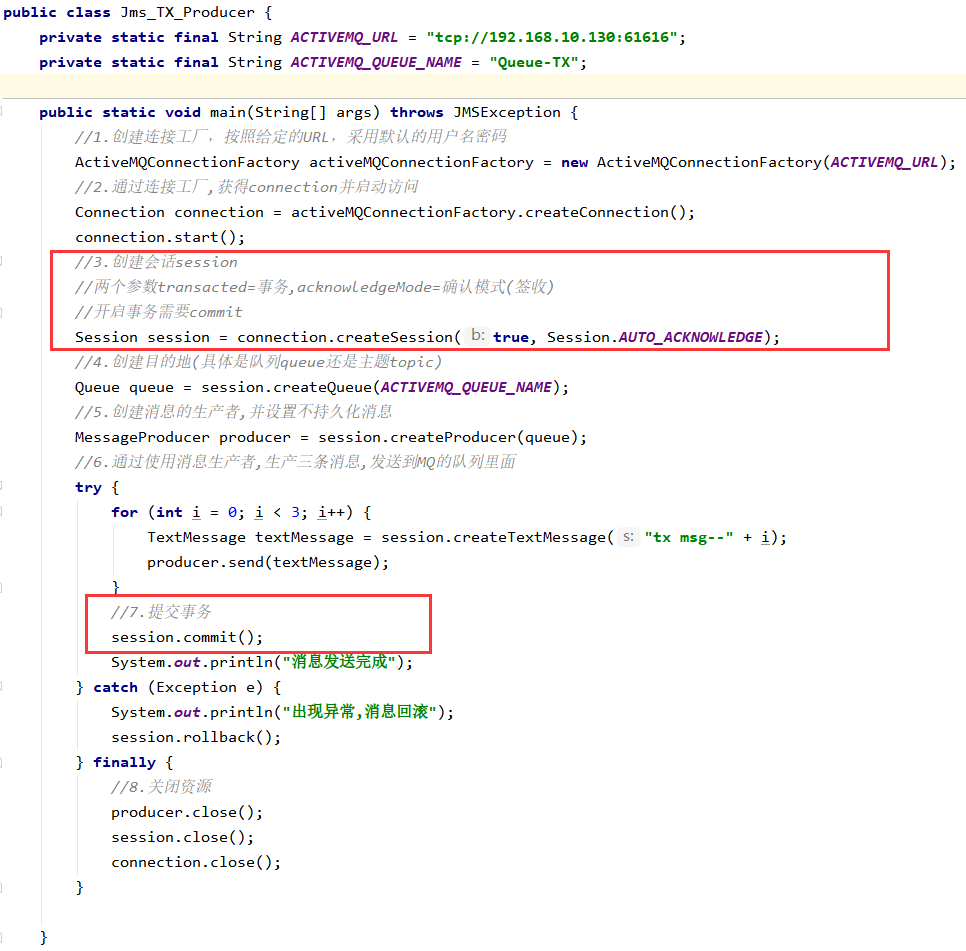
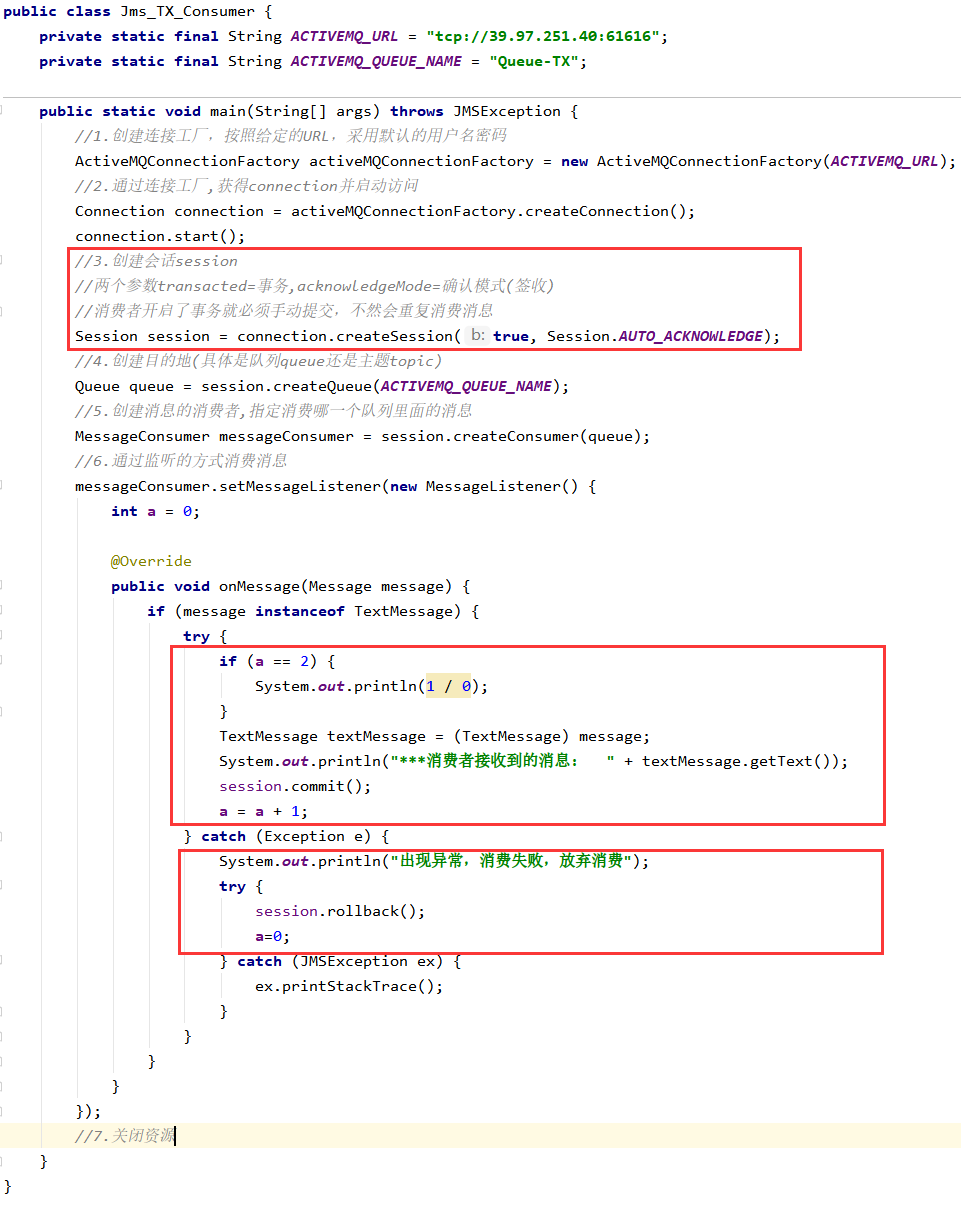
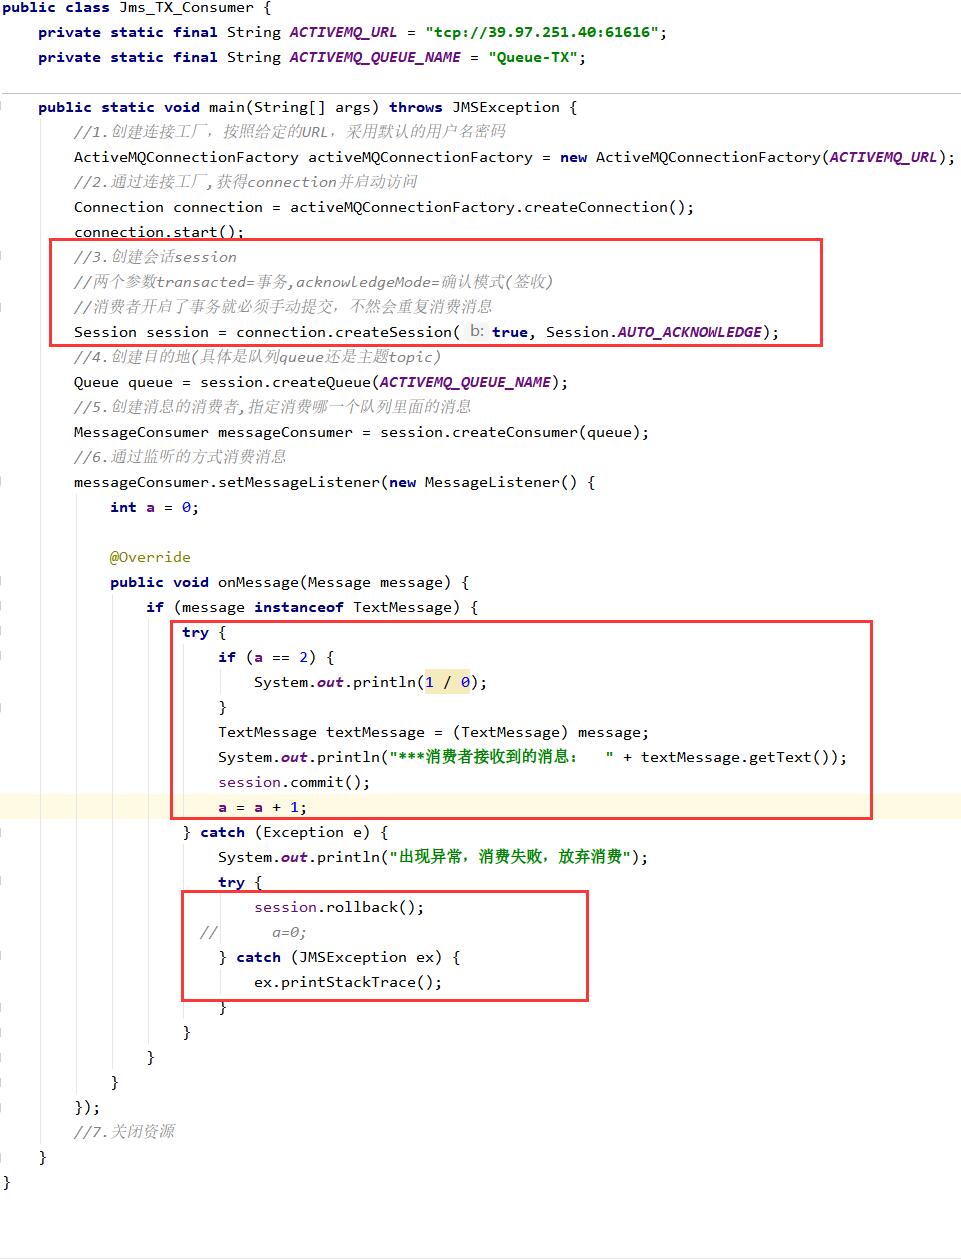
Transaction:事务 事务偏生产者/签收偏消费者
不开启时
只要执行send,就进入到队列中
关闭事务,那第2个签收参数的设置需要有效
开启事务
先执行send再执行commit,消息才被真正提交到队列中
消息需要需要批量提交,需要缓冲处理
代码(因为代码和之前一样全部写出来反而不好看区别)
生产者
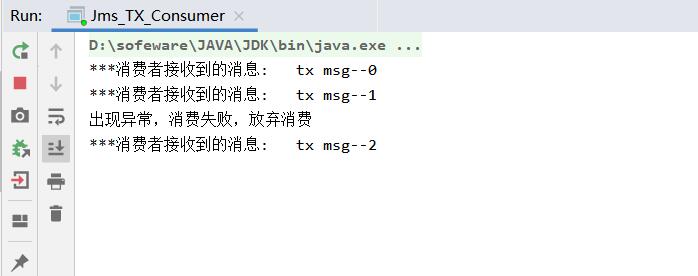
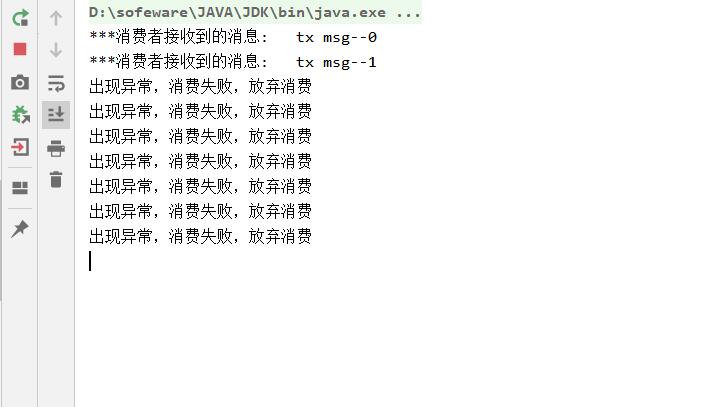
消费者(消费者开启事务,报错之后会重试)
注释掉catch中a=0时,即一直报错会尝试回滚几次如下代码
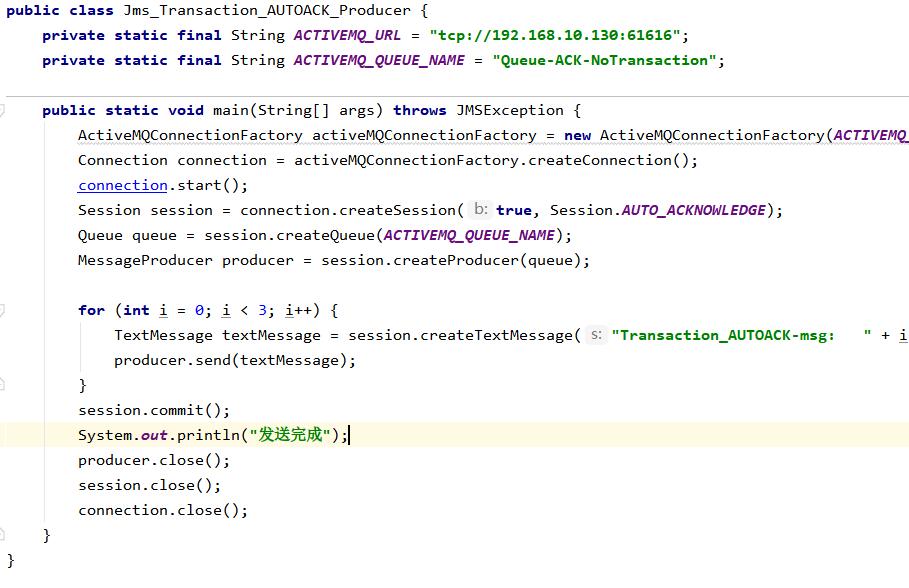
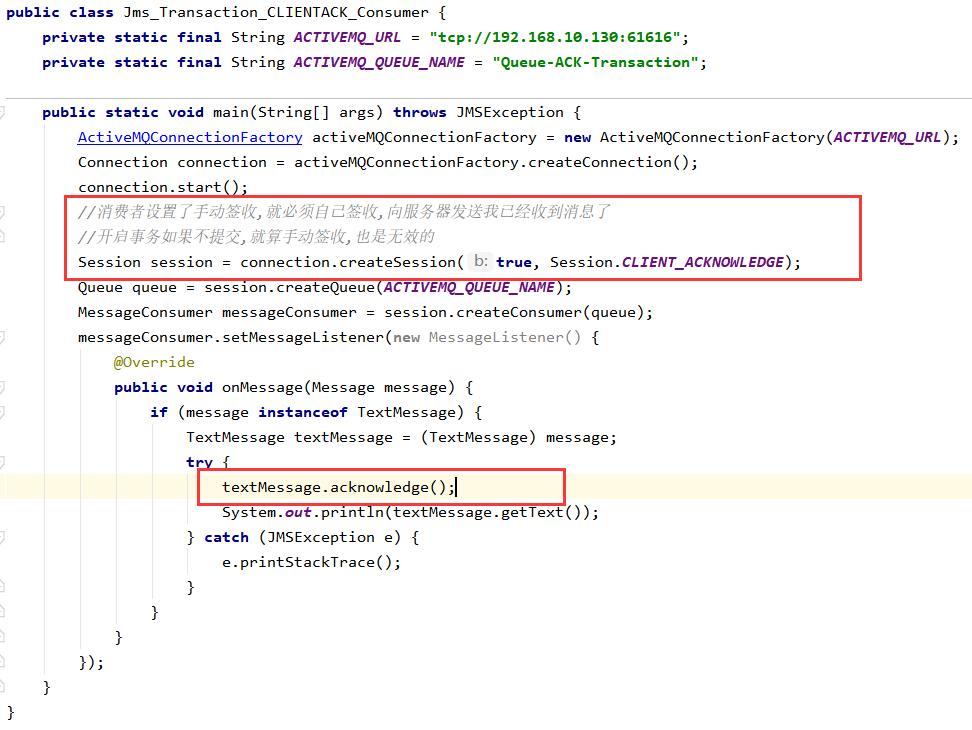
Acknowledge:签收 非事务情况下
自动签收(默认):Session.AUTO_ACKNOWLEDGE
手动签收:Session.CLIENT_ACKNOWLEDGE
客户端调用acknowledge方法手动签收
事务情况下
生产事务开启,只有commit后才能将全部消息变为已消费
结论:开启事务之后如果不commit 就算手动ack了消息也不会消费!!!!
1.5 JMS的点对点总结 点对点模型是基于队列的,生产者发送消息到队列,消费者从队列接收消息,队列的存在使得消息的异步传输成为可能。和我们平时给朋友发送短信类似。
1:如果在Session关闭时有部分消息被收到但还没有被签收(acknowledge),那当消费者下次连接到相同的队列时,这些消息还会被再次接收
2:队列可以长久的保存消息直到消费者收到消息。消费者不需要因为担心消息会丢失而时刻和队列保持激活的链接状态,充分体现了异步传输模式的优势
1.6 JMS的发布订阅总结 JMS Pub/Sub 模型定义了如何向一个内容节点发布和订阅消息,这些节点被称作topic
非持久订阅
非持久订阅只有当客户端处于激活状态,也就是和MQ保持连接状态才能收发到某个主题的消息。
如果消费者处于离线状态,生产者发送的主题消息将会丢失作废,消费者永远不会收到。
一句话:先订阅注册才能接受到发布,只给订阅者发布消息。
持久订阅
客户端首先向MQ注册一个自己的身份ID识别号,当这个客户端处于离线时,生产者会为这个ID保存所有发送到主题的消息,当客户再次连接到MQ的时候,会根据消费者的ID得到所有当自己处于离线时发送到主题的消息
当持久订阅状态下,不能恢复或重新派送一个未签收的消息。
持久订阅才能恢复或重新派送一个未签收的消息。
当所有的消息必须被接收,则用持久订阅。当消息丢失能够被容忍,则用非持久订阅
2. ActiveMQ的Broker 是什么
相当于一个ActiveMQ服务器实例
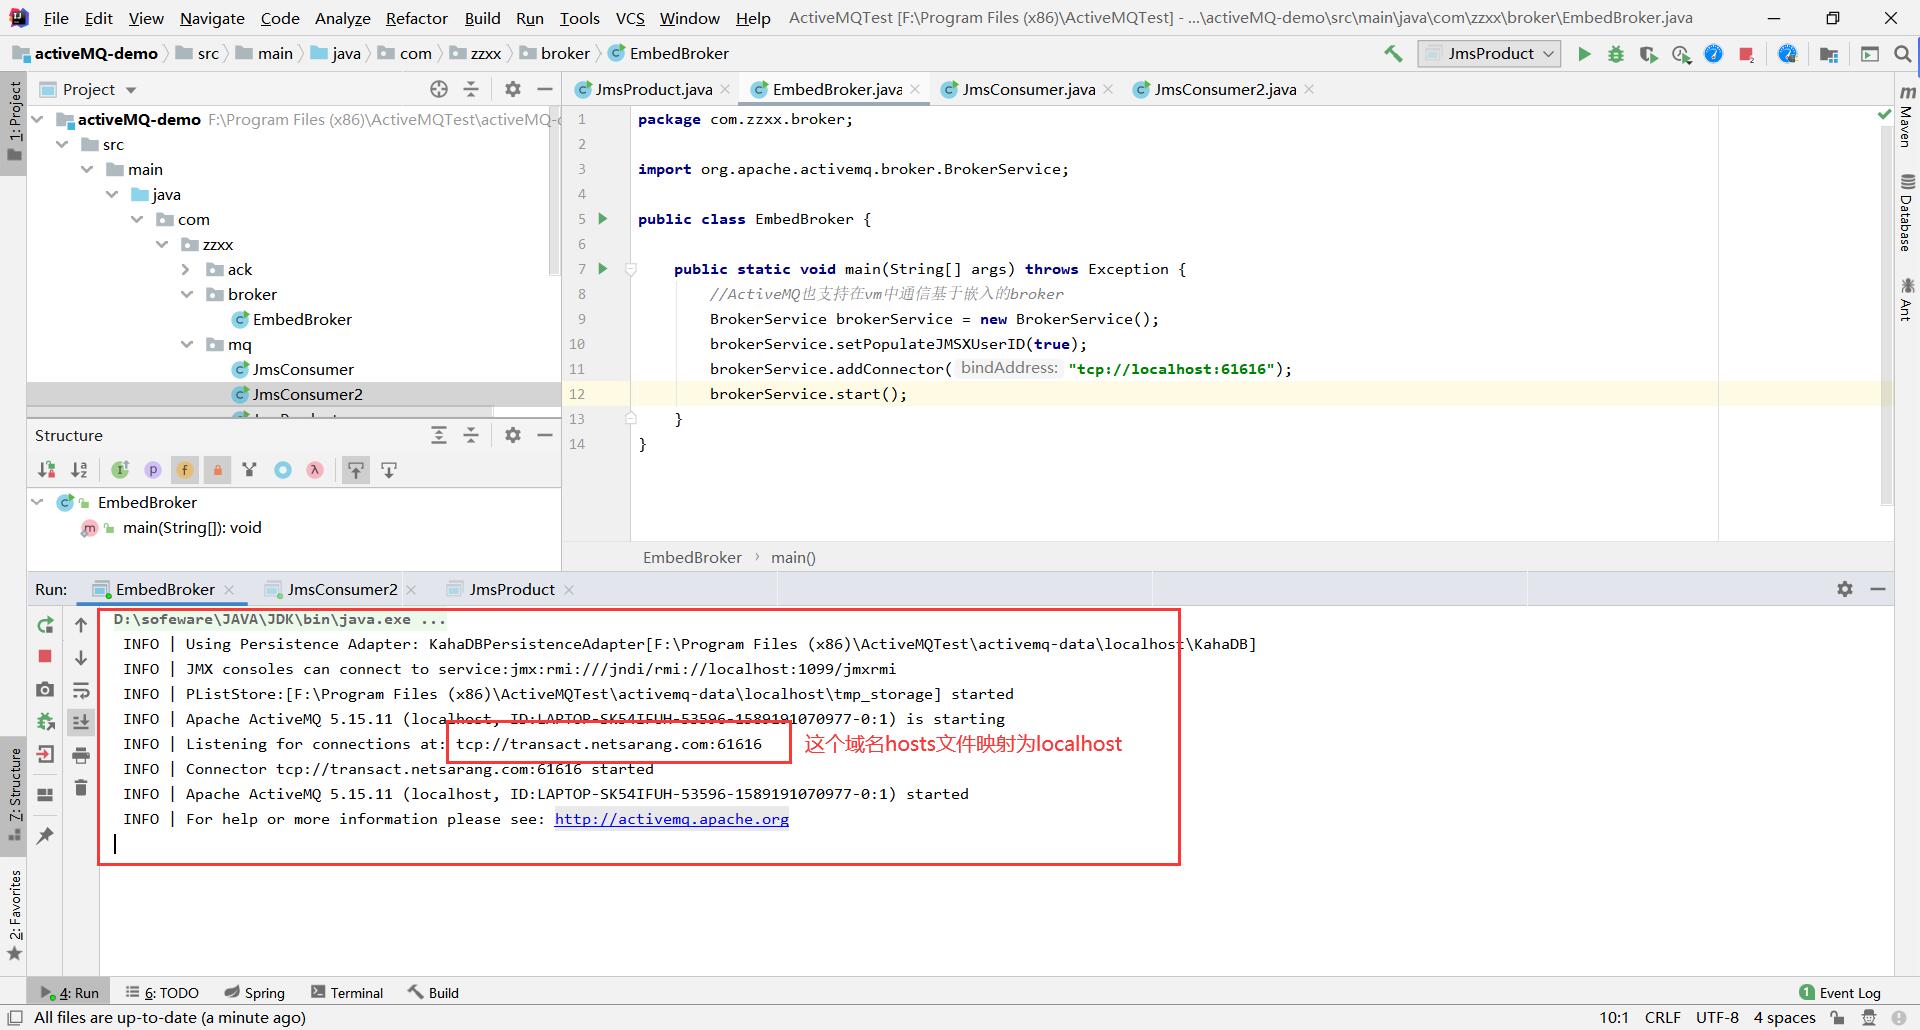
说白了,Broker其实就是实现了用代码的形式启动ActiveMQ将MQ嵌入到Java代码中,以便随时用随时启动,
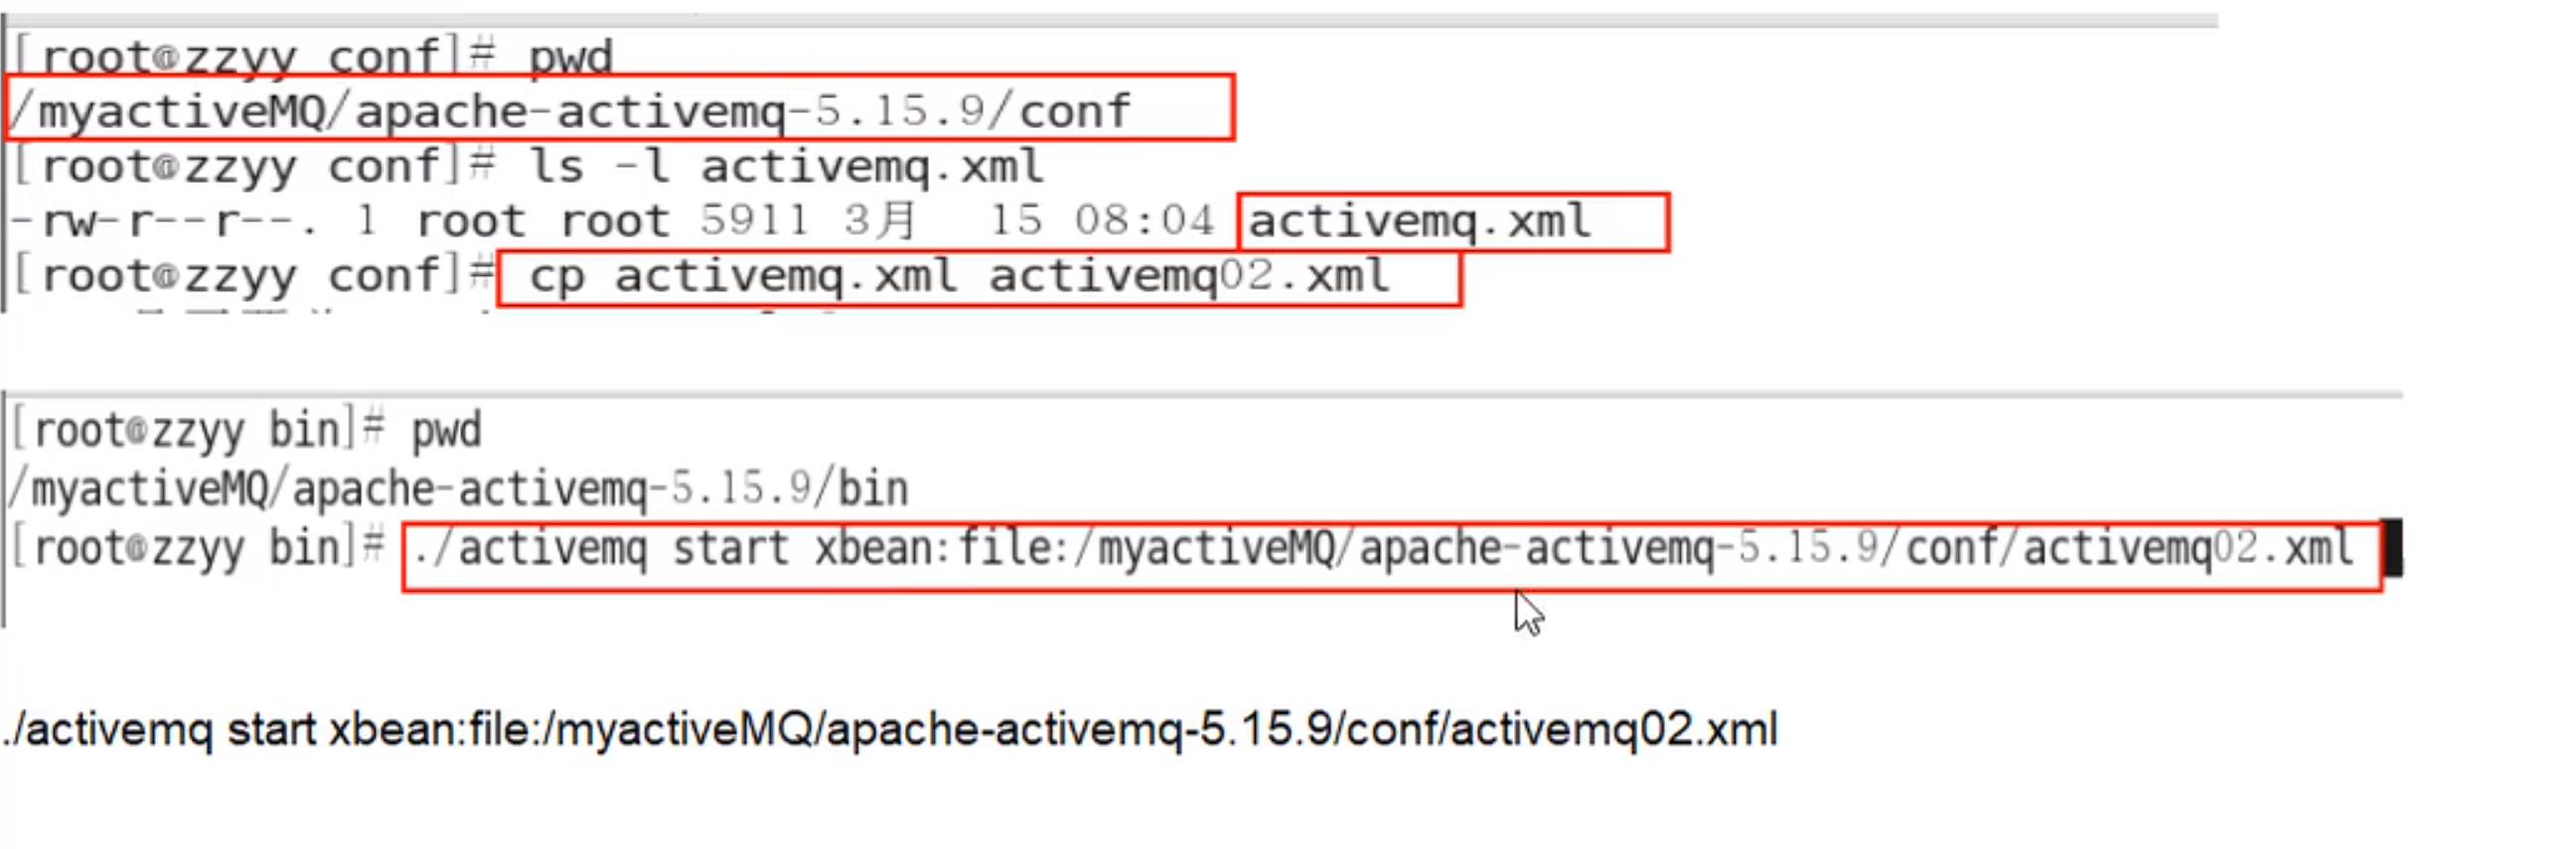
和Redis类似,不同config配置文件来模拟不同的实例
2.1 嵌入式Broker 用ActiveMQ Broker作为独立的消息服务器来构建Java应用。
pom.xml
1 2 3 4 5 6 7 8 9 10 11 12 13 14 15 16 17 18 19 20 21 22 23 24 25 26 27 28 29 30 31 32 33 34 35 36 37 <dependencies > <dependency > <groupId > org.apache.activemq</groupId > <artifactId > activemq-all</artifactId > <version > 5.15.11</version > </dependency > <dependency > <groupId > com.fasterxml.jackson.core</groupId > <artifactId > jackson-databind</artifactId > <version > 2.10.1</version > </dependency > <dependency > <groupId > org.apache.xbean</groupId > <artifactId > xbean-spring</artifactId > <version > 4.15</version > </dependency > <dependency > <groupId > log4j</groupId > <artifactId > log4j</artifactId > <version > 1.2.17</version > </dependency > <dependency > <groupId > junit</groupId > <artifactId > junit</artifactId > <version > 4.12</version > </dependency > <dependency > <groupId > org.projectlombok</groupId > <artifactId > lombok</artifactId > <version > 1.18.10</version > </dependency > </dependencies >
EmbedBroker
1 2 3 4 5 6 7 8 9 10 11 12 13 import org.apache.activemq.broker.BrokerService;public class EmbedBroker { public static void main (String[] args) throws Exception { BrokerService brokerService = new BrokerService (); brokerService.setPopulateJMSXUserID(true ); brokerService.addConnector("tcp://localhost:61616" ); brokerService.start(); } }
和Linux上的ActiveMQ是一样的,Broker相当于一个Mini版本的ActiveMQ
3. SpringBooact整合ActiveMQ 3.1 队列(Queue) 队列生产者 1.新建Maven工程并设置包名类名
工程名:boot_mq_producer
包名:com.zzxx
2.POM文件
1 2 3 4 5 6 7 8 9 10 11 12 13 14 15 16 17 18 19 20 21 22 23 24 25 26 27 28 29 30 31 32 33 34 35 36 37 38 39 40 41 42 43 44 45 46 <?xml version="1.0" encoding="UTF-8" ?> <project xmlns ="http://maven.apache.org/POM/4.0.0" xmlns:xsi ="http://www.w3.org/2001/XMLSchema-instance" xsi:schemaLocation ="http://maven.apache.org/POM/4.0.0 http://maven.apache.org/xsd/maven-4.0.0.xsd" > <modelVersion > 4.0.0</modelVersion > <groupId > com.zzxx</groupId > <artifactId > boot_mq_producer</artifactId > <version > 1.0-SNAPSHOT</version > <dependencies > <dependency > <groupId > org.springframework.boot</groupId > <artifactId > spring-boot-starter</artifactId > <version > 2.2.1.RELEASE</version > </dependency > <dependency > <groupId > org.springframework.boot</groupId > <artifactId > spring-boot-starter-activemq</artifactId > <version > 2.2.1.RELEASE</version > </dependency > <dependency > <groupId > org.springframework.boot</groupId > <artifactId > spring-boot-starter-web</artifactId > <version > 2.2.1.RELEASE</version > </dependency > <dependency > <groupId > org.springframework.boot</groupId > <artifactId > spring-boot-starter-test</artifactId > <version > 2.2.1.RELEASE</version > </dependency > </dependencies > </project >
3.Yml文件
1 2 3 4 5 6 7 8 9 10 11 12 13 14 15 16 17 18 server: port: 8080 spring: activemq: broker-url: tcp://192.168.10.130:61616 user: admin password: admin jms: pub-sub-domain: false myQueueName: springboot-activemq-queue
4.配置bean
1 2 3 4 5 6 7 8 9 10 11 12 13 14 15 16 17 18 19 20 21 package com.zzxx.activemq.config;import org.apache.activemq.command.ActiveMQQueue;import org.springframework.beans.factory.annotation.Value;import org.springframework.context.annotation.Bean;import org.springframework.jms.annotation.EnableJms;import org.springframework.stereotype.Component;@Component @EnableJms public class ConfigBean { @Value("${myQueueName}") private String myQueueName; @Bean public ActiveMQQueue queue () { return new ActiveMQQueue (myQueueName); } }
5.Queue_Producer
1 2 3 4 5 6 7 8 9 10 11 12 13 14 15 16 17 18 19 20 21 22 23 24 25 26 27 package com.zzxx.activemq.queue;import org.apache.activemq.command.ActiveMQQueue;import org.springframework.jms.core.JmsMessagingTemplate;import org.springframework.stereotype.Component;import java.util.UUID;@Component public class Queue_Producer { private JmsMessagingTemplate jmsMessagingTemplate; private ActiveMQQueue activeMQQueue; public void producerMsg () { jmsMessagingTemplate.convertAndSend(activeMQQueue, "**************" + UUID.randomUUID().toString()); } public Queue_Producer (JmsMessagingTemplate jmsMessagingTemplate, ActiveMQQueue activeMQQueue) { this .jmsMessagingTemplate = jmsMessagingTemplate; this .activeMQQueue = activeMQQueue; } }
6.主启动类
1 2 3 4 5 6 7 8 9 10 11 12 13 14 15 package com.zzxx;import org.springframework.boot.SpringApplication;import org.springframework.boot.autoconfigure.SpringBootApplication;@SpringBootApplication public class MainApp { public static void main (String[] args) { SpringApplication.run(MainApp.class); } }
7.测试单元
1 2 3 4 5 6 7 8 9 10 11 12 13 14 15 16 17 18 19 20 21 22 23 package com.zzxx.activemq;import com.zzxx.MainApp;import com.zzxx.activemq.queue.Queue_Producer;import org.junit.Test;import org.junit.runner.RunWith;import org.springframework.beans.factory.annotation.Autowired;import org.springframework.boot.test.context.SpringBootTest;import org.springframework.test.context.junit4.SpringJUnit4ClassRunner;import org.springframework.test.context.web.WebAppConfiguration;@SpringBootTest(classes = MainApp.class) @RunWith(SpringJUnit4ClassRunner.class) @WebAppConfiguration public class TestActiveMQ { @Autowired private Queue_Producer queue_producer; @Test public void testSend () { queue_producer.producerMsg(); } }
8.新需求:要求每隔3秒钟,往MQ推送消息
1.修改Queue_Produce
1 2 3 4 5 6 7 8 9 10 11 12 13 14 15 16 17 18 19 20 21 22 23 24 25 26 27 28 29 30 31 32 33 34 35 36 package com.zzxx.activemq.queue;import org.apache.activemq.command.ActiveMQQueue;import org.springframework.jms.core.JmsMessagingTemplate;import org.springframework.scheduling.annotation.Scheduled;import org.springframework.stereotype.Component;import java.util.UUID;@Component public class Queue_Producer { private JmsMessagingTemplate jmsMessagingTemplate; private ActiveMQQueue activeMQQueue; public void producerMsg () { jmsMessagingTemplate.convertAndSend(activeMQQueue, "**************" + UUID.randomUUID().toString()); } @Scheduled(fixedDelay = 3000) public void producerMsgScheduled () { jmsMessagingTemplate.convertAndSend(activeMQQueue, "**************Scheduled" + UUID.randomUUID().toString()); System.out.println("Scheduled定时投递" ); } public Queue_Producer (JmsMessagingTemplate jmsMessagingTemplate, ActiveMQQueue activeMQQueue) { this .jmsMessagingTemplate = jmsMessagingTemplate; this .activeMQQueue = activeMQQueue; } }
2.修改主启动类的MainApp_Producer
1 2 3 4 5 6 7 8 9 10 11 12 13 14 package com.zzxx.boot;import org.springframework.boot.SpringApplication;import org.springframework.boot.autoconfigure.SpringBootApplication;import org.springframework.scheduling.annotation.EnableScheduling;@SpringBootApplication @EnableScheduling public class MainApp { public static void main (String[] args) { SpringApplication.run(MainApp.class); } }
直接开启主启动类,间隔发送消息
队列消费者 1.新建Mavaen工程并设置包名类名
2.POM文件
3.Yml文件
1 2 3 4 5 6 7 8 9 10 11 12 13 14 server: port: 8081 spring: activemq: broker-url: tcp://192.168.10.130:61616 user: admin password: admin jms: pub-sub-domain: false myQueueName: springboot-activemq-queue
4.springboot的消息监听注解
1 2 3 4 5 6 @JmsListener(destination = "${myQueueName}") public void consumerMsg (TextMessage textMessage) throws JMSException { String text = textMessage.getText(); System.out.println("***消费者收到的消息: " + text); }
3.2 主题发布订阅(Topic) Topic生产者 1.新建Maven工程并设置包名类名
2.POM文件
3.Yml文件
1 2 3 4 5 6 7 8 9 10 11 12 13 14 server: port: 8083 spring: activemq: broker-url: tcp://192.168.10.130:61616 user: admin password: admin jms: pub-sub-domain: true myTopicName: springboot-activemq-topic
4.配置bean
1 2 3 4 5 6 7 8 9 10 11 12 13 14 15 16 17 18 19 20 package com.zzxx.activemq.config;import org.apache.activemq.command.ActiveMQTopic;import org.springframework.beans.factory.annotation.Value;import org.springframework.context.annotation.Bean;import org.springframework.jms.annotation.EnableJms;import org.springframework.stereotype.Component;@Component @EnableJms public class ActiveMQConfigBean { @Value("${myTopicName}") private String topicName; @Bean public ActiveMQTopic activeMQTopic () { return new ActiveMQTopic (topicName); } }
5.Topic_Producer
1 2 3 4 5 6 7 8 9 10 11 12 13 14 15 16 17 18 19 20 21 22 23 24 25 26 27 package com.zzxx.activemq.topic;import org.apache.activemq.command.ActiveMQTopic;import org.springframework.jms.core.JmsMessagingTemplate;import org.springframework.scheduling.annotation.EnableScheduling;import org.springframework.scheduling.annotation.Scheduled;import org.springframework.stereotype.Component;import java.util.UUID;@Component @EnableScheduling public class Topic_Producer { private JmsMessagingTemplate jmsMessagingTemplate; private ActiveMQTopic activeMQTopic; @Scheduled(fixedDelay = 3000) public void producer () { jmsMessagingTemplate.convertAndSend(activeMQTopic, "主题消息: " + UUID.randomUUID().toString()); } public Topic_Producer (JmsMessagingTemplate jmsMessagingTemplate, ActiveMQTopic activeMQTopic) { this .jmsMessagingTemplate = jmsMessagingTemplate; this .activeMQTopic = activeMQTopic; } }
6.主启动类
1 2 3 4 5 6 7 8 9 10 11 12 package com.zzxx.activemq;import org.springframework.boot.SpringApplication;import org.springframework.boot.autoconfigure.SpringBootApplication;@SpringBootApplication public class MainApp_TopicProducer { public static void main (String[] args) { SpringApplication.run(MainApp_TopicProducer.class); } }
先启动消费者,后启动生产者
Topic消费者 Topic消费者–非持久版 1.新建Maven工程并设置包名类名
2.POM文件
3.Yml文件
1 2 3 4 5 6 7 8 9 10 11 12 13 14 server: port: 8083 spring: activemq: broker-url: tcp://192.168.10.130:61616 user: admin password: admin jms: pub-sub-domain: true myTopicName: springboot-activemq-topic
4.Topic_Consumer
1 2 3 4 5 6 7 8 9 10 11 12 13 14 15 16 17 package com.zzxx.activemq.topic;import org.springframework.jms.annotation.JmsListener;import org.springframework.stereotype.Component;import javax.jms.JMSException;import javax.jms.TextMessage;@Component public class Topic_Consumer { @JmsListener(destination = "${myTopicName}") public void consumer (TextMessage textMessage) throws JMSException { System.out.println("订阅着收到消息: " + textMessage.getText()); } }
5.主启动类
1 2 3 4 5 6 7 8 9 10 11 package com.zzxx.activemq;import org.springframework.boot.SpringApplication;import org.springframework.boot.autoconfigure.SpringBootApplication;@SpringBootApplication public class MainApp_TopicConsumer { public static void main (String[] args) { SpringApplication.run(MainApp_TopicConsumer.class); } }
Topic消费者–持久版 1.新建Maven工程并设置包名类名
2.POM文件
3.Yml文件
1 2 3 4 5 6 7 8 9 10 11 12 13 14 server: port: 8083 spring: activemq: broker-url: tcp://192.168.10.130:61616 user: admin password: admin jms: pub-sub-domain: true myTopicName: springboot-activemq-topic
4.配置bean
配置文件的方式无法进行配置持久化订阅。所以需要自己去生成一个持久化订阅
1 2 3 4 5 6 7 8 9 10 11 12 13 14 15 16 17 18 19 20 21 22 23 24 25 26 27 28 29 30 31 32 33 34 35 36 37 38 39 40 41 42 43 44 45 package com.demo.boot.activemq.config;import org.apache.activemq.ActiveMQConnectionFactory;import org.checkerframework.checker.units.qual.A;import org.springframework.beans.factory.annotation.Value;import org.springframework.context.annotation.Bean;import org.springframework.jms.annotation.EnableJms;import org.springframework.jms.config.DefaultJmsListenerContainerFactory;import org.springframework.stereotype.Component;import javax.jms.ConnectionFactory;@Component @EnableJms public class ActiveMQConfigBean { @Value("${spring.activemq.broker-url}") private String brokerUrl; @Value("${spring.activemq.user}") private String user; @Value("${spring.activemq.password}") private String password; public ConnectionFactory connectionFactory () { ActiveMQConnectionFactory connectionFactory = new ActiveMQConnectionFactory (); connectionFactory.setBrokerURL(brokerUrl); connectionFactory.setUserName(user); connectionFactory.setPassword(password); return connectionFactory; } @Bean(name = "jmsListenerContainerFactory") public DefaultJmsListenerContainerFactory jmsListenerContainerFactory () { DefaultJmsListenerContainerFactory defaultJmsListenerContainerFactory = new DefaultJmsListenerContainerFactory (); defaultJmsListenerContainerFactory.setConnectionFactory(connectionFactory()); defaultJmsListenerContainerFactory.setSubscriptionDurable(true ); defaultJmsListenerContainerFactory.setClientId("我是持久订阅者一号" ); return defaultJmsListenerContainerFactory; } }
5.Topic_Consumer
1 2 3 4 5 6 7 8 9 10 11 12 13 14 15 16 17 18 package com.zzxx.activemq.topic;import org.springframework.jms.annotation.JmsListener;import org.springframework.stereotype.Component;import javax.jms.JMSException;import javax.jms.TextMessage;@Component public class Topic_Consumer { @JmsListener(destination = "${myTopicName}",containerFactory = "jmsListenerContainerFactory") public void consumer (TextMessage textMessage) throws JMSException { System.out.println("订阅着收到消息: " + textMessage.getText()); } }
6.主启动类
1 2 3 4 5 6 7 8 9 10 11 package com.demo.boot.activemq;import org.springframework.boot.SpringApplication;import org.springframework.boot.autoconfigure.SpringBootApplication;@SpringBootApplication public class MainApp_TopicConsumer { public static void main (String[] args) { SpringApplication.run(MainApp_TopicConsumer.class); } }
4. ActiveMQ的传输协议 面试题
默认的61616端口如何更改
你生产上的连接协议如何配置的?使用tcp吗?
官网: http://activemq.apache.org/configuring-version-5-transports.html
是什么
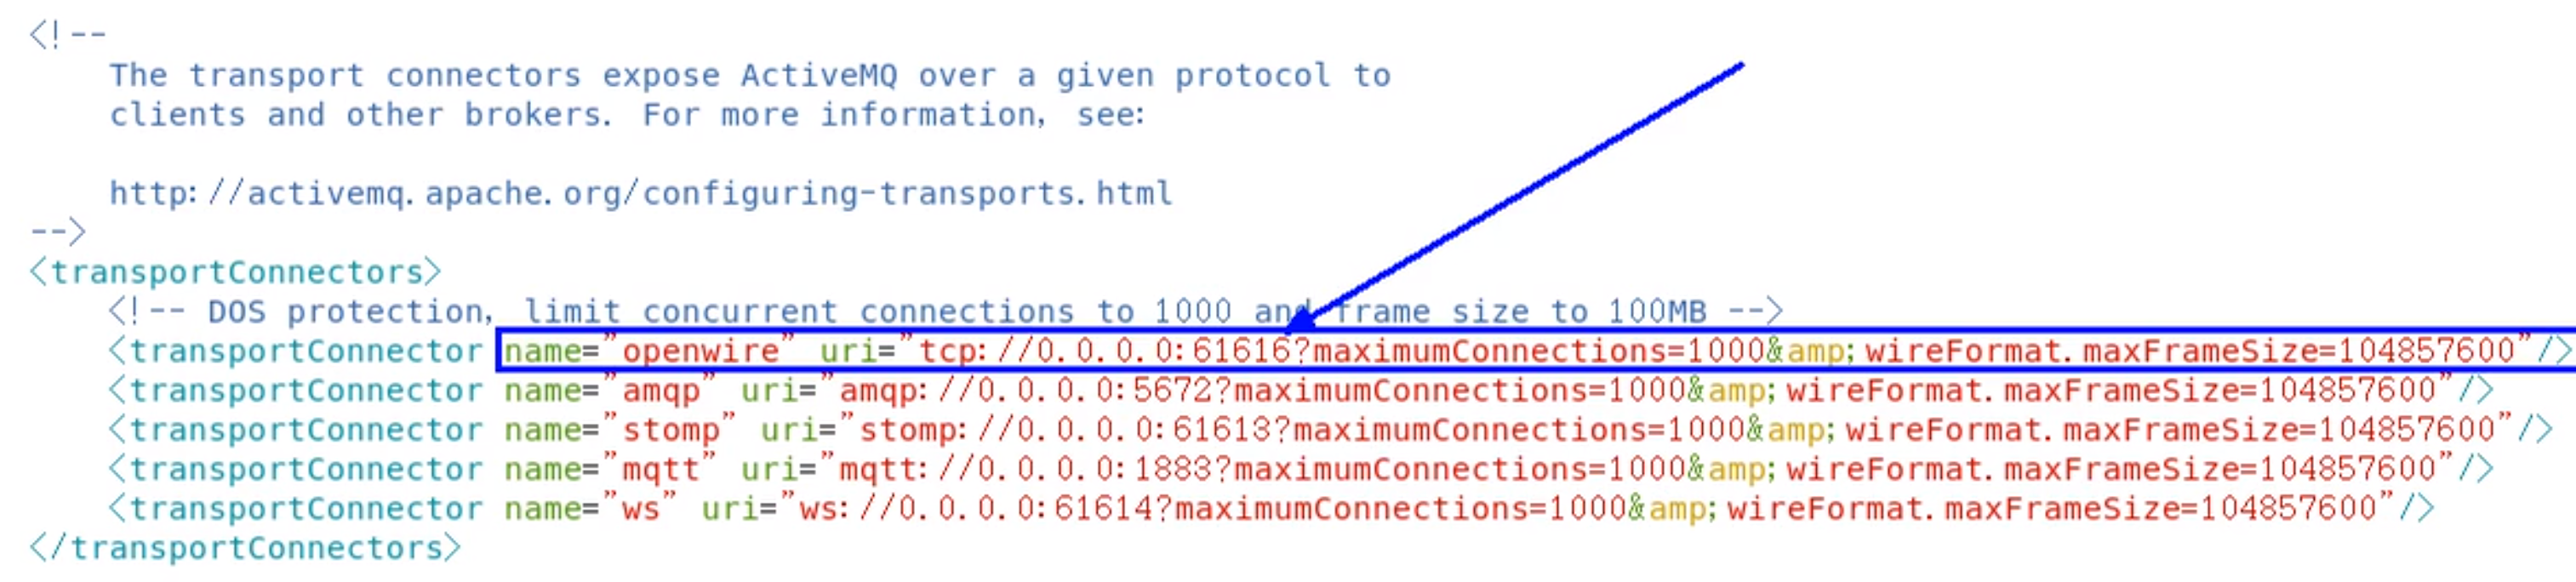
ActiveMQ支持的client-broker通讯协议有:TVP、NIO、UDP、SSL、Http(s)、VM。<transportConnectors>标签之内。
https://image.zxrmrf.com/x/mq38.png )
在上文给出的配置信息中,
描述Stomp协议的监听端口时,采用URI描述格式为“stomp://······”;
唯独在进行openwire协议描述时,URI头却采用的“tcp://······”。这是因为ActiveMQ中默认的消息协议就是openwire
有哪些
1.Transmission Control Protocol(TCP)默认
1.这是默认的Broker配置,TCP的Client监听端口61616
2.在网络传输数据前,必须要先序列化数据,消息是通过一个叫wire protocol的来序列化成字节流。
3.TCP连接的URI形式如:tcp://HostName:port?key=value&key=value,后面的参数是可选的。
4.TCP传输的的优点:
(4.1)TCP协议传输可靠性高,稳定性强
(4.2)高效率:字节流方式传递,效率很高
(4.3)有效性、可用性:应用广泛,支持任何平台
5.关于Transport协议的可选配置参数可以参考官网http://activemq.apache.org/configuring-version-5-transports.html
2.New I/O API Protocol(NIO)
1.NIO协议和TCP协议类似,但NIO更侧重于底层的访问操作。它允许开发人员对同一资源可有更多的client调用和服务器端有更多的负载。
2.适合使用NIO协议的场景:
(2.1)可能有大量的Client去连接到Broker上,一般情况下,大量的Client去连接Broker是被操作系统的线程所限制的。因此,NIO的实现比TCP需要更少的线程去运行,所以建议使用NIO协议。
(2.2)可能对于Broker有一个很迟钝的网络传输,NIO比TCP提供更好的性能。
3.NIO连接的URI形式:nio://hostname:port?key=value&key=value
4.关于Transport协议的可选配置参数可以参考官网http://activemq.apache.org/configuring-version-5-transports.html
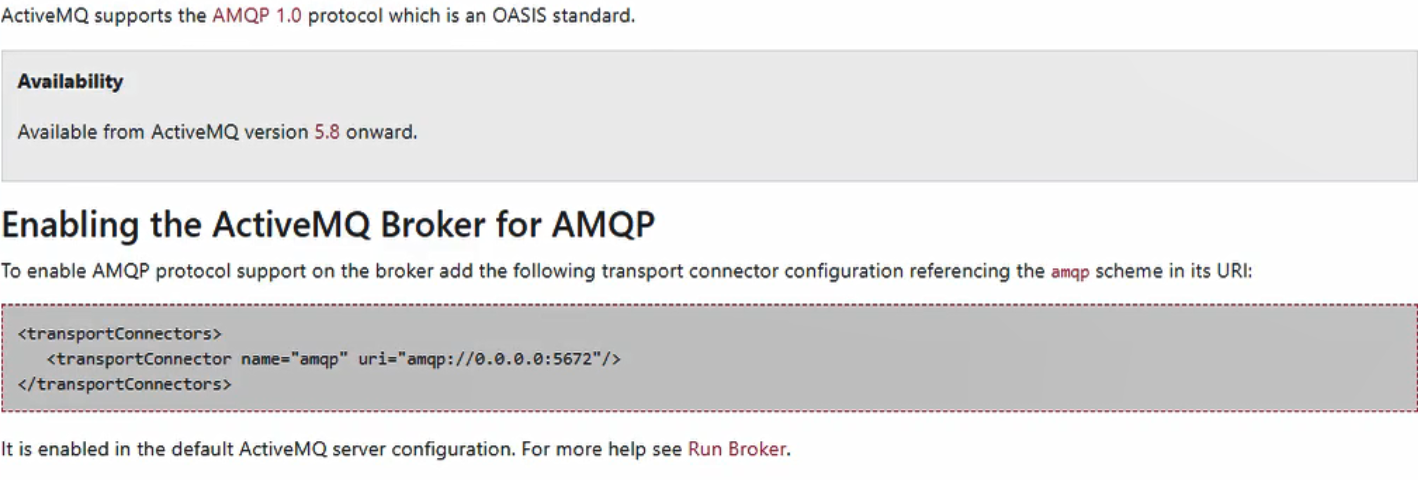
3.AMQP协议
Advanced Message Queuing Protocol,一个提供统一消息服务的应用层标准高级消息队列协议,是应用层协议的一个开放标准,为面向消息的中间件设计。基于此协议的客户端与消息中间件可传递消息,并不受客户端/中间件不同产品,不同开发语言等条件限制。
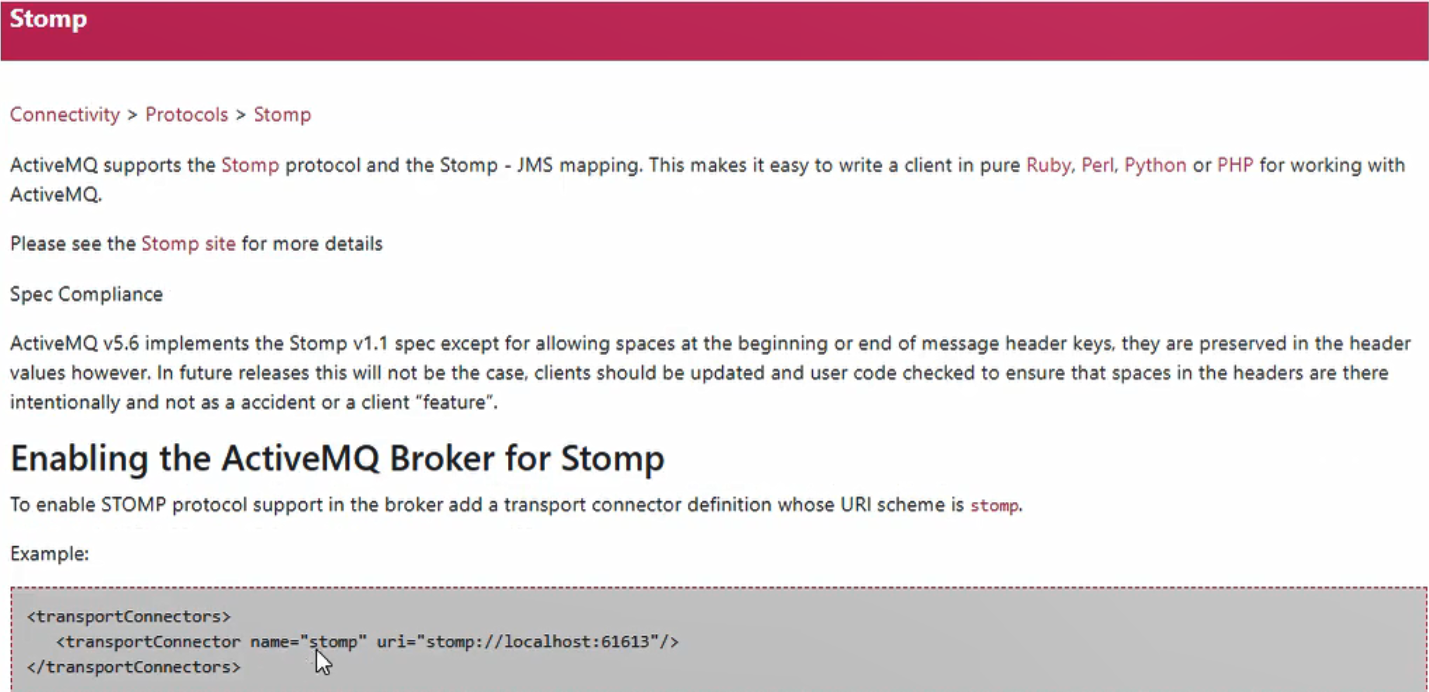
4.Stomp协议
STOP,Streaming Text Orientation Message Protocol,是流文本定向消息协议,是一种为MOM(Message Oriented Middleware,面向消息中间件)设计的简单文本协议。
5.Secure Sockets Layer Protocol(SSL)
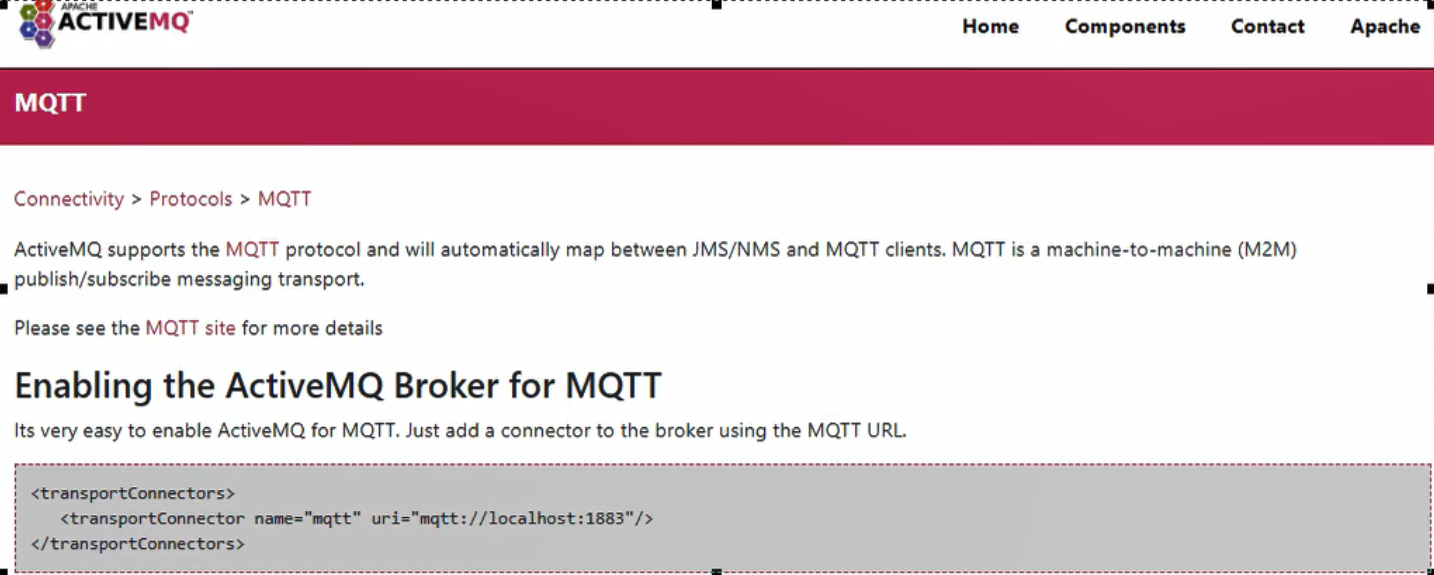
6.MQTT协议
MQTT(Message Queuing Telemetry Transport,消息队列遥测传输)是IBM开发的一个即时通讯协议,有可能成为物联网的重要组成部分。该协议支持所有平台,几乎可以把所有联网物品和外部连接起来,被用来当作传感器和致动器(比如通过Twitter让房屋联网)的通信协议。
7.WS协议(websocket)
8.小总结
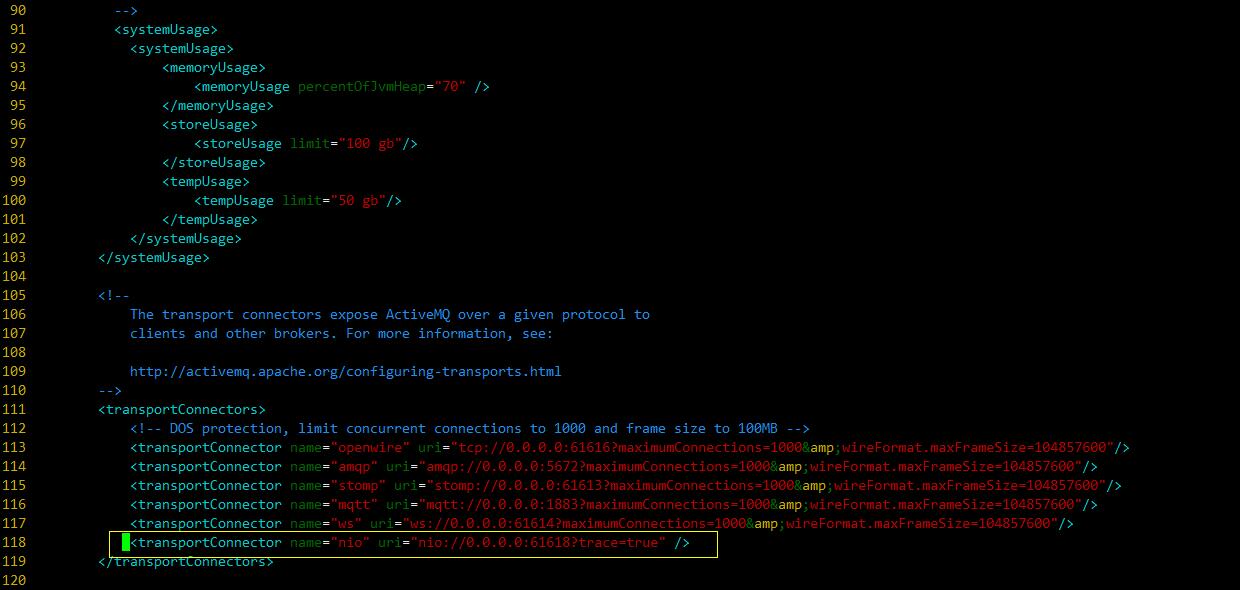
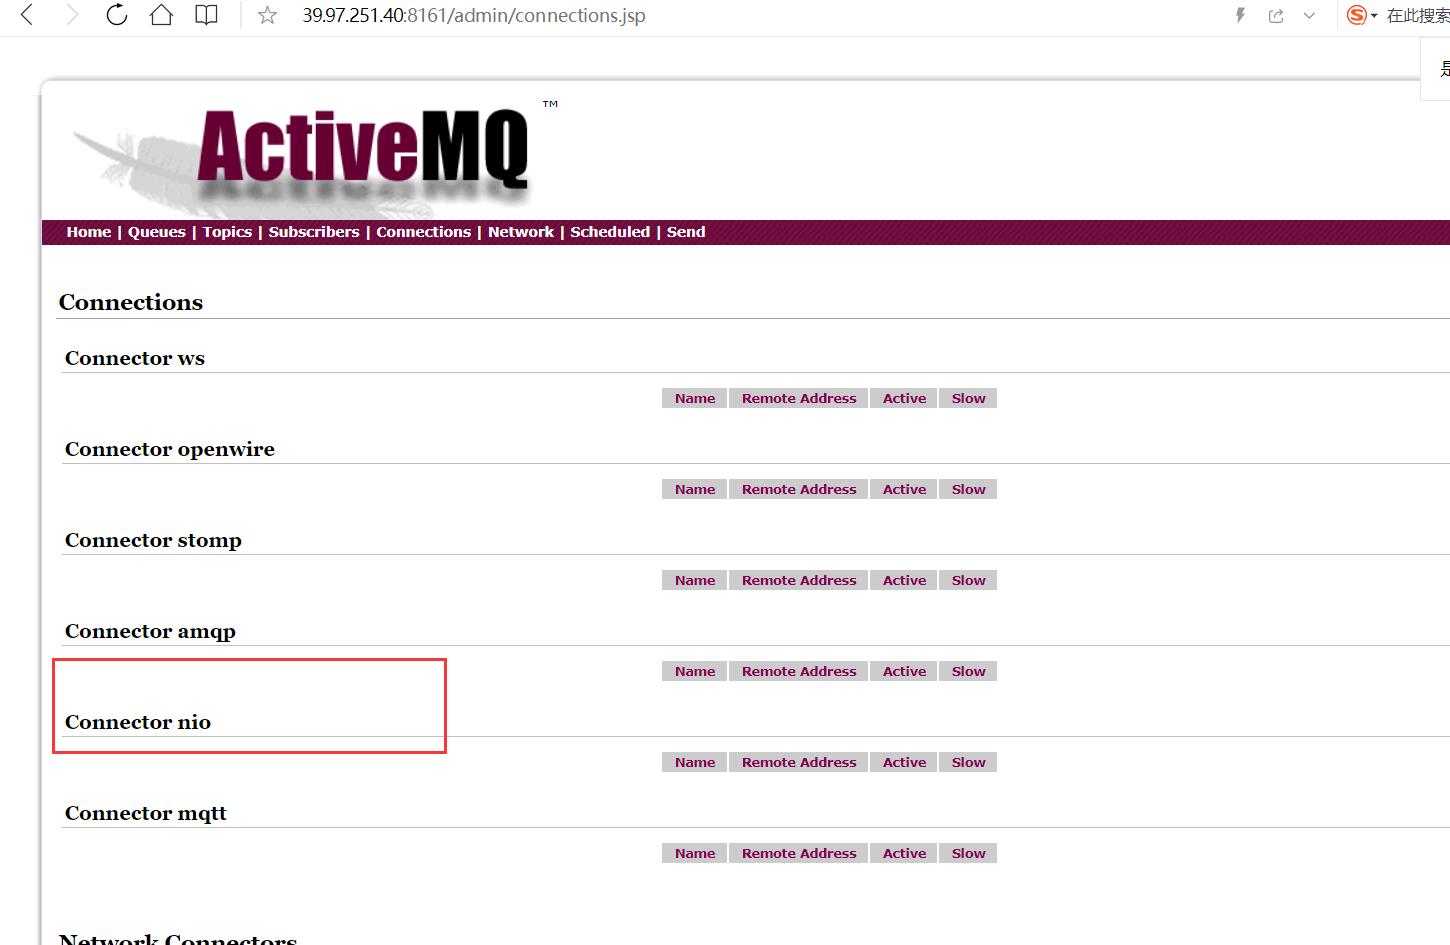
5. nio案例演示 修改配置文件
1 2 3 <transportConnectors > <transportConnector name ="nio" uri ="nio://0.0.0.0:61618?trace=true" /> </transportConnectors >
如果你不特别指定ActiveMQ的网络监听端口,那么这些端口都讲使用BIO网络IO模型
所以为了首先提高单节点的网络吞吐性能,我们需要明确指定ActiveMQ网络IO模型。
如下所示:URI格式头以“nio”开头,表示这个端口使用以TCP协议为基础的NIO网络IO模型。
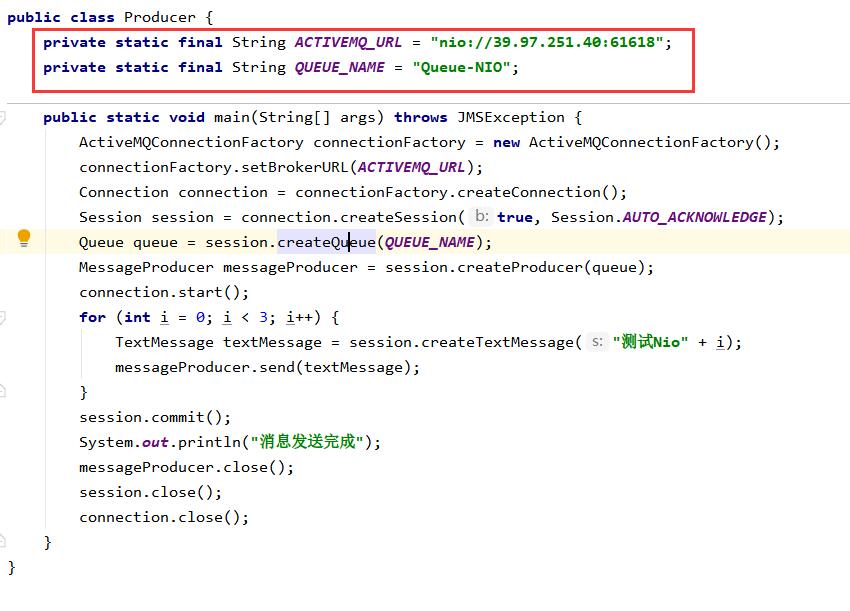
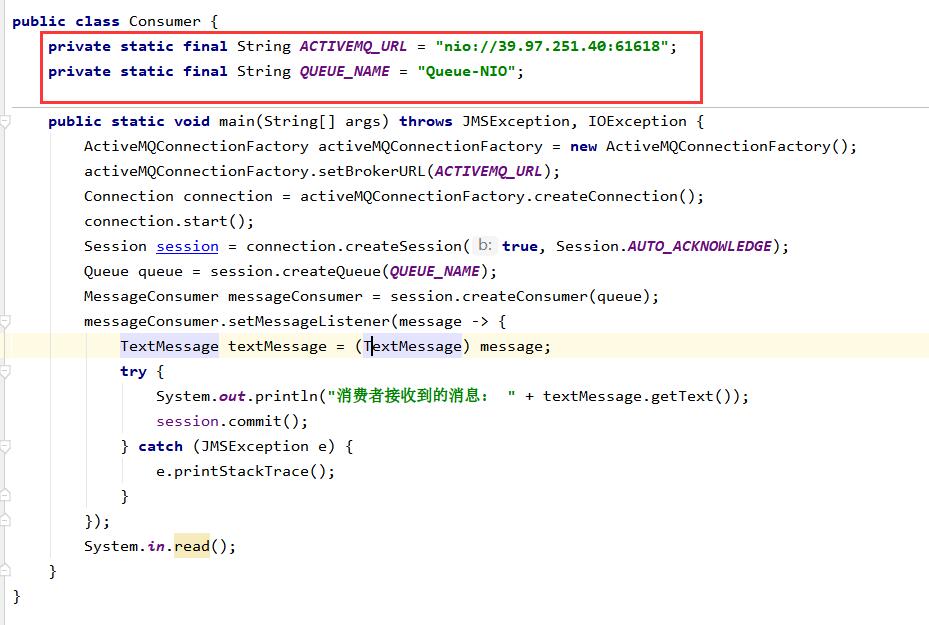
生产和消费两端协议代码修改
生产者
消费者
5.1 nio案例演示增强 上诉NIO性能不错了,如何进一步优化?
问题
URI格式以”nio”开头,代表这个端口使用TCP协议为基础的NIO网络模型。
但是这样的设置方式,只能使这个端口支持Openwire协议。
我们怎么能够让这个端口既支持NIO网络模型,又让他支持多个协议呢?
解决
使用auto关键字
使用”+”符号来为端口设置多种特性
如果我们既需要使用某一个端口支持NIO网络模型,又需要它支持多个协议
<transportConnector name="auto+nio" uri="auto+nio://localhost:5671"/>
6. ActiveMQ的消息存储和持久化 官网: http://activemq.apache.org/persistence
6.1 是什么 面试题: ActiveMQ持久化机制
Redis持久化机制有几种 RDB AOF
说明
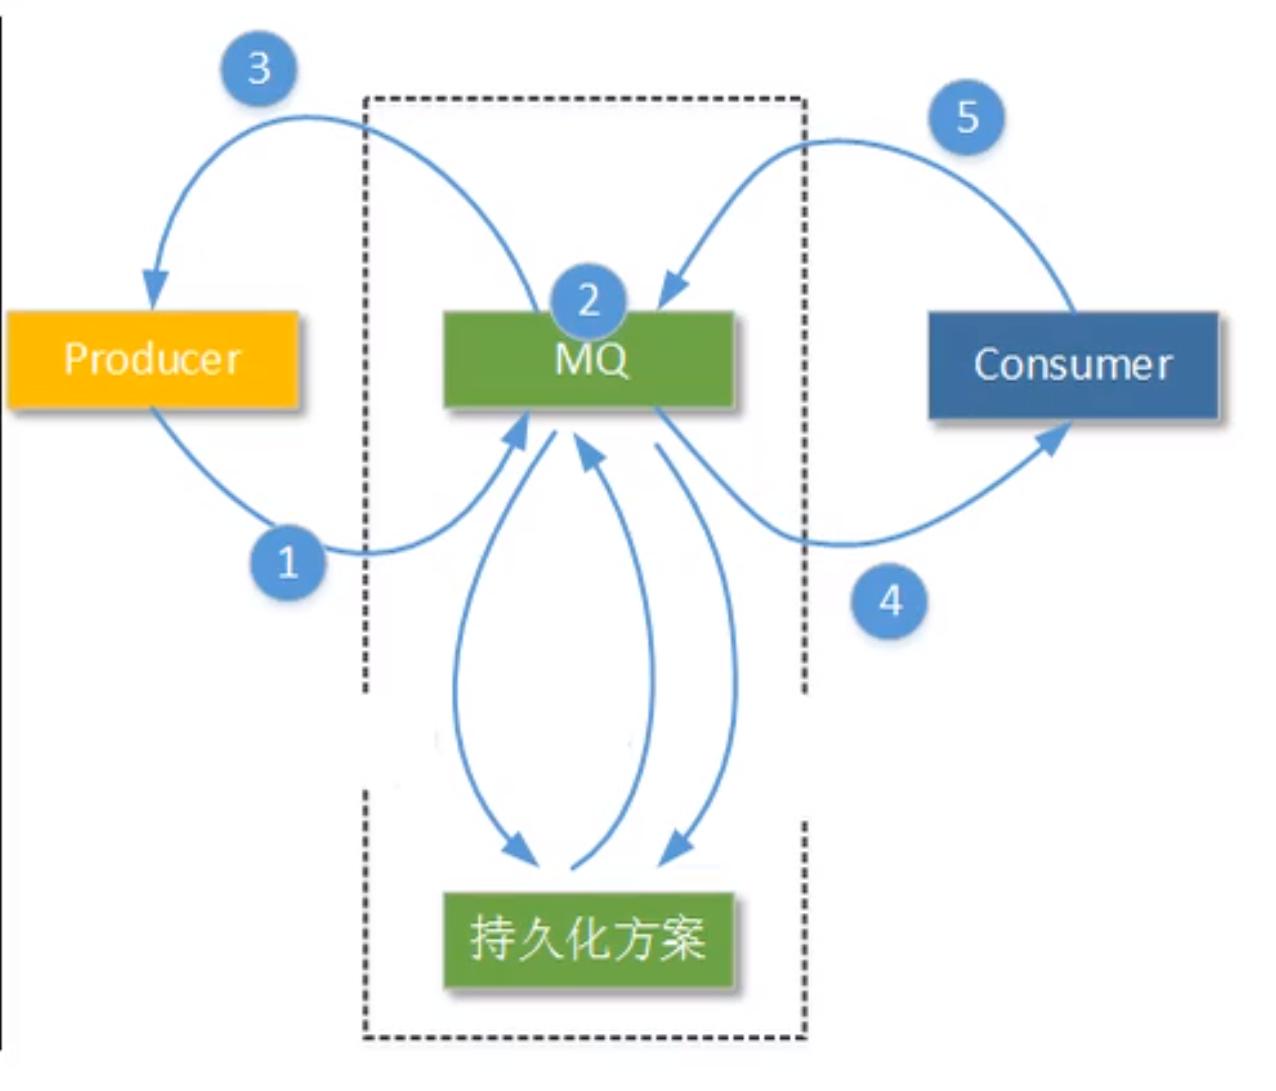
为了避免意外宕机以后丢失信息,需要做到重启后可以恢复消息队列,消息系统一半都会采用持久化机制 。
就是在发送者将消息发送出去后,消息中心首先将消息存储到本地数据文件、内存数据库或者远程数据库等。再试图将消息发给接收者,成功则将消息从存储中删除 ,失败则继续尝试尝试发送。
消息中心启动以后,要先检查指定的存储位置是否有未成功发送的消息,如果有,则会先把存储位置中的消息发出去。
一句话:ActiveMQ宕机了,消息不会丢失的机制。
6.2 有哪些 AMQ Mesage Store(了解)
AMQ是一种文件存储形式,它具有写入速度快和容易恢复的特点。消息存储再一个个文件中文件的默认大小为32M,当一个文件中的消息已经全部被消费,那么这个文件将被标识为可删除,在下一个清除阶段,这个文件被删除。AMQ适用于ActiveMQ5.3之前的版本
基于文件的存储方式,是以前的默认消息存储,现在不用了
KahaDB消息存储(默认)
JDBC消息存储
消息基于JDBC存储的
LevelDB消息存储(了解)
http://activemq.apache.org/leveldb-store
这种文件系统是从ActiveMQ5.8之后引进的,它和KahaDB非常相似,也是基于文件的本地数据库存储形式,但是它提供比KahaDB更快的持久性。
默认配置如下:
1 2 3 <persistenceAdapter> <levelDB directory="activemq-data"/> </persistenceAdapter>
JDBC Message Store with ActiveMQ Journal
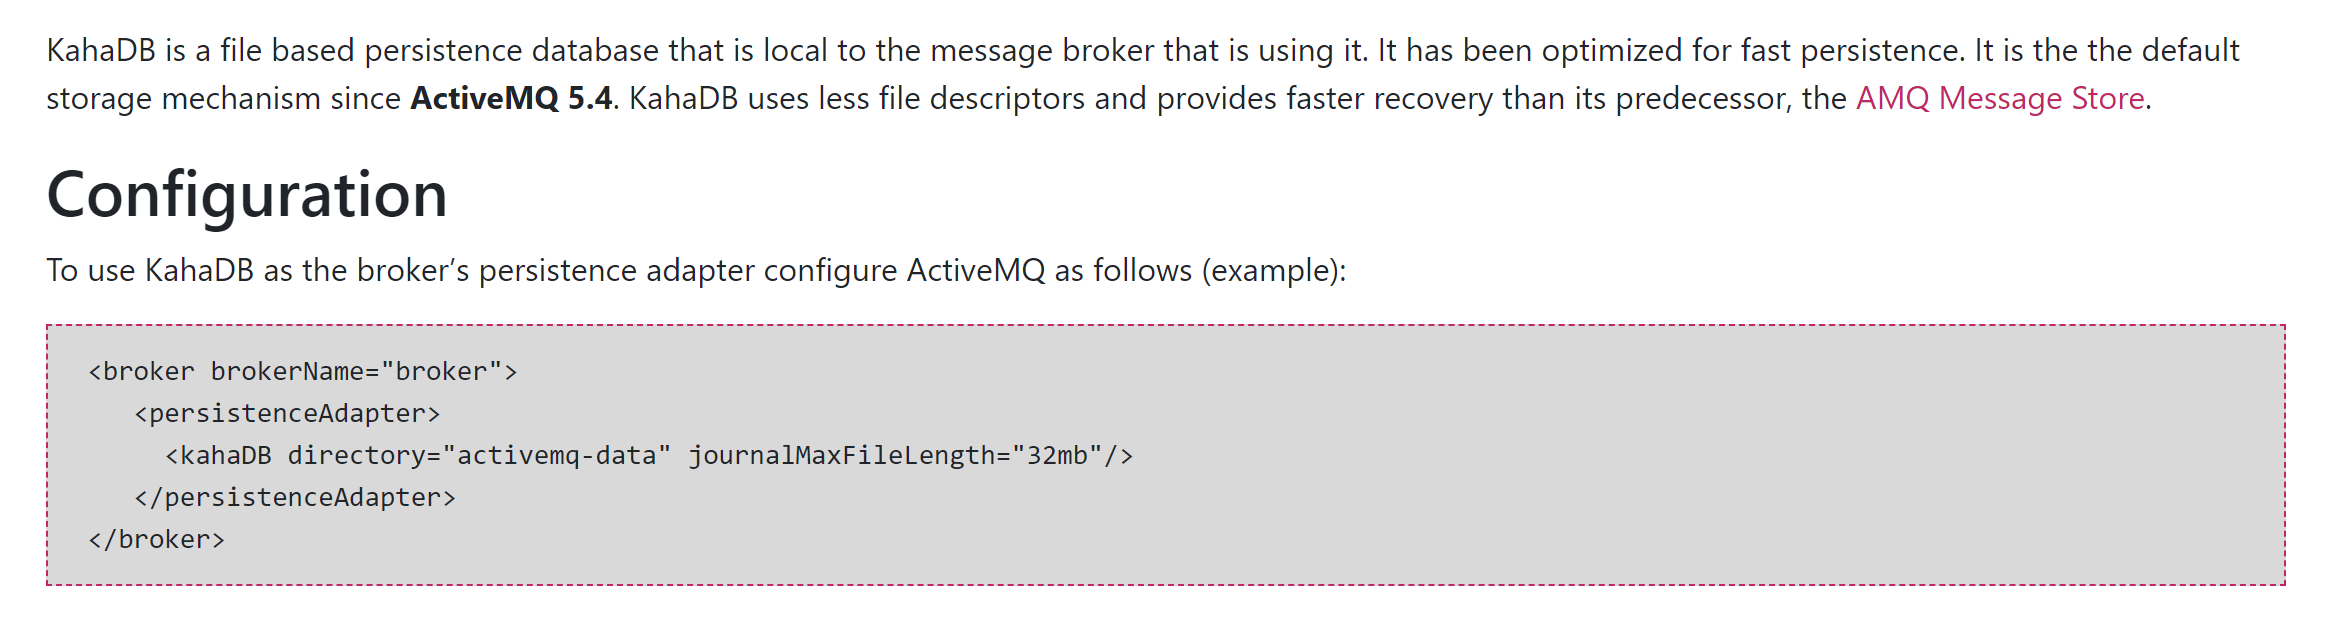
6.3 KahaDB消息存储(默认) 基于日志文件,从ActiveMQ5.4开始默认的持久化插件
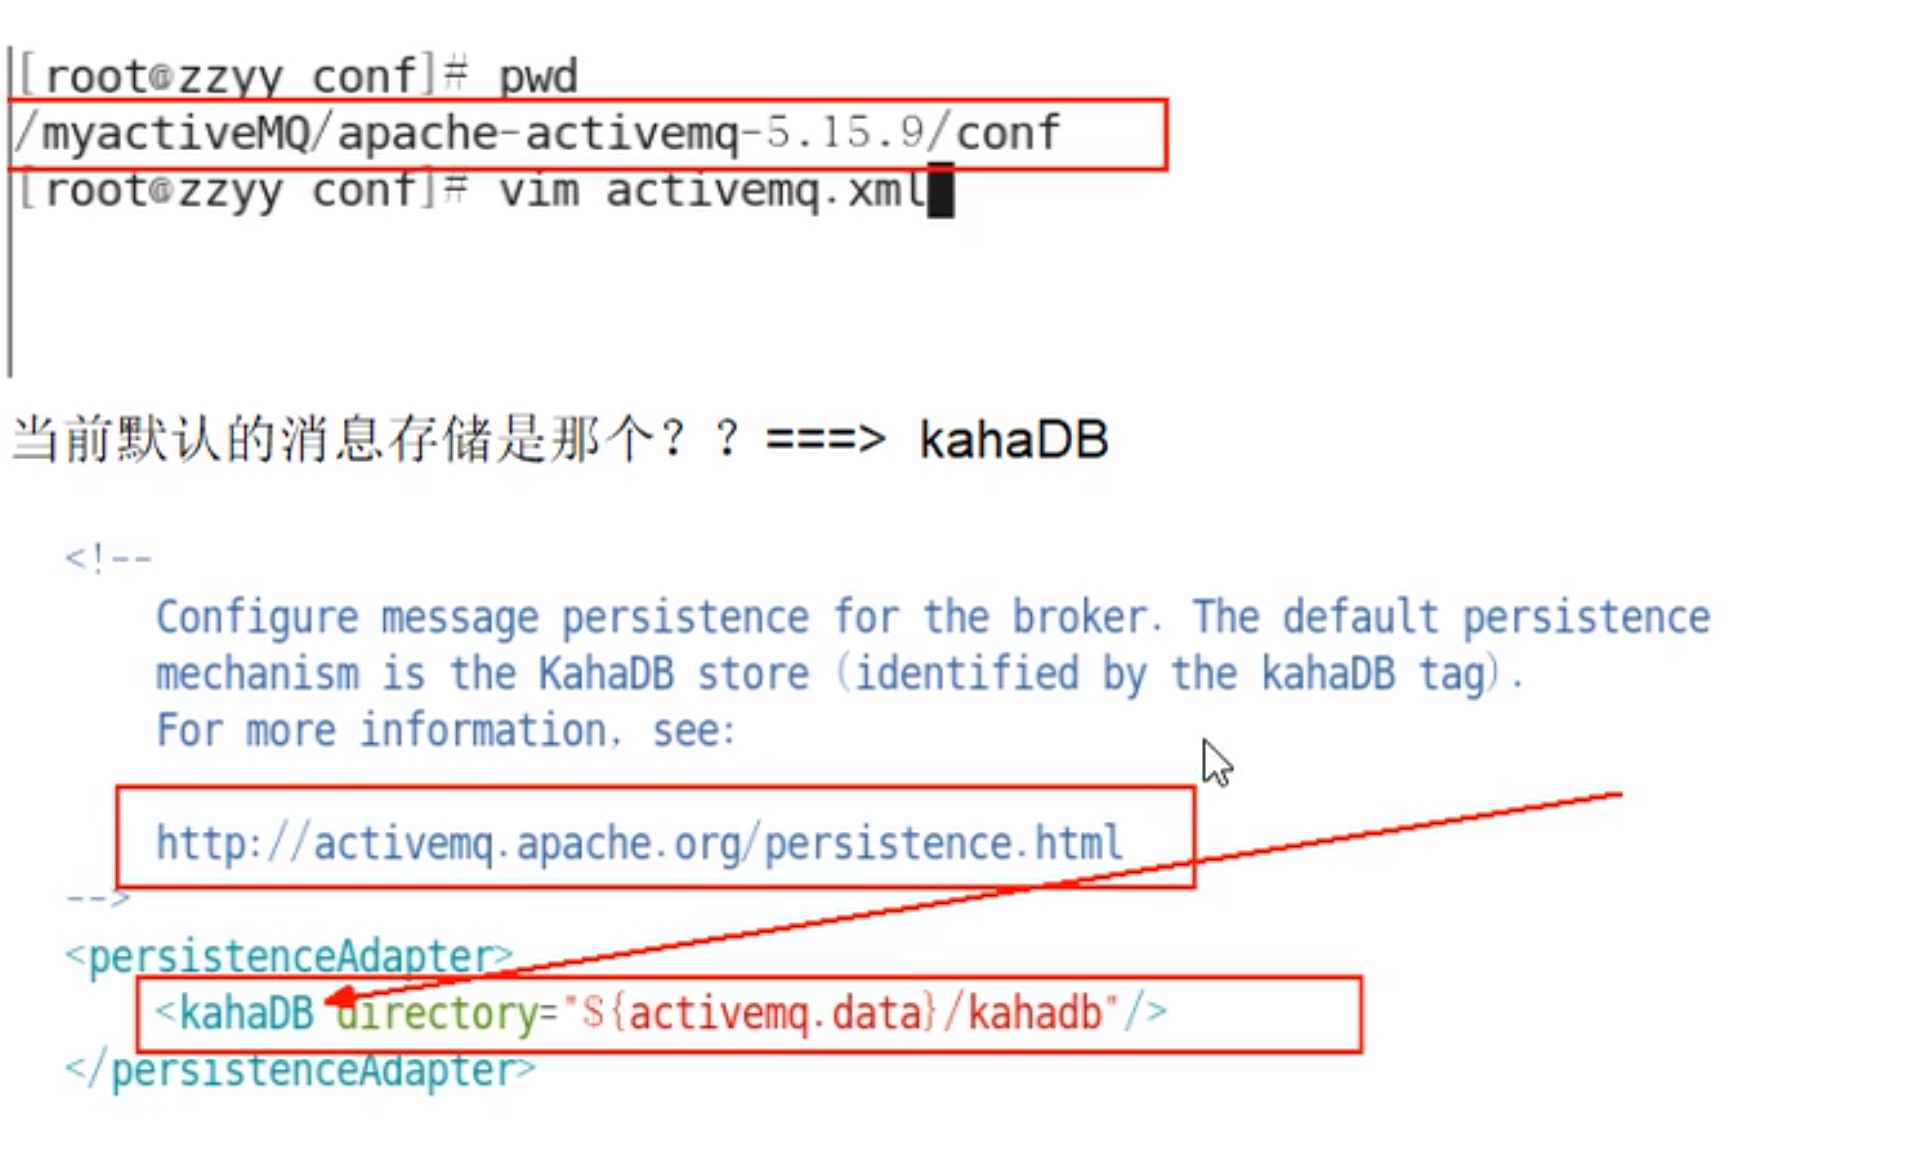
官网
kahaDB: http://activemq.aache.org/kahadb
验证
说明
KahaDB是目前默认的存储方式,可用于任何场景,提高了性能和恢复能力。
消息存储使用一个事务日志和仅仅用一个索引文件来存储它所有的地址。
KahaDB是一个专门针对消息持久化的解决方案,它对典型的消息使用模型进行了优化。
数据被追加到data logs中。当不再需要log文件中的数据的时候,log文件会被丢弃。
http://activemq.aache.org/kahadb
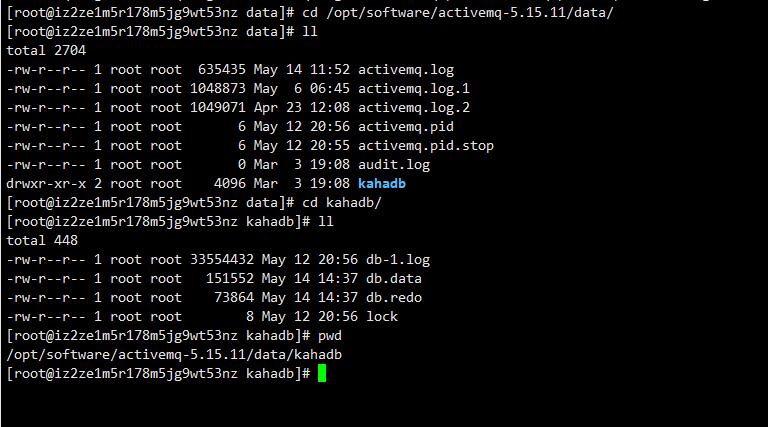
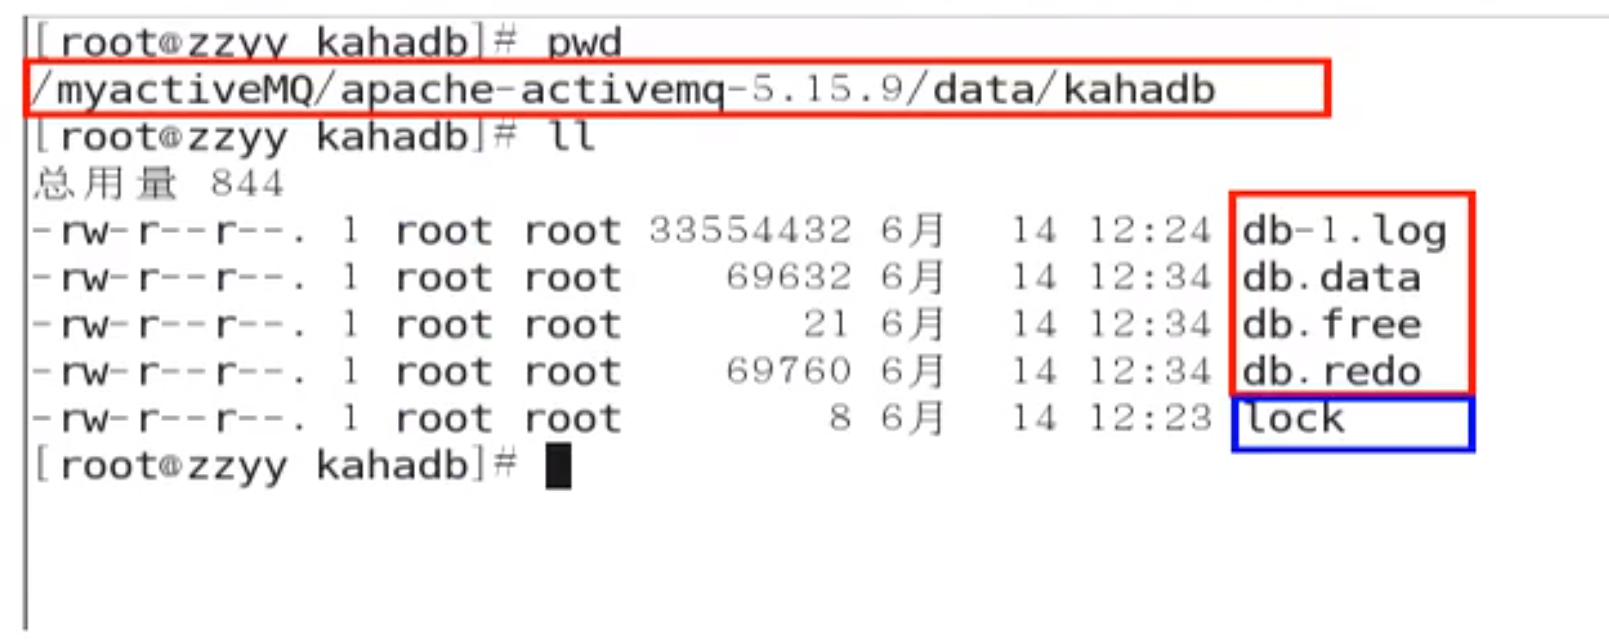
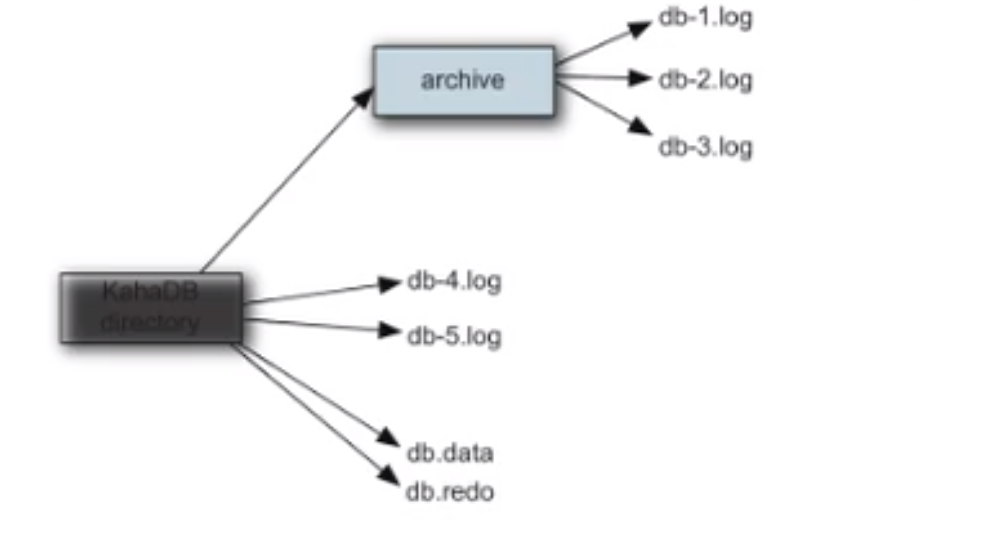
KahaDB的存储原理
KahaDB在消息保存的目录中有4类文件和一个lock,跟ActiveMQ的其他几种文件存储引擎相比,这就非常简洁了。
1,db-number.log
KahaDB存储消息到预定大小的数据纪录文件中,文件名为db-number.log。当数据文件已满时,一个新的文件会随之创建,number数值也会随之递增,它随着消息数量的增多,如没32M一个文件,文件名按照数字进行编号,如db-1.log,db-2.log······。当不再有引用到数据文件中的任何消息时,文件会被删除或者归档。
2,db.data
该文件包含了持久化的BTree索引,索引了消息数据记录中的消息,它是消息的索引文件,本质上是B-Tree(B树),使用B-Tree作为索引指向db-number。log里面存储消息。
3,db.free
当问当前db.data文件里面哪些页面是空闲的,文件具体内容是所有空闲页的ID
4,db.redo
用来进行消息恢复,如果KahaDB消息存储再强制退出后启动,用于恢复BTree索引。
5,lock
文件锁,表示当前kahadb独写权限的broker。
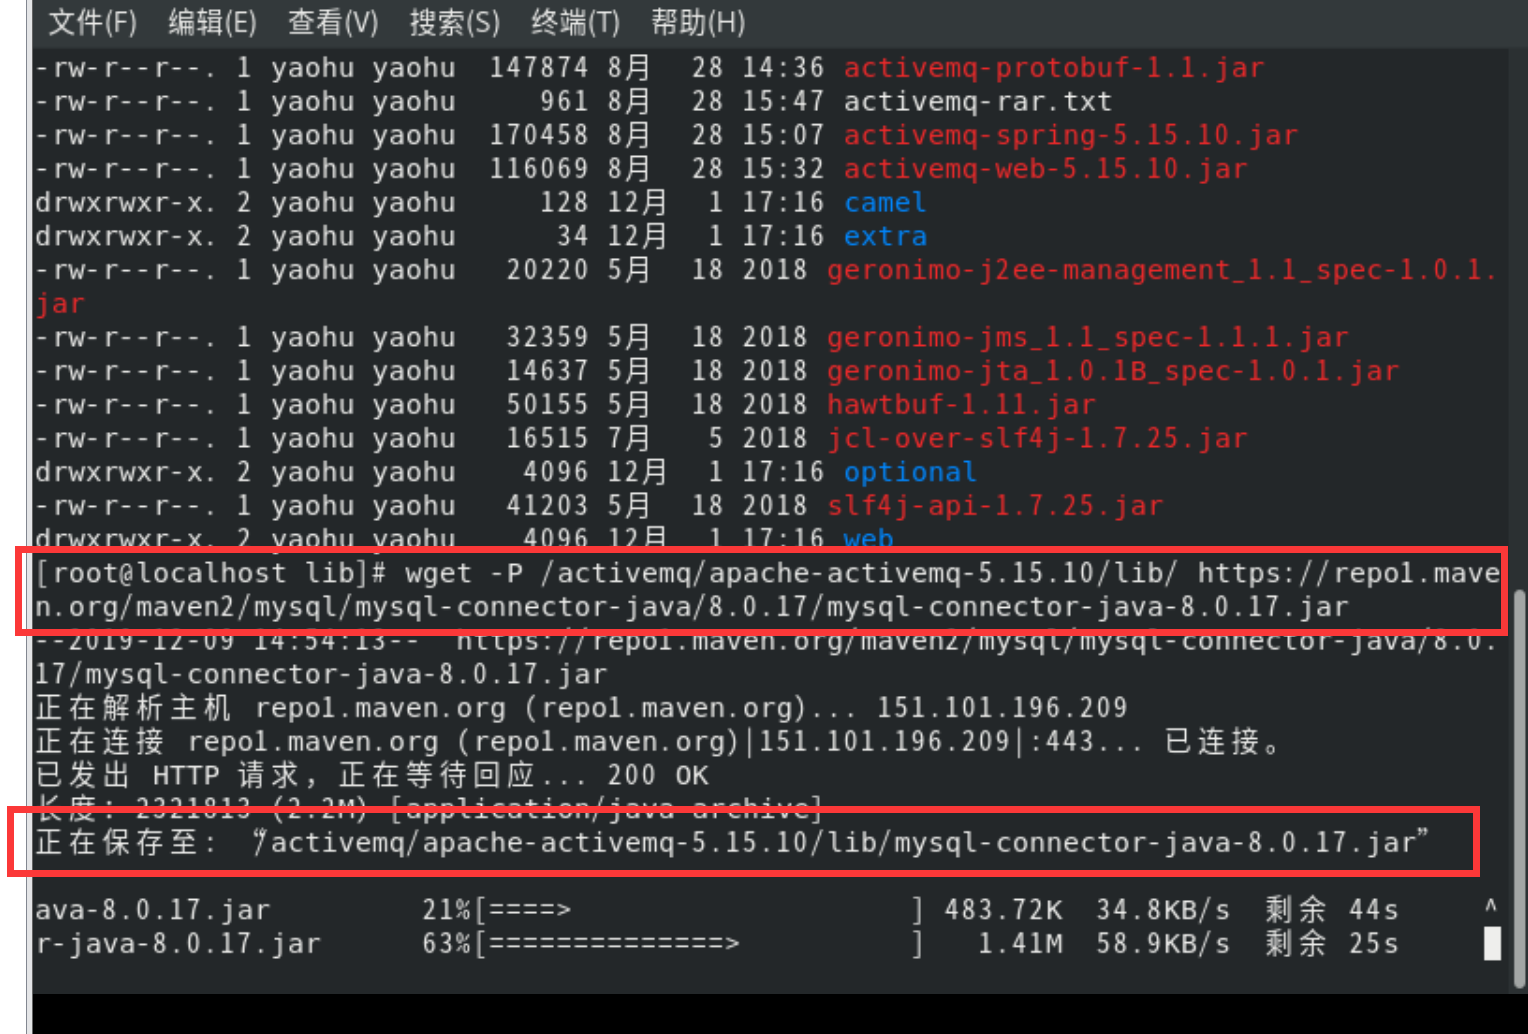
6.4 JDBC存储消息 1.MQ+MySQL
http://activemq.apache.org/persistence
2.添加mysql数据库的驱动包到lib文件夹 wget -P 保存目录 https://repo1.maven.org/maven2/mysql/mysql-connector-java/8.0.17/mysql-connector-java-8.0.17.jar
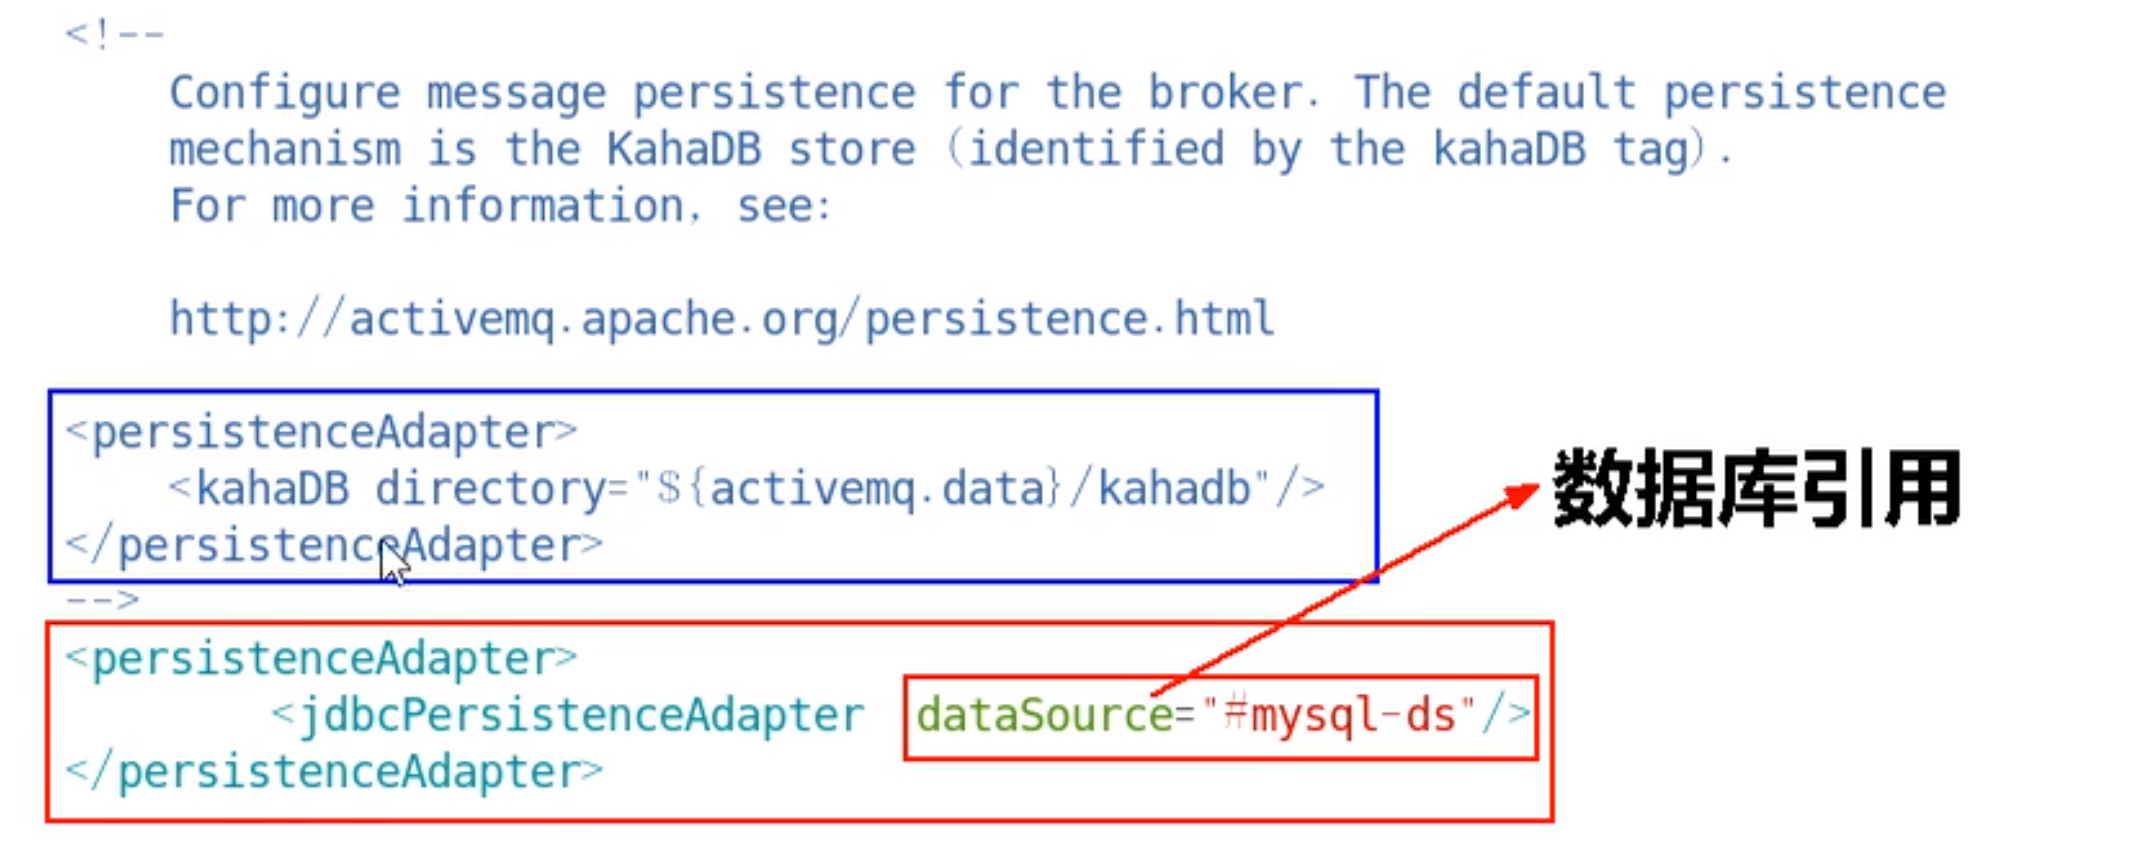
3.jdbcPersistenceAdapter配置 修改activemq.xml配置文件
修改前的KahaDB
1 2 3 <persistenceAdapter> <kahaDB directory="${activemq.data}/kahadb"/> </persistenceAdapter>
修改后的jdbcPersisteceAdapter
1 2 3 <persistenceAdapter> <jdbcPersistenceAdapter dataSource="#mysql-ds" /> </persistenceAdapter>
dataSource是指定将要引用的持久化数据库的bean名称 。一般是第一次启动的时候设置为true,然后再去改成false 。
4.数据库连接池配置 1 2 3 4 5 6 7 <bean id="mysql-ds" class="org.apache.commons.dbcp2.BasicDataSource" destroy-method="close"> <property name="driverClassName" value="com.mysql.cj.jdbc.Driver"/> <property name="url" value="jdbc:mysql://192.168.10.132:3306/activemq?relaxAutoCommit=true"/> <property name="username" value="root"/> <property name="password" value="123456"/> <property name="poolPreparedStatements" value="true"/> </bean>
5.建库SQL和创表说明 建一个名为activemq的数据库
三张表的说明
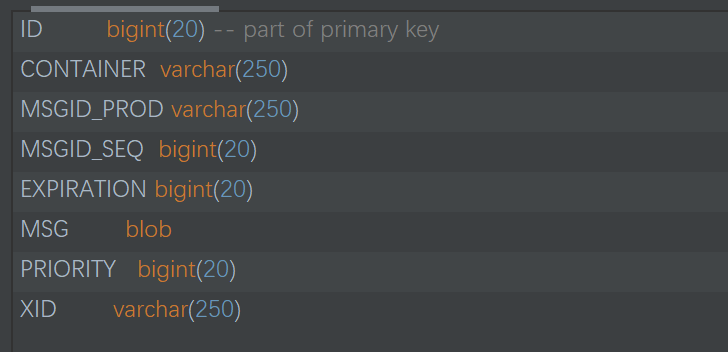
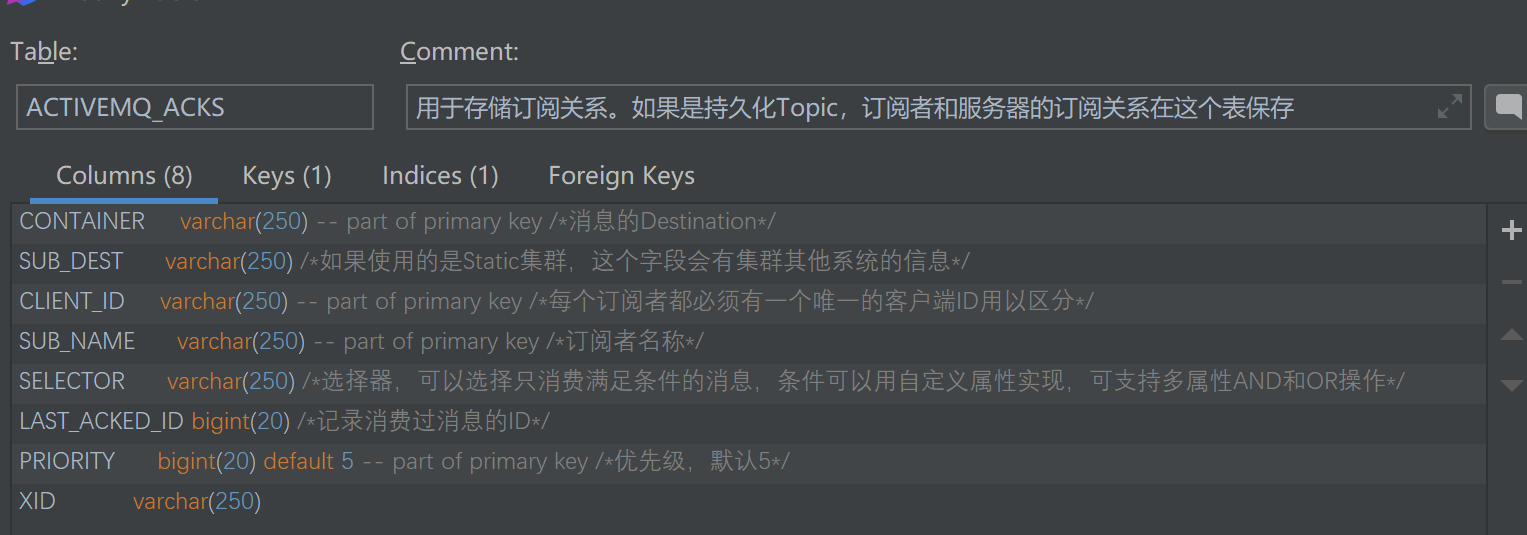
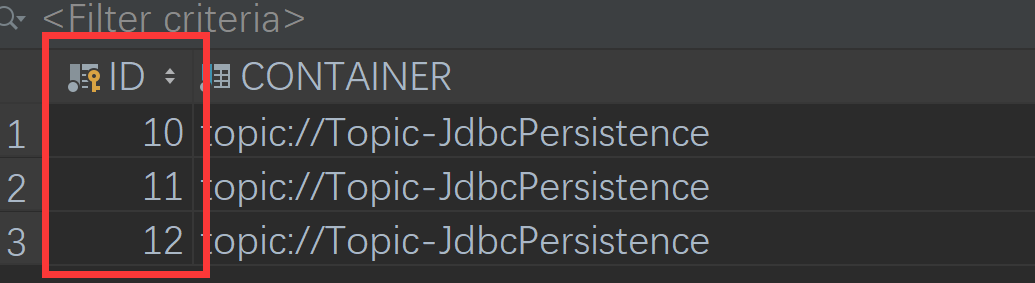
ACTIVEMQ_MSGS
ID:自增的数据库主键
CONTAINER:消息的Destination
MSGID_PROD:消息发送者的主键
MSG_SEQ:是发送消息的顺序,MSGID_PROD+MSG_SEQ可以组成JMS的MessageID
EXPIRATION:消息的过期时间,存储的是从1970-01-01到现在的毫秒数
MSG:消息本体的Java序列化对象的二进制数据
PRIORITY:优先级,从0-9,数值越大优先级越高
消息表,缺省表名ACTIVEMQ_MSGS,Queue和Topic都存在里面,结构如下
ACTIVEMQ_ACKS
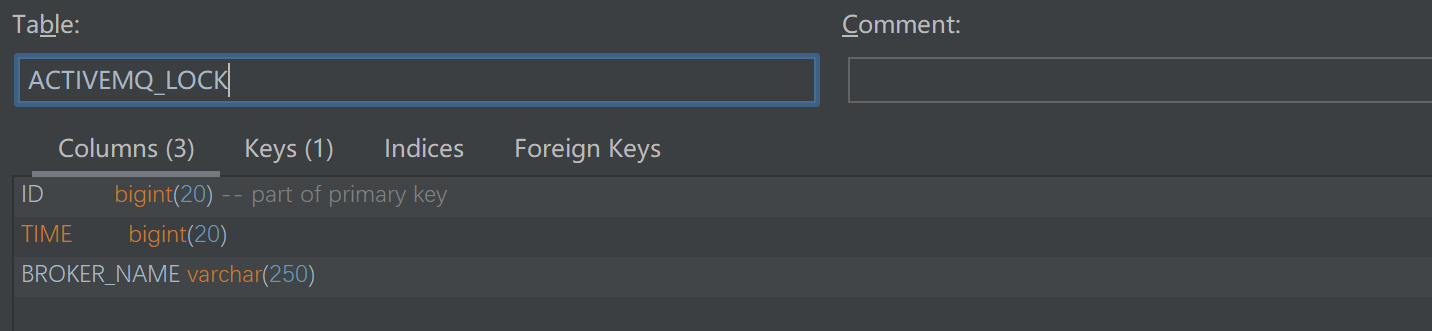
ACTIVEMQ_LOCK
如果新建数据库ok,上述配置ok,代码运行ok,3张表会自动生成
1 2 3 4 5 6 7 8 9 10 11 12 13 14 15 16 17 18 19 20 21 22 23 24 25 26 27 28 29 30 31 32 33 34 35 36 37 38 39 40 41 42 43 44 45 46 47 48 49 50 51 52 53 54 55 56 57 58 -- auto-generated definition create table ACTIVEMQ_ACKS ( CONTAINER varchar(250 ) not null comment '消息的Destination' , SUB_DEST varchar (250 ) null comment '如果使用的是Static集群,这个字段会有集群其他系统的信息' , CLIENT_ID varchar (250 ) not null comment '每个订阅者都必须有一个唯一的客户端ID用以区分' , SUB_NAME varchar (250 ) not null comment '订阅者名称' , SELECTOR varchar (250 ) null comment '选择器,可以选择只消费满足条件的消息,条件可以用自定义属性实现,可支持多属性AND和OR操作' , LAST_ACKED_ID bigint null comment '记录消费过消息的ID' , PRIORITY bigint default 5 not null comment '优先级,默认5' , XID varchar (250 ) null , primary key (CONTAINER, CLIENT_ID, SUB_NAME, PRIORITY) ) comment '用于存储订阅关系。如果是持久化Topic,订阅者和服务器的订阅关系在这个表保存' ; create index ACTIVEMQ_ACKS_XIDX on ACTIVEMQ_ACKS (XID) ; -- auto-generated definition create table ACTIVEMQ_LOCK ( ID bigint not null primary key, TIME bigint null , BROKER_NAME varchar(250 ) null ); -- auto-generated definition create table ACTIVEMQ_MSGS ( ID bigint not null primary key, CONTAINER varchar(250 ) not null , MSGID_PROD varchar (250 ) null , MSGID_SEQ bigint null , EXPIRATION bigint null , MSG blob null , PRIORITY bigint null , XID varchar (250 ) null ); create index ACTIVEMQ_MSGS_CIDX on ACTIVEMQ_MSGS (CONTAINER) ; create index ACTIVEMQ_MSGS_EIDX on ACTIVEMQ_MSGS (EXPIRATION) ; create index ACTIVEMQ_MSGS_MIDX on ACTIVEMQ_MSGS (MSGID_PROD, MSGID_SEQ) ; create index ACTIVEMQ_MSGS_PIDX on ACTIVEMQ_MSGS (PRIORITY) ; create index ACTIVEMQ_MSGS_XIDX on ACTIVEMQ_MSGS (XID) ;
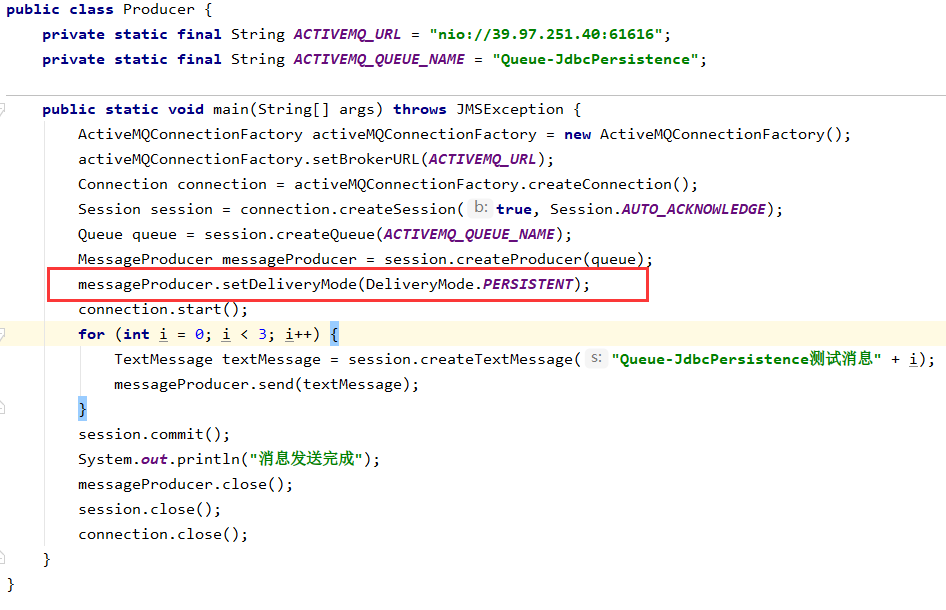
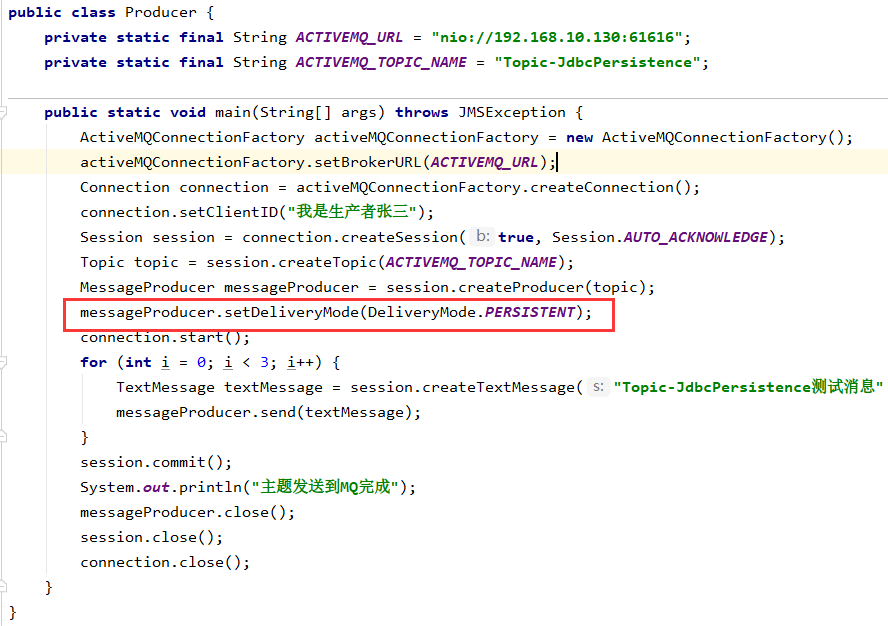
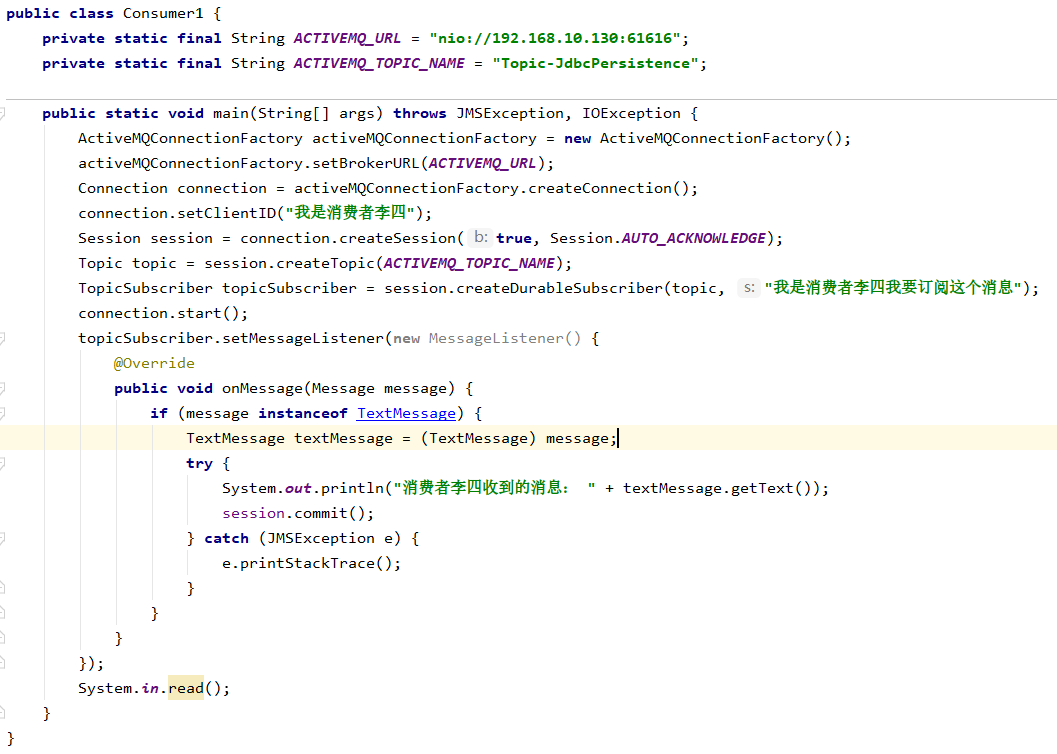
6.代码运行验证 一定要开启持久化
messageProducer.setDeliveryMode(DeliveryMode.PERSISTENT);
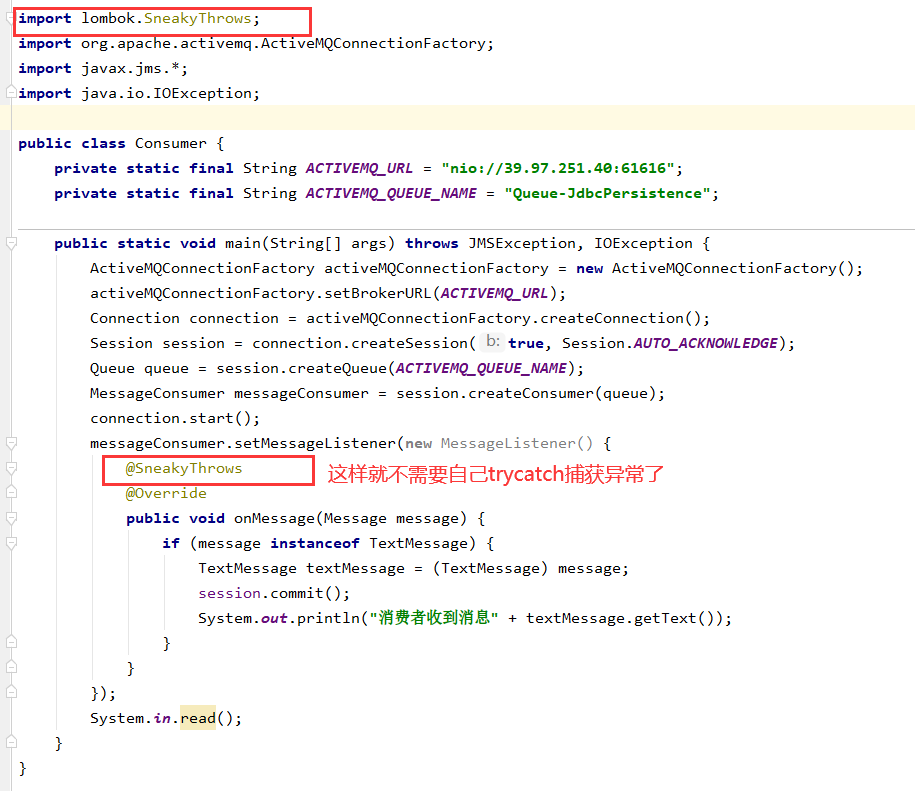
队列(为了方便测试我直接把代码粘贴进来)
生产者
消费者
运行
在点对点类型中
当DeliveryMode设置为NON_PERSISTENCE时,消息被保存在内存中
当DeliveryMode设置为PERSISTENCE时,消息保存在broker的相应的文件或者数据库中。
而且点对点类型中消息一旦被Consumer消费,就从数据中删除
消费前的消息,会被存放到数据库
上面的消息被消费后被MQ自动删除
主题
生产者
消费者
设置了持久订阅数据库里面会保存订阅者的信息
ACTIVEMQ_ACKS表中的LAST_ACKED_ID记录了CLIENT_ID最后签收的一条消息
而LAST_ACKED_ID和ACTIVEMQ_MSGS的ID字段是外键关联关系,这样就可以实现,Topic的消息保存到ACTIVEMQ_MSGS表内,还能根据ACTIVEMQ_ACKS表中的持久订阅者查到该订阅者上次收到的最后一条消息是什么
值得注意的是,Topic内的消息是不会被删除的,而Queue的消息在被删除后,会在数据库中被删除,如果需要保存Queue,应该使用其他方案解决
7.小总结
在没有消费者消费的情况下会将消息保存到activemq_msgs表中,只要有任意一个消费者消费了,就会删除消费过的消息
一般是先启动消费订阅者然后再生产的情况下会将持久订阅者永久保存到qctivemq_acks,而消息则永久保存在activemq_msgs,
8.开发有坑 在配置关系型数据库作为ActiveMQ的持久化存储方案时,有坑
数据库jar包
注意把对应版本的数据库jar或者你自己使用的非自带的数据库连接池jar包
createTablesOnStartup属性
默认为true,每次启动activemq都会自动创建表,在第一次启动后,应改为false,避免不必要的损失。
java.lang.IllegalStateException: LifecycleProcessor not initialized
确认计算机主机名名称没有下划线
6.5 JDBC Message store with ActiveMQ Journal 是什么
说明
这种方式克服了JDBC Store的不足,JDBC每次消息过来,都需要去写库读库。
ActiveMQ Journal,使用高速缓存写入技术,大大提高了性能。
当消费者的速度能够及时跟上生产者消息的生产速度时,journal文件能够大大减少需要写入到DB中的消息。
举个例子:
生产者生产了1000条消息,这1000条消息会保存到journal文件,如果消费者的消费速度很快的情况下,在journal文件还没有同步到DB之前,消费者已经消费了90%的以上消息,那么这个时候只需要同步剩余的10%的消息到DB。如果消费者的速度很慢,这个时候journal文件可以使消息以批量方式写到DB。
配置
修改配置前
1 2 3 <persistenceAdapter > <jdbcPersistenceAdapter dataSource ="#mysql-ds" /> </persistenceAdapter >
修改配置后
1 2 3 4 5 6 7 8 9 10 <persistenceFactory > <journalPersistenceAdapterFactory journalLogFiles ="5" journalLogFileSize ="32768" useJournal ="true" useQuickJournal ="true" dataSource ="#mysql-ds" dataDirectory ="../activemq-data" /> </persistenceFactory >
以前是实时写入mysql,在使用了journal后,数据会被journal处理,如果在一定时间内journal处理(消费)完了,就不写入mysql,如果没消费完,就写入mysql,起到一个缓存的作用
6.6 ActiveMQ持久化机制小总结
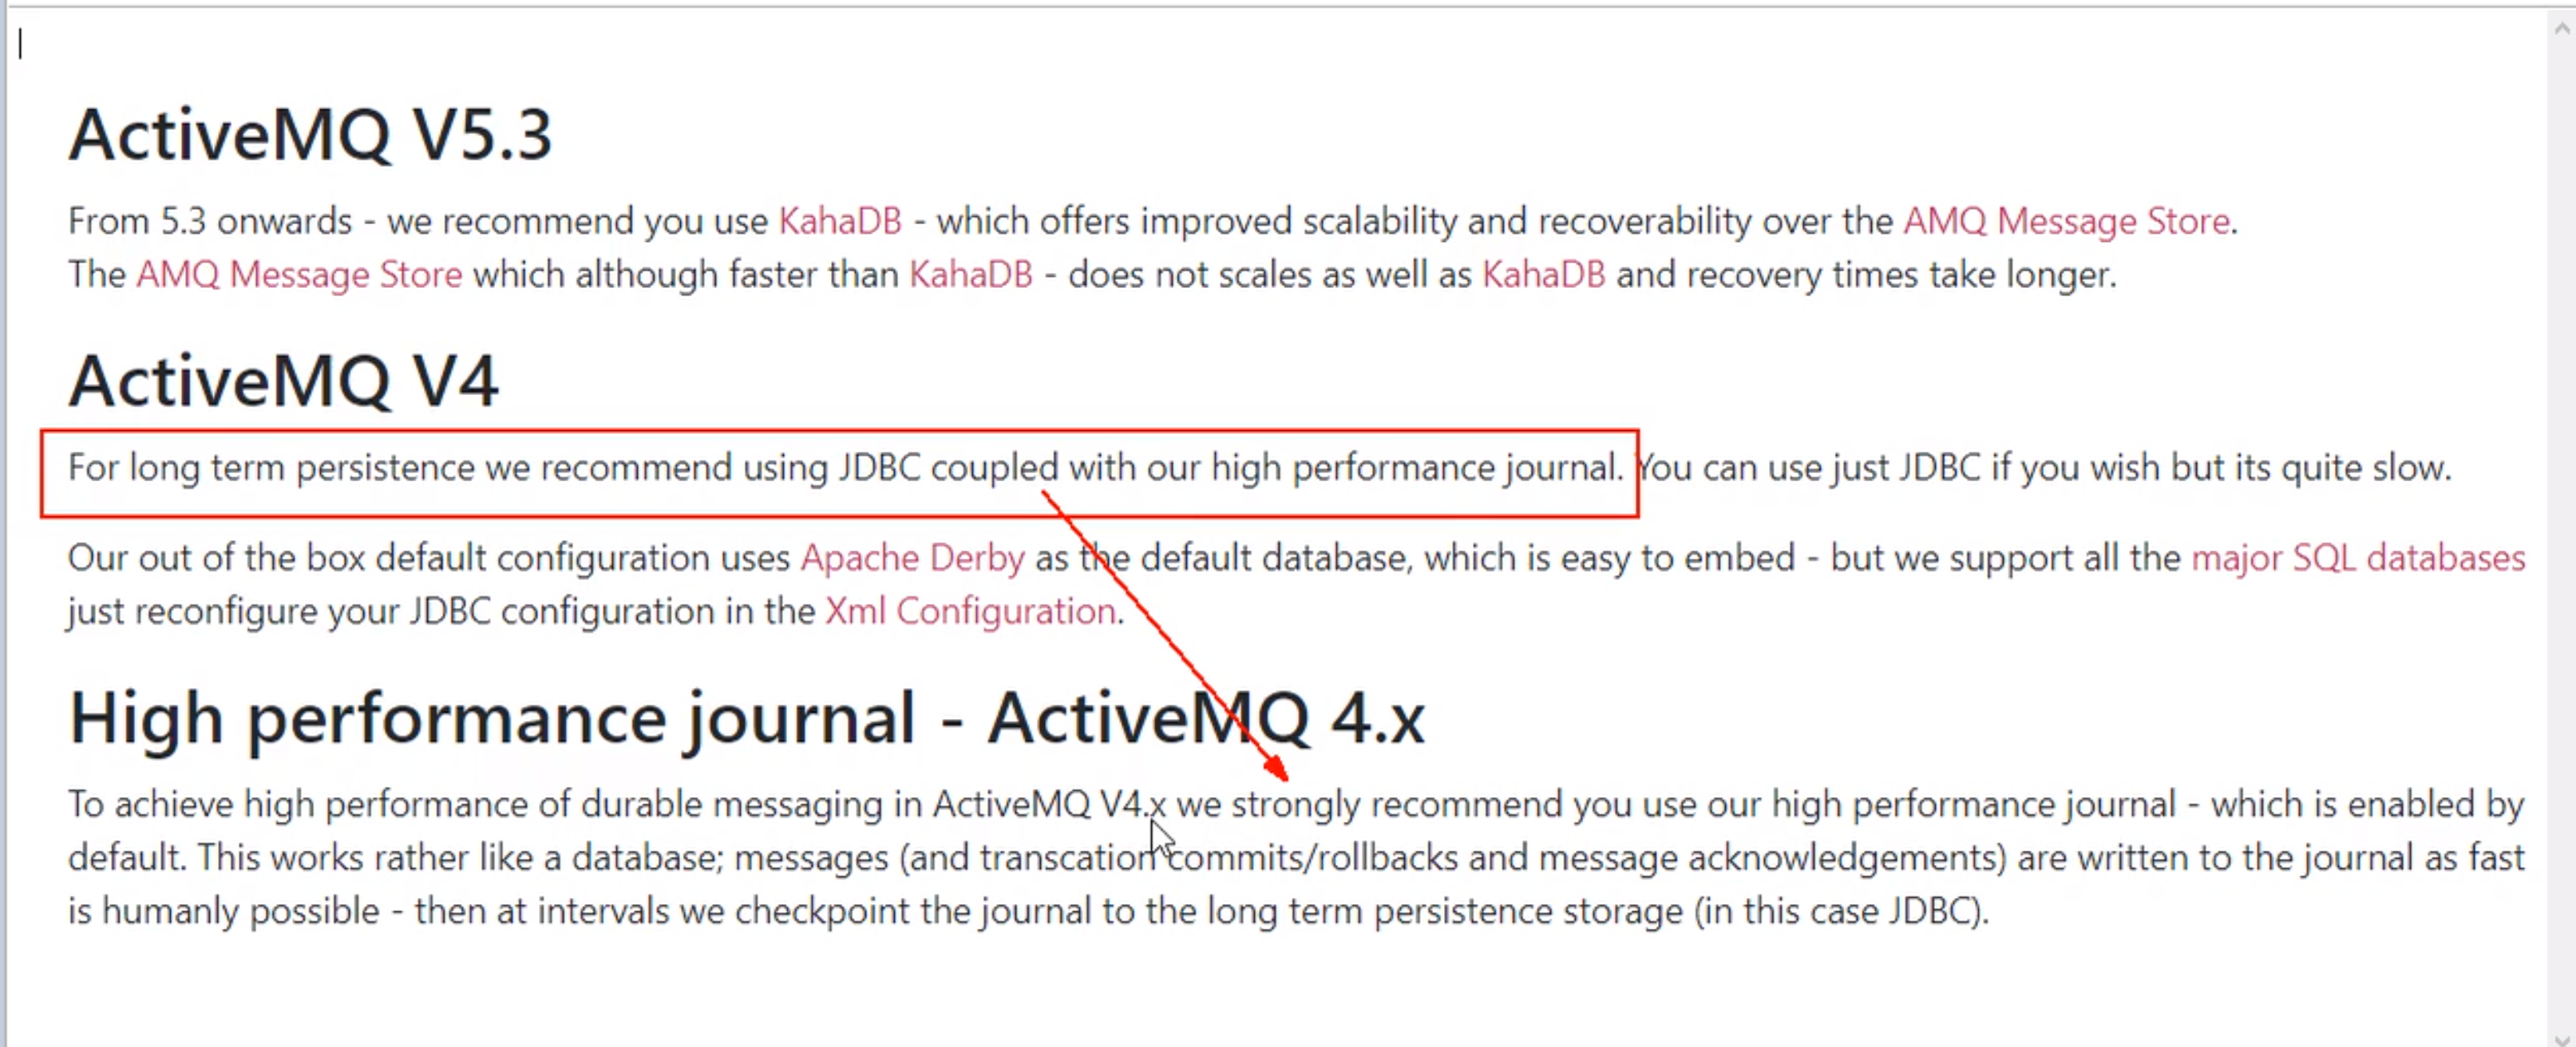
MQ所在服务器宕机了消息不会丢试的机制。
从最初的AMQ Message Store方案到ActiveMQ V4版本退出的High Performance Journal(高性能事务支持)附件,并且同步推出了关于关系型数据库的存储方案。ActiveMQ5.3版本又推出了对KahaDB的支持(5.4版本后被作为默认的持久化方案),后来ActiveMQ 5.8版本开始支持LevelDB,到现在5.9提供了标准的Zookeeper+LevelDB集群化方案。
ActiveMQ消息持久化机制有:
AMQ 基于日志文件
KahaDB 基于日志文件,从ActiveMQ5.4开始默认使用
JDBC 基于第三方数据库
Replicated LevelDB Store 从5.9开始提供了LevelDB和Zookeeper的数据复制方法,用于Master-slave方式的首选数据复制方案。


 ]( https://image.zxrmrf.com/x/mq23.jpg)
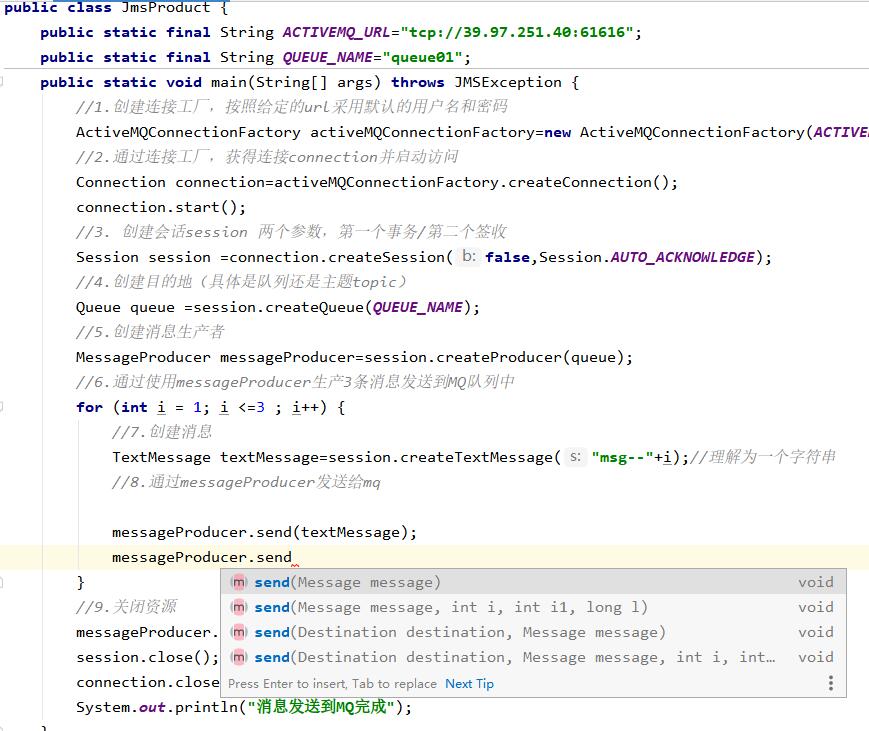 ](
](

 ]( https://image.zxrmrf.com/x/mq38.png)